(@dik maintenance)
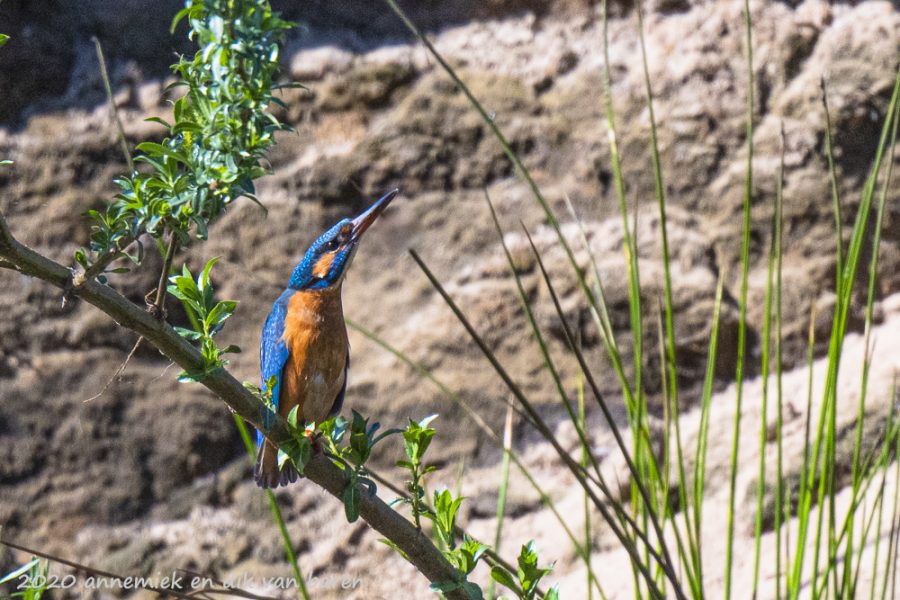
Photo at top: Lesbos Bee-eater (Bijeneter) size 16cm distance 25m equivalent 900mm D300 Nikkor 300mm f/4D total camouflage 1//1000 second f/8 ISO 400. Crop 1500 x 1000. Marvellous detail and colour depth of famous old timer Nikkor 300mm f/4D!
Extra Info: Use F11 of your browser to view pictures full frame.
About this page
This and the fikowing pages may be the most important pages in this blog about bird photographyL reach mens akas exensive equioment. Thes pages may also be the most hard to understand. Don’t worry if it takes you some time to understand everything about “reach” (bereik) when reading and possibly re-reading these pages. Understanding them will dwfinitely pay off in your bird photography andwhenbuying your photographic equipment or when choosing it for a day in the field. Some marketeers, salesmen and photographers may have their own ideas about sufficient “reach”, but as a serious enthousiast bird photographer you really need to understand everything about “reach”. Make sure you can quantify it when buying equipment and in particular in those “once in a lifete time birding moments” you should not miss. Birders use telescopes, photographers have their lenses, converters and camera’s and optimal settings thereof and sometimes use a combination of all this: digiscoping.
Reach is key, especially when interesting small birds are relatively far away but be aware: photographic equipment often happens to be unnecessarily expensive or heavy, if you don’t grasp what “reach” really is. So take your time when reading this page! It will definitely pay off!
Sufficiently detailed bird pictures
To get sufficient reach you need high quality, semi pro equipment for shooting sufficiently detailed pictures particularly when photographing small (shy) birds far away. If you want to use but one combination then use one zoom lens preferably 500 or 600mm to avoid switching converters which often takes precious time in the field. This choice of equipment is a bit of a dilemma though quite important. Every bird photographer has to decide about this by him- or herself. We ourselves have experienced, over fifty years, when (thinking about) buying equipment with sufficient reach, that first of all we absolutely needed three “items”:
- A definition of something like the “bird-image-area“, the minimal rectangular part in a bird picture, that contains all pixels (beeldpunten) of the photographed bird in the picture. This area should contain a sufficient amount of sufficiently resolved pixels (look at the diagram below).
- Some kind of standard measure (maatstaf) of “sufficiently resolved detail” like the standard meter, second, gram, dozen, percentage, etcetera. We will define this standard measure (maatstaf) using a well defined benchmark picture of a Kingfisher (IJsvogel) at 10 meter distance, a rather small bird. We will define this picture below at this page.
- An expression that quantifies the relationship between “reach”,bird size, bird distance and 35mm equivalent of the equipment used, which we could use to calculate the amount of reach we can expect form any given combination camera-lens-converter when choosing equipment for a photographic trip or a specific shot or when buying equipment for our bird photography.
More about this “bird-image-area” in a bird picture
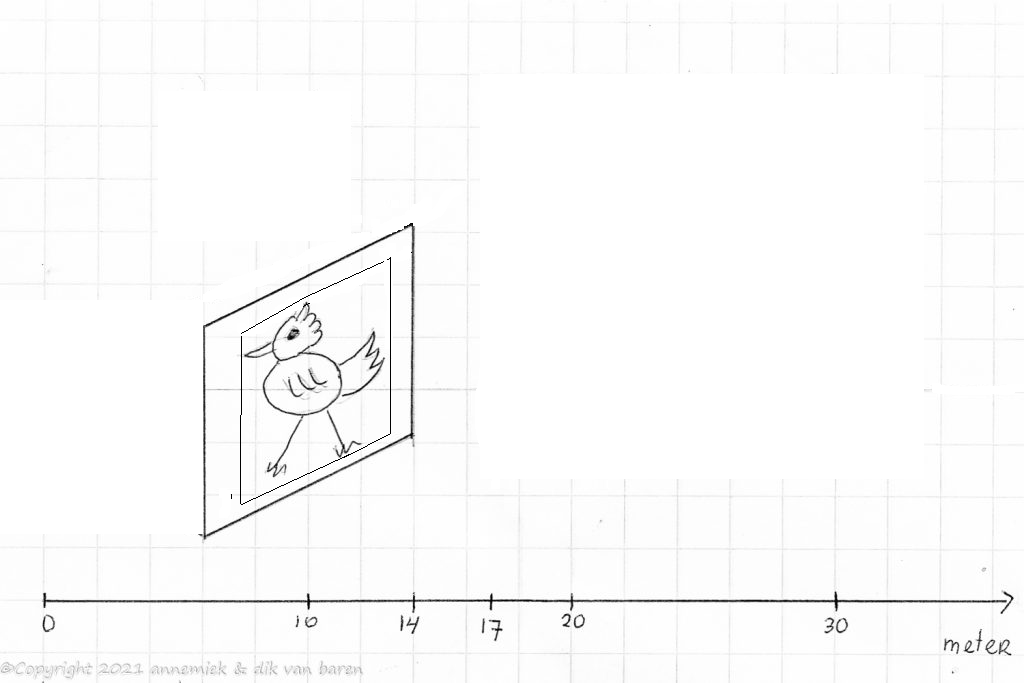
The “bird-image-area” in a bird picture contains the complete image of the bird. Naturally not all pixels within this rectangle are part of the bird image itself. However the size of this bird-image is a sound indication of the amount of actual “reach”(bereik): the more pixels this “bird-image-area” contains, the more “reach” the used combination camera-lens-converter has.
A bit of reasoning tell us that the relative size of the “bird-image-area” is quadratically proportional to the size of the bird, which is determined by both, width (cm) and height (cm) of the bird, and inverted quadratically proportional to the distance (m) camera to bird.
About Nikon
Over many years we have experienced that Nikon consistently offers innovative photographic equipment almost perfectly suited for lightweight bird photography, like:
- Nikkor 300mm f/4E PF VR, uses phase Fesnel technology, is not cheap, but the best lightweight 300mm prime we ever used, the only one of this quality being Nikkor 300mm f/4E PF VR, but extremely light, fast focussing, extraordinary detail.
- Nikkor 500mm f/5.6E PF VR, uses phase Fesnel technology, is not cheap, but the best lightweight 500mm prime we ever used, the only one of this quality being Nikkor 300mm f/4E PF VR, also extremely light, fast focussing, extraordinary detail.
- Nikons unique top quality aspherical converter TC-20E III.
- Nikons second generation mirrorless camera’s Z50 and Z7 II. Although fast, they are not (yet?) the absolutely fastest. We expect that this will improve over time when Nikon gathers more experience in affordabel mirrorless autofocus technology. Their Z8 and Z9 feature extremely fast and reliable autofocus, but they are not affordable for medium-budget, serious enthousiast bird photographers.
The fact that Nikon Z mirrorless camera’s are almost perfect for lightweight bird photography, not in the least by featuring the largest opening for light transmission in the smallfilm world which is key in low light situations in bird photography.
Quantifying “reach” and “three quadratic rules” for reach

Quantifying “reach” and “three quadratic rules” for reach
Reach is determined by three factors: size of bird, distance to bird and 35mm equivalent of photographic equipment. See the diagram above. It is, to a lesser degree, also determined by image sensor quality, amount of available light and state of the atmosphere.
All test pictures of different bird species of all kinds of size at varying distance, using different sets of photographic equipment with all kinds of 35mm equivalents, consistently showed us that the amount of sufficiently resolved pixels (beeldpunten), in other words the amount and quality of detail in the bird-image-area, is determined by three quadratic rules:
1. The amount of sufficiently resolved detail is quadratically proportional to size , width x hight, of the bird in centimeters.
2. The amount of sufficiently resolved detail is inversely quadratically proportional to distance (m) of the bird.
3. The amount of sufficiently resolved detail is quadratically proportional to the 35mm equivalent (mm) of the equipment used. A combination with large equivalent will produce a quadratically proportional magnified picture of the subject bird: width (m) x height (m) so the bird-image-area in the picture will contain quadratically more or less pixels (beeldpunten).
Mind you: after shooting and saving the picture on the memory card of the camera, the amount of detail (pixels) in the bird-image–area of the picture is fixed.
We can combine these three rules in one formula. This will be our quantification of reach (bereik):
| We define “reach” as being the amount of sufficiently resolved pixels (beeldpunten) contained by the “bird-image-area” of a picture. This “reach” is (1) quadratically proportional to size bird and (2) quadratically proportional to 35mm equivalent equipment used and (3) inversely quadratically proportional to actual distance bird. |
By the way we do not yet involve other factors like amount of available light, air purity and state of atmosphere. Most of the time they do not contribute significantly to reach (bereik) and they are not easily quantifiable. We will briefly review these factors later at this page.
@dik check
In this blog we always use the official bird size (“s” for size” or “length” in most Bird Guides next to “w for wingspan”) as also reported in Dutch bird guide “De Nieuwe Tirion Natuurgids“. See Literature This is the “size” or rather the “length” of the body of a vertically or horizontally resting, standing up, swimming or flying bird. It does not include extraordinary long bill (e.g. Heron, Kingfisher) or legs (Stork, Black-winged Stilt). If the bird-image-area contains not one bird but a group of birds, bird size is less relevant.
Using a benchmark picture (maatstaf voor bereik) to quantify reach
In order to quantify reach we need a well defined measure (maatstaf) for what we call “sufficiently resolved detail” like mankind ever defined the benchmark “meter” for length, “second” for time, “gram” for mass, etcetera.
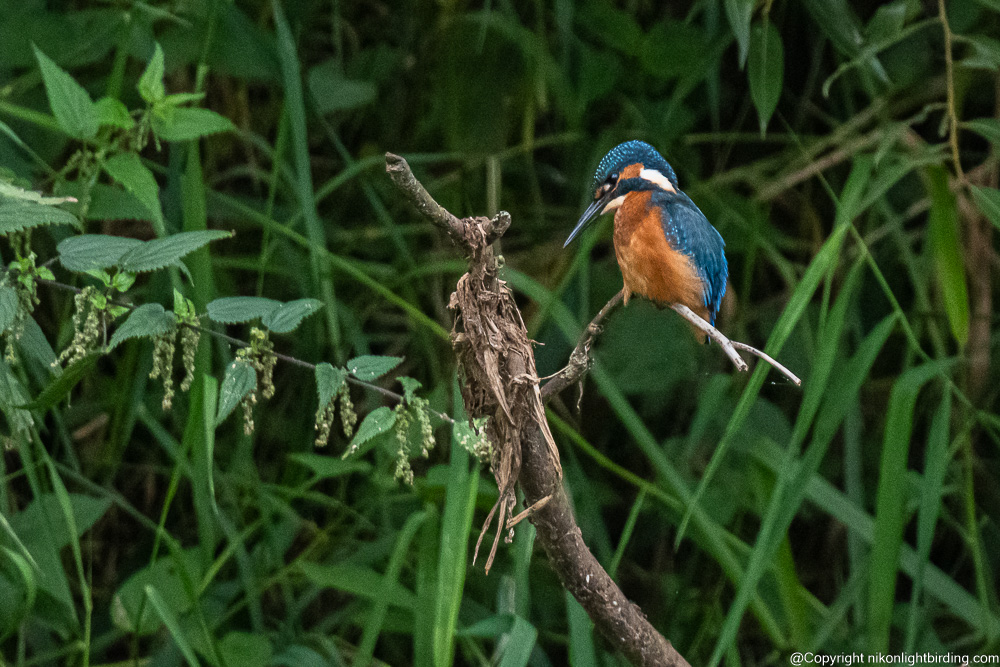
So we define the following picture as our “benchmark picture”: a picture of a Kingfisher (IJsvogel) size 17cm distance 30m photographed using equipment with equivalent 1050mm in clean atmosphere and direct sunlight. This picture is shown below and our view cotains a sufficiently resolved detail of the subject bird. We feel that more cropping would degrade image quality and level of detail of the bird-image area in this picture too much. It might result in more noise and or less contrast and possibly a so-called “soft” picture. Cropping less would make the bird not really stand out as the primary subject. If you wish you can define your own benchmark picture or any cropping level as being your standard of sufficiently resolved detail. In other words: “sufficiently resolved” is a subjective judgement.
In this blog we will always use this benchmark picture as our standard measure (maatstaf) of sufficiently resolved detail when we want to quantify reach:
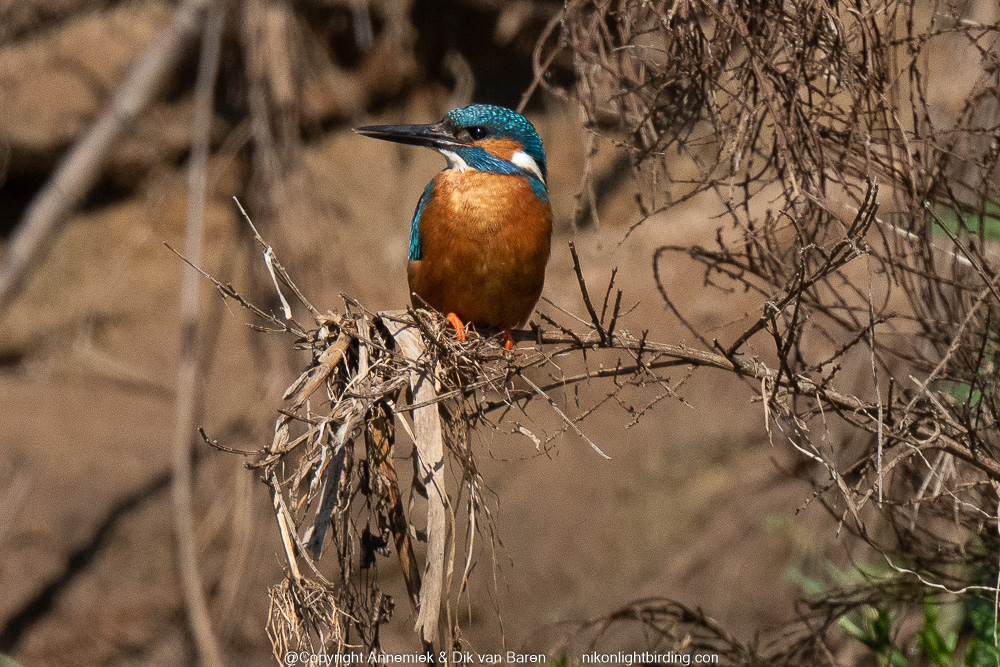
In our view this picture contains a sufficient amount of sufficiently resolved pixels of the subject bird. When comparing the amount of detail with other pictures, like in the examples below, we roughly compare the height of the actual bird with the height of this upright sitting Kingfisher, in bird photography usually including head and feet, excluding extraordinary long tail, bill or legs, in this case about 33% (1/3) of the total height of this picture). Naturally this is a more or less subjective, measure. Use common sense: “reach” in bird photography, though essential in bird photography, is not about millimeters or centimeters, rather about distances like 5, 15, 20, 30 or 50 meter.
Now we finally can quantify “reach” as a “quality” or “potential” of a certain combination camera-lens-converter, telescope-digicompact or telescope-smartphone as follows:
| Actual “reach” of certain equipment in bird photography is: the amount (0 – 100%) of sufficiently resolved detail in the “bird-image-area” of any bird picture, edited and cropped to 2100 x 1400 pixels, compared to the amount of sufficiently resolved pixels in our benchmark picture, which by definition contains a sufficient amount of sufficiently resolved pixels: a picture of a Kingfisher, size 17 cm, distance 30 meter, direct sunlight, clean atmosphere,, cropped 2100 x 1400 pixels, produced by equipment having equivalent 1050mm. |
Any bird picture we produce will, by our definition, contain sufficiently resolved detail if it has this kind of resolved detail. By the way: many bird photographers will call this kind of pictures “sharp” pictures. We sometimes do so too, but in this blog we want to keep matters absolutely clear so we will consistently describe pictures as “containing a sufficient (or insufficient) amount of sufficiently resolved detail“, or shortly or “detailed” pictures, but we willnever call them “sharp” or “unsharp” pictures. So this definition of a benchmark picture enable us to create an exact definiton of “reach” in bird photography. We use it all the time in the field and also when reviewing, estimating or buying photographic equipment for bird photography. This is our “reach– formula”:
| reach = (size/17 x 30/distance x 35-mm-equivalent/1050)2 x 100 % of detail bird-image-area benchmark picture. |
In the field you may probably never really use this formula as such, but it helps to know and understand which three main factors contribute quadratically to reach. We althe time use them the “3 quadratic rules” and use them when we select photographic equipment for a day or trip. In the field we use these quadratic rules or (part of) the reach-formula over and over again.
By the way, if you prefer, do create your own benchmark picture. It will save you time because you can compare any situation with “your benchmark situation” like we do. Look at the twenty example belows below.
Using different cropping levels asks for an extra correction factor
When comparing the number of pixels in the bird-image-area of the actual picture with the number of pixels of the bird-image-area (Kingfisher) in the benchmark picture, we have to add a correction factor to our reach formula so we can quantify reach connected to an actual picture with any cropping level as follows:
| Reach (%) = (size/15 x 30/distance x equivalent/1050)2 x (2100/crop width)2 x 100% reach benchmark picture. |
15 examples quantifying reach in the field
We will show qqq examples of different bird species of different size at various distance using various type of equipment and 35mm equivalent and various cropping levels. These example pictures may show you how important reach is in lightweight bird photography in various situations. Take a close look at these examples. They show what level of reach you can expect from affordable Nikon equipment. And once more: we don’t use this reach formula to calculate reach, rather to get a quick estimate of actual reach in the field.
We will frequently use species eurasian Kingfisher in these examples so you can see and compare the specific effect of distance and 35mm equivalent in relation to reach. Kingfisher has, over the years, become our ideal “testbird”. It is a year-around beautiful bird, breeding March through August, often more than one nest, small, shy, fast, energetic, unique and with interesting territorial, breeding and feeding behaviour, usually signalling its arrival with a typical high-pitched sound and present all over Europe and Northern Africa.
Example 0 using cropping level 2100 x 1400
(17/17 x 30/30 x 1050/1050)2 x 100% => 100 % detail bird-image area benchmark picture.
This picture contains 100% of satisfactory resolved detail compared to our benchmark picture. No wonder, this is our benchmark picture!
Example 1 using cropping level 2100 x 1400

(17/17 x 30/27 x 1500/1050)2 x 100% => 250 % detail bird-image area benchmark picture.
The main factor is a larger equivalent. The effect is substantial as you can see.
Example 2 using cropping level 2100 x 1400

Amount sufficiently resolved detail bird-image-area compared with same amount bird-image-area benchmark picture = (17/17 x 30/33 x 1500/1050)2 x 100% => 170 % detail bird-image-area benchmark picture.
The main factor is the larger equivalent.
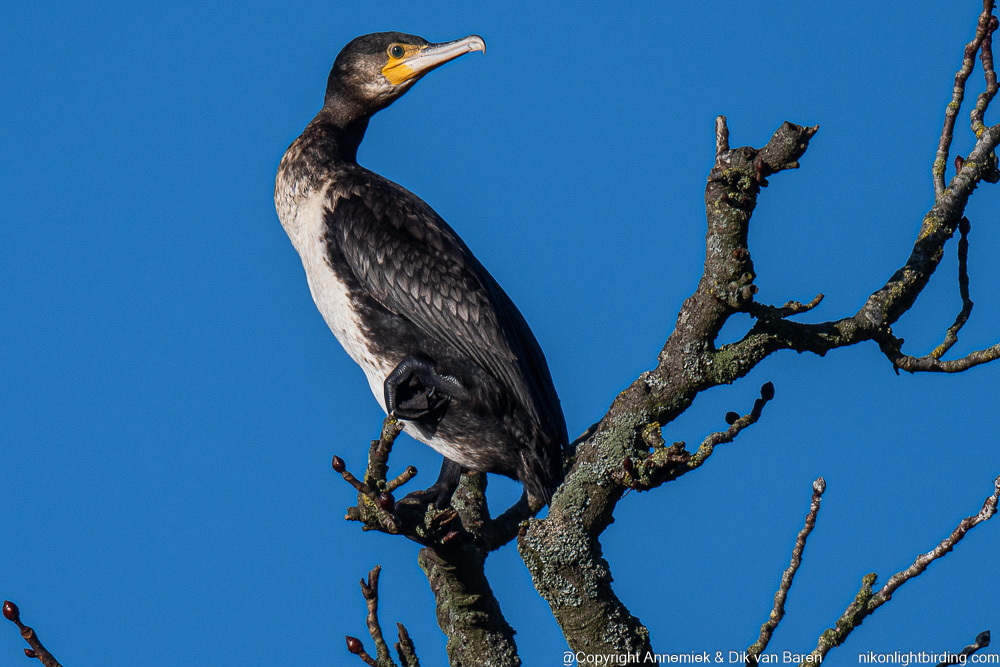
Example 3 using cropping level 2100 x 1400
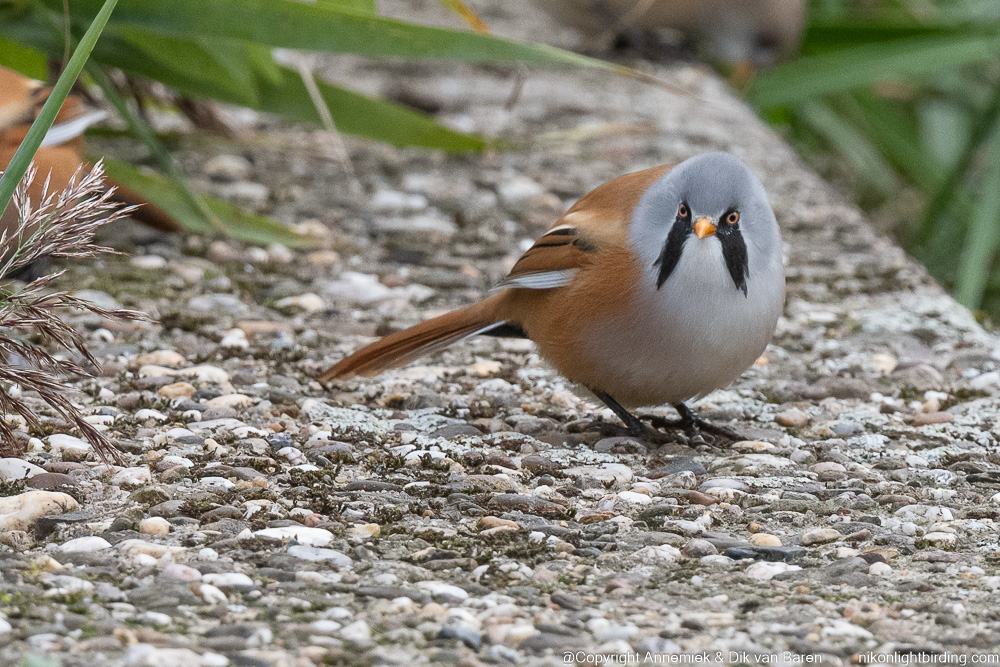
Amount sufficiently resolved detail bird-image-area compared with same amount bird-image-area benchmark picture = (13/17 x 30/15 x 750/1050)2 x 100% => 120 % benchmark picture.
At this cropping level the height of the vertically positioned body of the Bearded Tit indeed is about 120 % of the upright Kingfishers body in the benchmark picture.
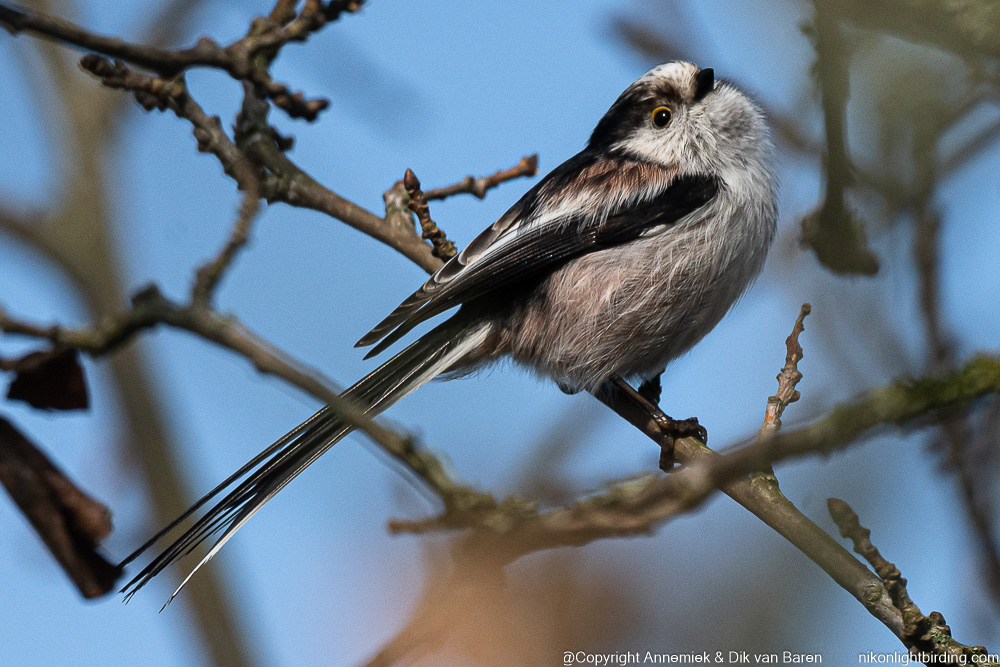
Example 4 using cropping level 3000 x 2000

Amount sufficiently resolved detail bird-image-area compared with same amount bird-image-area benchmark picture = (54/17 x 30/45 x 1050/1050)2 x (2100/3000)2 x 100% => 150%
The width of the bird-image-area of the & tail of the horizontally flying bird in this picture is about 1.5 times the width of the height of the bird-image-area of our benchmark picture (33%) according to this formula including the correction factor.
Example 5 using cropping level 3900 x 2600

Amount sufficiently resolved detail bird-image-area compared with same amount bird-image-area benchmark picture = (90/17 x 30/60 x 750/1050)2 x (2100/3900)2 x 100% => 100 %.
The bird-image-area in this picture (with an upright White Heron with body 90cm excluding its super long neck) has about the same size the height of the Kingfisher in the bird-image-area of our benchmark picture.
Example 6 using cropping level 2700 x 1800
reach = (13/17 x 30/6 x 600/1050)2 x (2100/2700)2 x 100% => % reach of the benchmark picture-situation.
100% => 200 % reach of the benchmark picture-situation.
The bird-image-area of this picture indeed is about 2 times as large as the bird-image-area of the benchmark picture mainly caused by a significantly smaller distance.
Example 7 using cropping level 3000 x 2000.
reach = (90/17 x 40/6 x 600/1050)2 x (2100/2300)2 x 100% => 190% reach of the benchmark picture-situation.
Example 8 using cropping level 3000 x 2000
reach = (13/17 x 30/6 x 600/1050)2 x (2100/2700)2 x 100% => % reach of the benchmark picture-situation.
Example 9 using cropping level 2400 x 1600

reach = (17/17 x 30/45 x 1500/1050)2 x x (2100/2700)2 x 100% => 150 % reach of the benchmark picture-situation.
The bird-image-area of this picture is somewhat larger than the bird-image-area of the benchmark picture and will contain about one and a half the amount of detail of the bird image-area of the benchmark picture. This is caused by a significantly greater equivalent because a TC-20E III converter was used. It was not because the Z7 has a full frame sensor. More explanation about full fame sensors and reach at the end of this page.
Example 10 using cropping level 900 x 600
reach = (15/15 x 30/35 x 1050/1050)2 x x (2100/2700)2 x 100% +15% => 90 % detail benchmark picture.
The bird-image-area of this picture is somewhat smaller than the bird-image-area of the benchmark picture, caused by a somewhat larger distance bird which is partially compensated by exceptionally clean atmosphere which adds 15%.
Example 11 using cropping level qqqq x qqqq

reach = (15/15 x 30/35 x 1050/1050)2 x x (2100/2700)2 x 100% +15% => 90 % detail benchmark picture.
The bird-image-area of this picture is somewhat smaller than the bird-image-area of the benchmark picture, caused by a somewhat larger distance bird which is partially compensated by exceptionally clean atmosphere which adds 15%.
Example 12 using cropping level qqqq x qqqq

reach = (15/15 x 30/35 x 1050/1050)2 x x (2100/2700)2 x 100% +15% => 90 % detail benchmark picture.
The bird-image-area of this picture is somewhat smaller than the bird-image-area of the benchmark picture, caused by a somewhat larger distance bird which is partially compensated by exceptionally clean atmosphere which adds 15%.
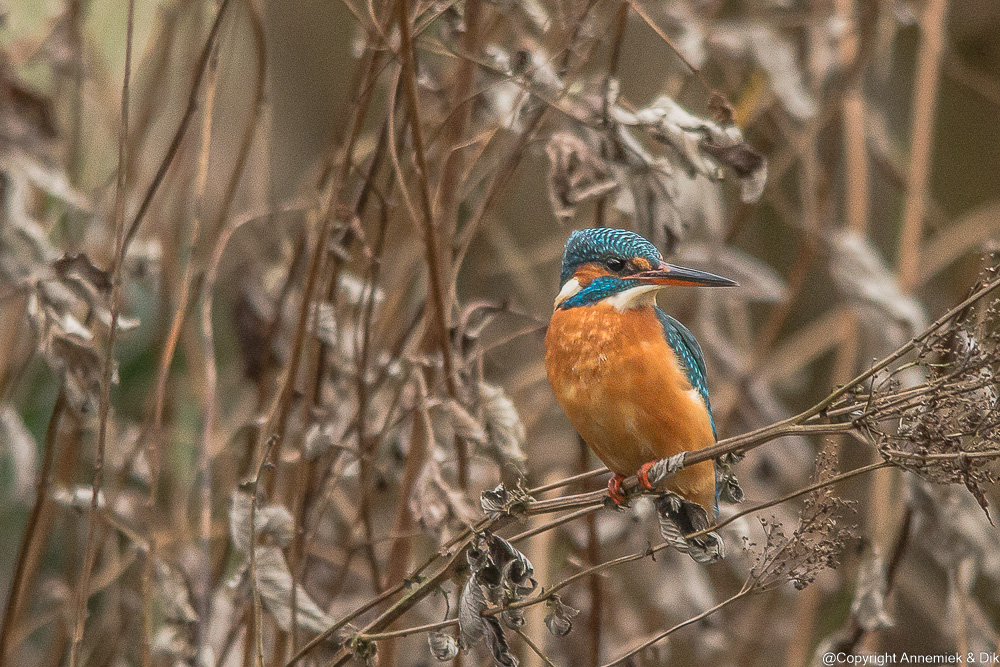
Example 13 quantifying reach using cropping level 1500 x 1000
Example 14 quantifying reach using cropping level
reach = (15/20 x 30/15 x 1135/1050)2 x 100% => 150 % detail benchmark picture. qqq @dik check
Example 15 quantifying reach using cropping level
reach = (17/17 x 30/22 x 630/1050)2 x (1500/2100)2 x 100% => 160% (corrected via Csensor = 10%) =>180% detail benchmark picture (@dik correction crop level).
The bird-image-area of this picture is over 1.5 times as large as the bird-image-area of the benchmark picture and will contain significantly more detail than the bird-image-area of the benchmark picture. By the way notice the fine quality, rich detail, great colour depth, high contrast and low noise level in midwinter wheather produced by this high quality full frame D800. This picture is a good example of sensor quality contributing to overall reach.
The “30 m border” for small birds
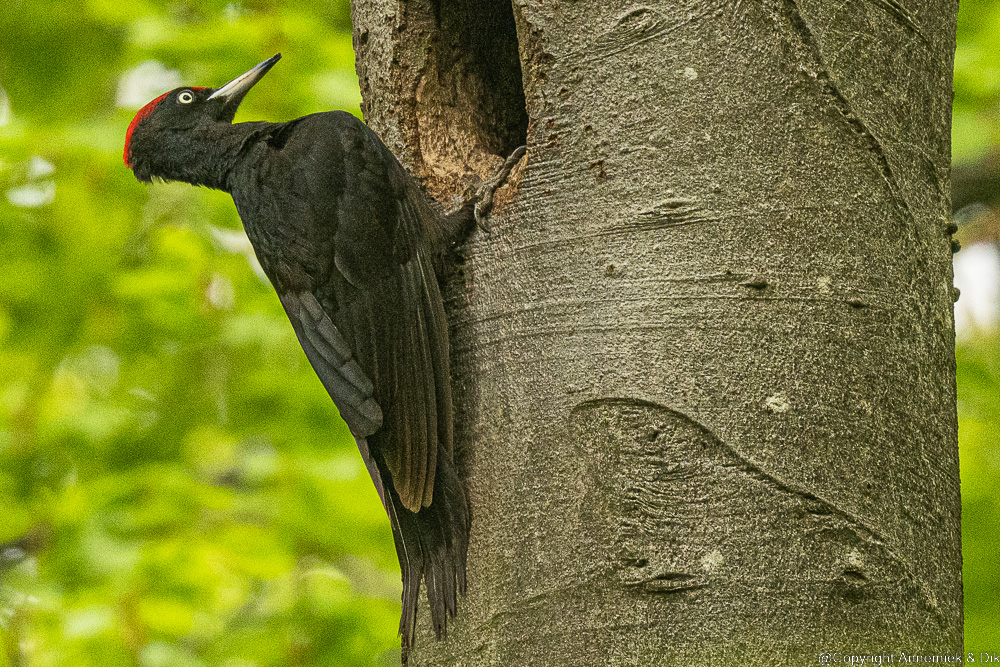
The relatively large Black Woodpecker may completely fill or even not fit in the picture frame at this distance using this kins of cropping level!
We found that sufficient reach is extraordinaary crucial when photographing small or very small birds. Shooting pictures of large or extraordinary large birds is a different matter. In thos situation reach (bereik) is less relevant. One needs to be sure that the bird (expected) to be photographed (will) fit within the picture in the actual given situation. We will get back to this.
Shoot your bird pictures with optimal settings of EXPOSURE TIME in APERTURE Mode Birds Reach or Action to get in-focus pictures with sufficiently resolved detailed, including birds that show up unexpectedly or only short time. When photographed the amount and quality of detail in the picture depend upon size and distance of the bird and quality and 35mm equivalent of the equipment used.
Over 30 meter the amount of reach gets progressively lower. One explanation may be that air pollution and cleanness of atmosphere accumulate because at substatial distances. The further away the bird is, the more dust and condensed water will be blocking the available light in a sort of column of polluted air between bird and the lens.
We found that at about 30 meter this kind of border in bird photographys seems to exist paarticularly when photographing small birds. Photographing Kingfishers or Bee-eaters below 30 meter is okay at hogher distacne it will be progressively mor difficult to get good resulets with average equipment. When photographing a small bird like a Kingfisher at 30 meter we could get sufficiently detailed pictures, far better detailed pictures at a few meters less like around 27m and definitely insufficiently detailed pictures at 33 meter. The explanation is most likely the quadratic distance rule for reach. The same boundary seems to exist for all small species.
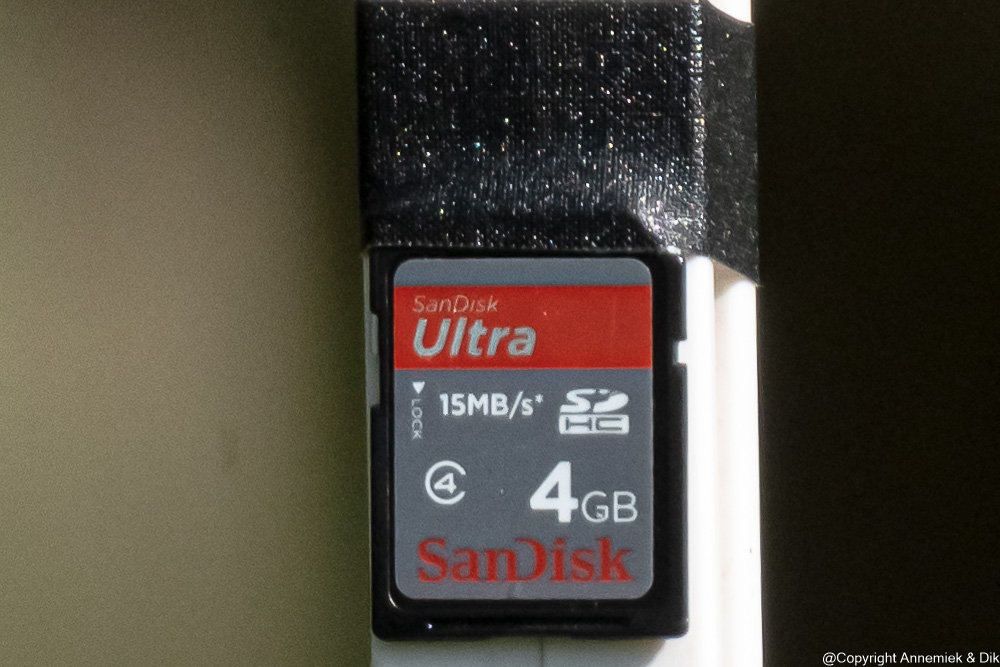
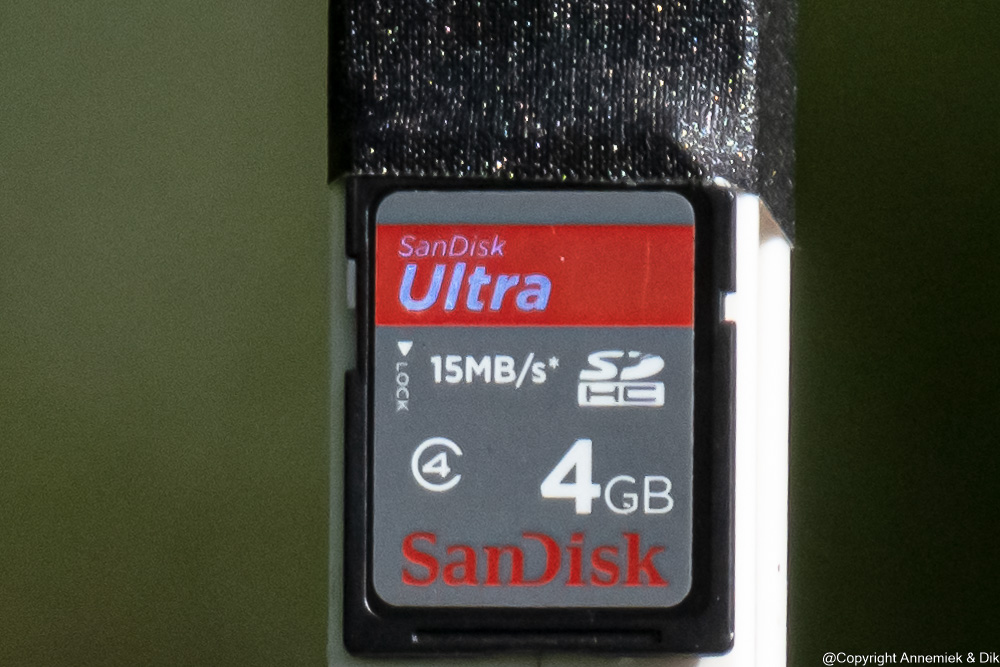
The following pictures of a SD card, at 16.5 meter, 15 meter and 13.5 meter, llustrate the substantial quadratic effect of one of the three “quadratic rules”: when you photograph something at distances of plus or minus 10 percent, the resulting pictures show significant difference in detail! We use this quadratic rule for distance in the over and over again:
(click -> open picture, > < next/previous picture, i -> info & settings camera & lens, “Full size” -> full screen, x-> Exit picture)

When editing the RAW picture use the optimal cropping level to get a picture a sufficient amount of sufficiently resolved detail in the “bird image-area” – see diagram below – of the picture. This is an important process, because it will consolidate the amount and quality of detail in the final picture. After editing and cropping the picture the type of editing and or choice of cropping level still may be changed as long as the original RAW or JPG file is available. This activity determines the final number of dots per square inch (DPI) of the picture.
A good bird picture is in-focus and the “bird image-area” of the cropped picture contains a sufficient amount of sufficiently resolved image dots (beeldpunten). The more sufficiently resolved pixels the “bird-image-area” in the picture contains, the more reach your equipment has at the moment this picture is shot. This is our definition of “reach“. In other words: Reach is a property of your photographic equipment. For example a combination D500 Nikkor 500mm f/4E TC 14E equivalent 1050mm has more reach than a combination D500 Nikkor 300mm f/4E TC 14E equivalent 630mm.
reach = (17/17 x 30/20 x 1500/1050)2 x (2100/3600)2 x 100% => 130 % reach of the benchmark picture-situation.
This is somewhat complicated. The bird-image-area of this picture is about 30% larger than the bird-image-area of the benchmark picture and therefore will contain about 30% more detail than the bird image-area of the benchmark picture. This is caused y a significantly greater equivalent because a TC-20E III converter was used and this bird was at a shorter distance, 20 meter instead of 30 meter, which made the higher cropping level possible. The reach property of the equipment was the same.
Take a close look at the picture of the Bee-eater below which is a good example of a picture with rich detail. Reach is about sufficiently resolved detail in a picture. It is not a matter of focus although bird photographers often tend to talk about “sharp” pictures. In this blog we talk about “in-focus pictures” versus “out-of-focus pictures” to emphasize the essential difference of these “in-focus” pictures with sufficiently detailed pictures of birds. In this blog we prefer to keep matters well defined. So:
The “30 meter border” for satisfactory pictures of small or very small birds
We found that at about 30 meter some kind of border for succesfully photographing small birds seems to exist. When photographing a small bird like a Kingfisher at 30 meter we could get sufficiently detailed pictures, far better detailed pictures at a few meters less like around 27m and definitely insufficiently detailed pictures at 33 meter. The explanation is most likely the quadratic distance rule for reach. The same boundary seems to exist for all small species.
We found that sufficient reach is far more crucial when photographing small and very small birds. Shooting pictures of large or extraordinary large birds is a different matter. In case if larger birds reach is not first priority but it is definitely more important to know for sure that the bird will fit within the picture frame if one for example when a bird is not in a situation were one is expecting a bird to arrive at the scene like a Kingfisher or a Black Woodpecker nrar its nest and one needs to ensure that this bird will fit within the picture frame using thisactual equipment. Look at the example of the Black Woodpecker below:
Available light, wheather condition, state of atmosphere also determine amount of reach
Over 30 meter the amount of reach gets progressively lower. One explanation may be that air pollution and cleanness of atmosphere accumulate because at substatial distances. The further away the bird is, the more dust, pollution and humidity is blocking the available light in some kind of cylinder of air between bird and the lens. We found that at about 30 meter some kind of border for succesfully photographing small birds seems to exist. When photographing a small bird like a Kingfisher at 30 meter we could get sufficiently detailed pictures, far better detailed pictures at a few meters less like around 27m and definitely insufficiently detailed pictures at 33 meter. The explanation is most likely the quadratic distance rule for reach. The same boundary seems to exist for all small species.
Does sensor size contribute to reach?
In other words: does a camera with a full frame sensor have more reach (bereik) than a camera with an APS-C type sensor? This type of question continues to create confusion: “Does a Nikon full frame camera have more reach when operating in what Nikon calls “FX mode” (full frame format 36 x 24 mm) compared to working in in “DX mode” (APS-C format 24 x 16 mm)?
The answer is No!
A full frame camera in DX mode will “cut” a 24 x 16 mm image area out of the full frame sensor area and by the way always at the very centre of this sensor. However you can, using software like Lightroon, “soft crop” an area of 24 x 16 mm (APS-C format) out of the full frame image area at any position you wish, centre, corner, along a side, anywhere. This APS-C size “soft cropped” portion will always have exactly the same resolution being (24 x 16) / (36 x 24) / Megapixels of full frame area, 4/9 of the total amount of pixels of the full frame sensor. So your crop will always have the same resolution (pixels/square millimeter) as any picture created by this camera in DX mode or in FX mode. In other words “full frame” does not mean more reach but it means: in total more pixels (to select an APS-C format area. Try it if you want to be sure. We did so.
However – and this is something essentially different – using a camera in full frame mode, “FX mode”, will give you a larger (factor 2.25) amount of detail and also a larger field of view in your camera viewer, which is often required when photographing fast flying birds since they stay longer “in the picture”. Amongst other features like two card slots and two processors, this may be a reason to go for a full frame Nikon MLC like Z7 (II) or Z6 (II) if you can afford this.
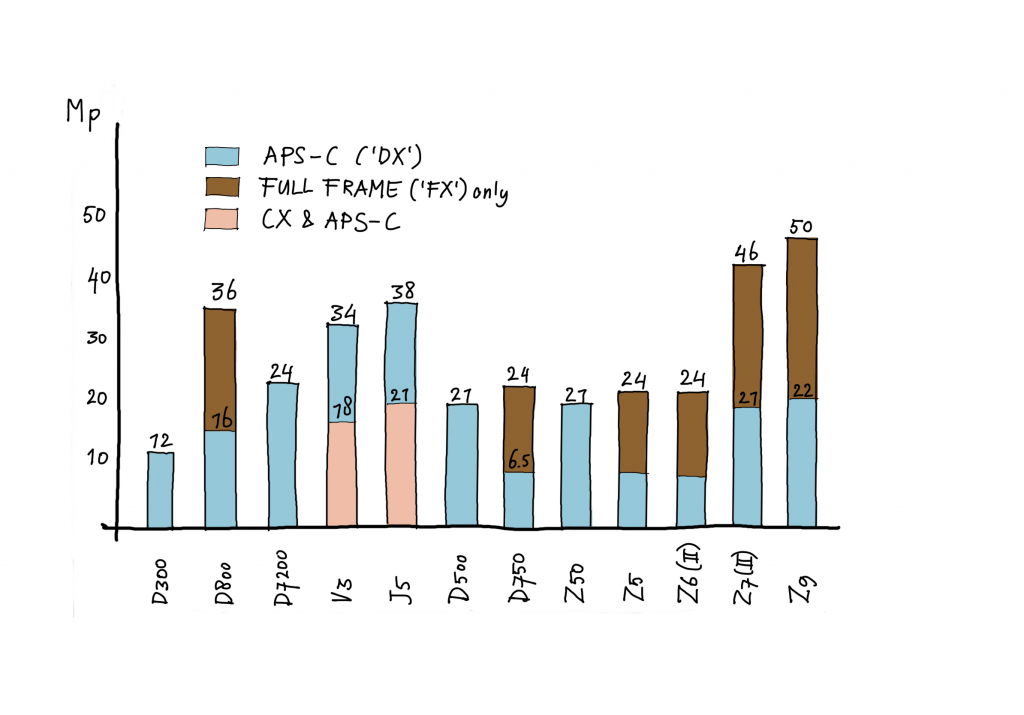
Only when you “normalise” the output af a digital camera to a 24 x 16mm-image area you can compare the contribution in megapixels to reach of full frame and other camera types with the output of an “APS-C type camera” like a D500 or Z50.
Look at the table below.
You see this APS-C-normalised contribution to reach of a few Nikon camera’s used in lightweight bird photography in the diagram below. By the way this diagram is quite informative! It can help you decide which camera you should buy if you consider reach to be important.
However keep in mind that it is not only the sensor output but often also the field of view of the eye viewer of a DSLR or the EVF of a mirrorless camera that you should take into consideration because this can very important in action photography.
Reach of photographic equipment in bird photography
To get more precision this percentage can optionally be adjusted by a correction factor Ctotal of maximally 25%:
Ctotal = Csensor+ Clight + Catmosphere
- Csensor: quality image sensor: in our experience maximally 0 – plus 10%
- Clight: amount available light: sunlight, overcast, twilight, total darkness: in our experience 0 – minus 100%
- Catmosphere: cleanness atmosphere: exceptionally clean, smoke, sandstorm: in our experience minus 10 – plus 15%.
Ctotal -100 – +25%.
When editing the RAW picture use the optimal cropping level to get a picture a sufficient amount of sufficiently resolved detail in the “bird image-area” – see diagram below – of the picture. This is an important process, because it will consolidate the amount and quality of detail in the final picture. After editing and cropping the picture the type of editing and or choice of cropping level still may be changed as long as the original RAW or JPG file is available. This activity determines the final number of dots per square inch (DPI) of the picture.
A good bird picture is in-focus and the “bird image-area” of the cropped picture contains a sufficient amount of sufficiently resolved image dots (beeldpunten). The more sufficiently resolved pixels the “bird-image-area” in the picture contains, the more reach your equipment has at the moment this picture is shot. This is our definition of “reach“. In other words: Reach is a property of your photographic equipment. For example a combination D500 Nikkor 500mm f/4E TC 14E equivalent 1050mm has more reach than a combination D500 Nikkor 300mm f/4E TC 14E equivalent 630mm.
reach = (17/17 x 30/20 x 1500/1050)2 x (2100/3600)2 x 100% => 130 % reach of the benchmark picture-situation.
This is somewhat complicated. The bird-image-area of this picture is about 30% larger than the bird-image-area of the benchmark picture and therefore will contain about 30% more detail than the bird image-area of the benchmark picture. This is caused y a significantly greater equivalent because a TC-20E III converter was used and this bird was at a shorter distance, 20 meter instead of 30 meter, which made the higher cropping level possible. The reach property of the equipment was the same.
Take a close look at the picture of the Bee-eater below which is a good example of a picture with rich detail. Reach is about sufficiently resolved detail in a picture. It is not a matter of focus although bird photographers often tend to talk about “sharp” pictures. In this blog we talk about “in-focus pictures” versus “out-of-focus pictures” to emphasize the essential difference of these “in-focus” pictures with sufficiently detailed pictures of birds. In this blog we prefer to keep matters well defined. So