Extra Info: Use F11 Browser to view page and pictures full frame!
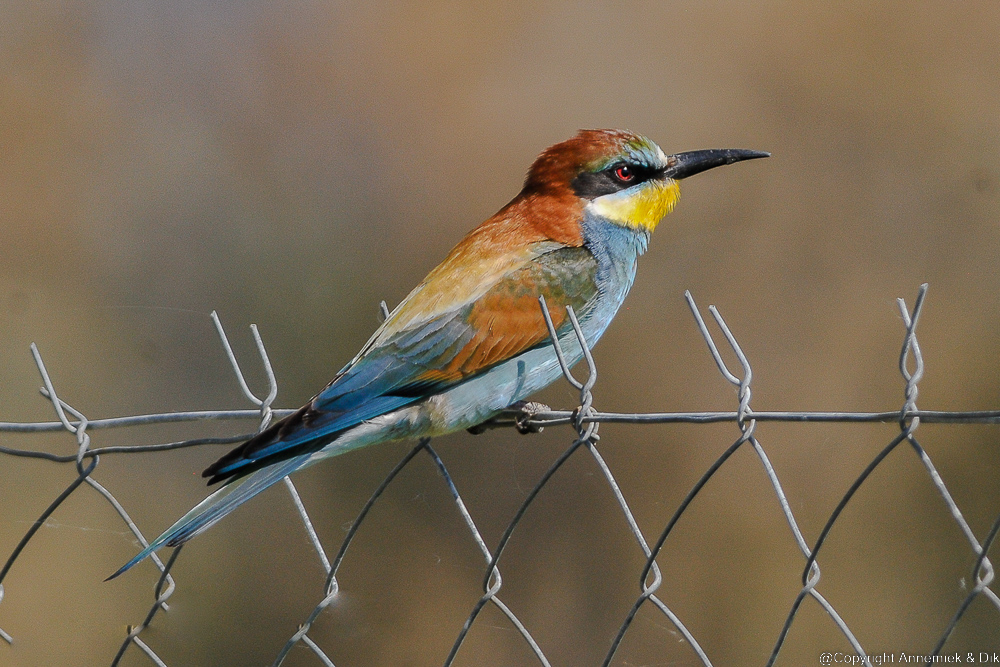
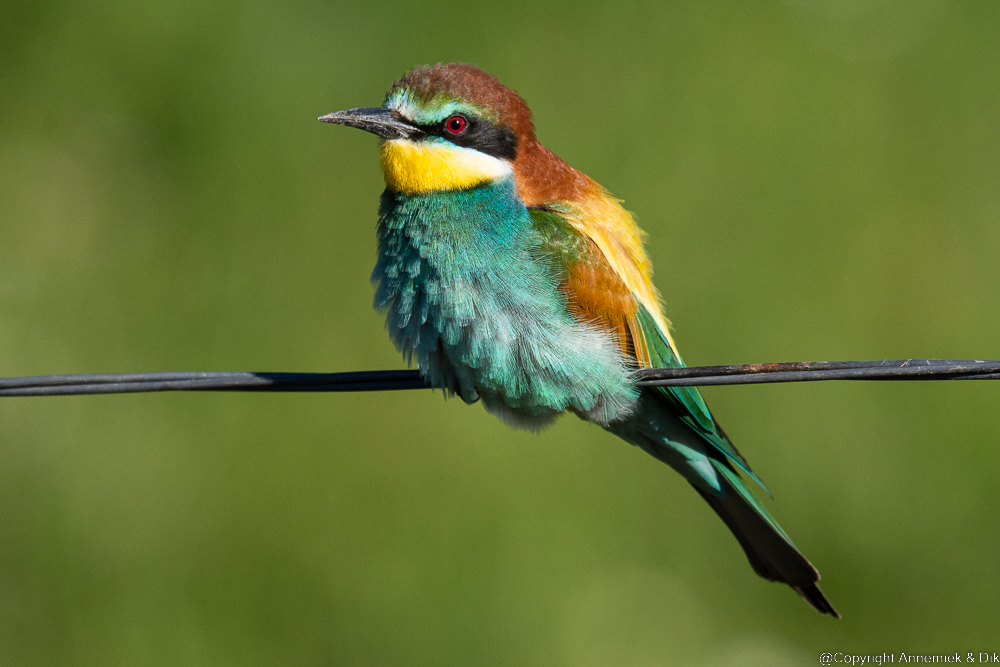
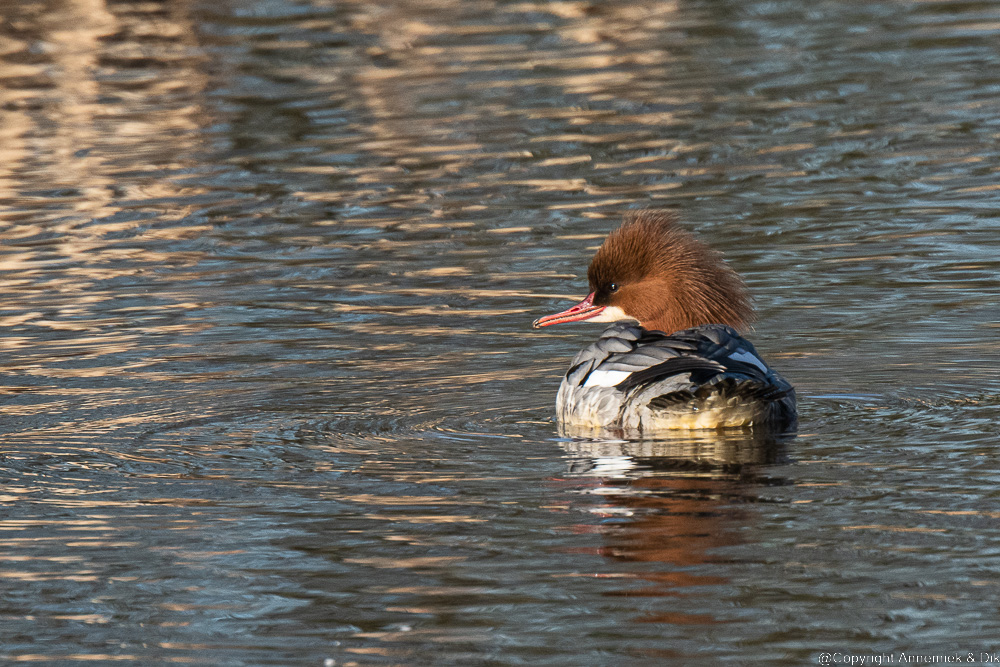
Photo at top: Lesbos Bee-eater (Bijeneter) Size 16cm distance 20m equivalent 900mm D300 Nikkor 300mm f/4D total camouflage 1//1000 second f/8 ISO 400. Edited & cropped 1500 x 1000. qqq % crop).
This page is in maintenance mode through 30th july 2023.
@dik and private
“Reach” (introduction)
All this is based on decades bird photography in European and Eurasian countries with Canon, Fujifilm, Kowa, Panasonic Nikon, Panasonic and Swarovski equipment:
Reach (bereik) is essential in bird photography. Nevertheless it seems to be ill defined. Digiscopers, photographers and salesmen talk about “reach” without defining what it exactly is. At this page we will define reach and suggest tools to estimate and or quantify it precisely. As a consequence this page is probably rather technical and maybe a bit hard. So don’t worry if it takes you some time to understand everything about reach, but it really pays off in your bird photography and surely pays off when you buy your equipment. High quality semi pro photographic equipment is usually expensive and heavy if not far too heavy.
We have experienced that nowadays one can shoot great bird pictures and enjoy bird photography using what we consider affordable lightweight equipment: camera’s and lenses less than 3000 gram and less than 3000 Euro, still considerable money, however we do consider this as a longtime investment for many years enjoying birding and photography out in nature.
Nikon is obviously well aware of all this. Their daring System 1 Series mirrorless camera’s may have been a bridge too far at the time but their latest Z camera’s are featuring the largest light transmission opening in the world of 36 x 24mm digital system camera’s and their S class Z lenses and still some of their classical lightweight F-mount 300mm and 500mm Phase Fresnel lenses, are almost perfect for lightweight bird photography. Our favourite still is F mount Nikkor 500mm f/5.6E PF VR, also in combination with Z mirrorless camera’s. This formidable lightweight lens happens to perform extremely well in lightweight bird photography and is a good example of a lifetime investment, weight 1460 gram and about 3500 Euro (july 2023). When we add the aspherical TC-20E III converter we use either D500 for photographing fast action and Z50 and some other Z camera’s and lenses for all remining bird photography. Combination Z50 with Z Nikkor 180-600mm 1950 gram and 1600 Euro (July 2023) is another favourite and almost perfect lightweight combination. Sometimes we use Z50 not in RAW mode but JPEG FINE for action photography. This way the Z50 produces at high speed in APERTURE Mode Birds out of-the-camera-pictures, all in-focus with good colours and rich detail.
Because of the complexity of reach and its significant importance in bird photography we split this page in two parts:
- an easy practical PART I which suffices if you only want to know the basics about estimating reach in your practical bird photography
- a more technical PART II which enables you to precisely quantify what reach really means when buying equipment or selecting the right combination for a day out in the field: “how far” a certain combination camera-lens-converter will “reach”.
Reach PART I: estimating “reach” through comparing the actual situation with one of 12 sample pictures
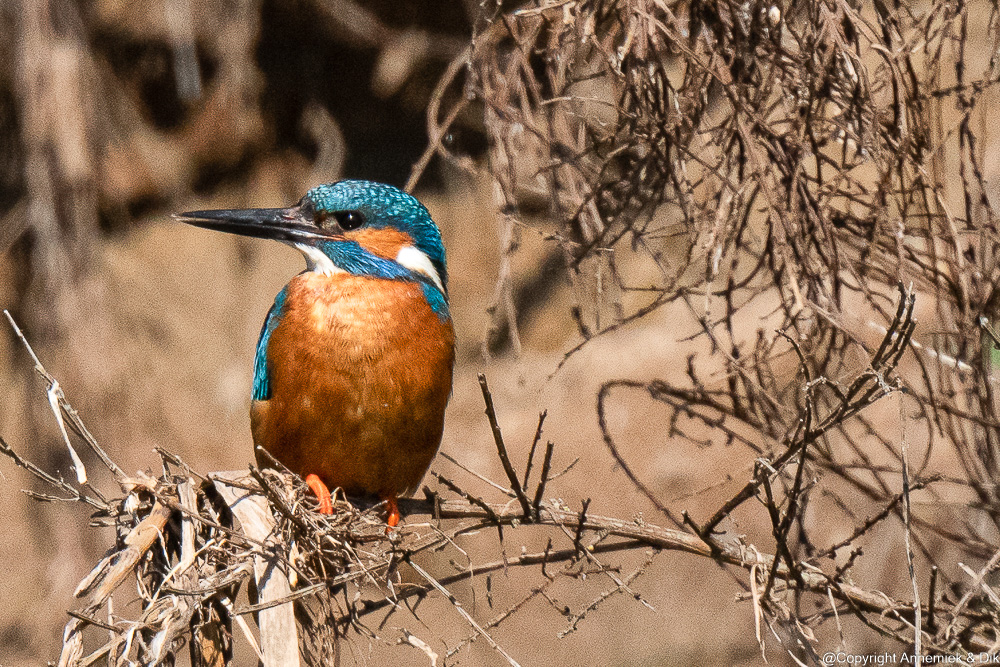
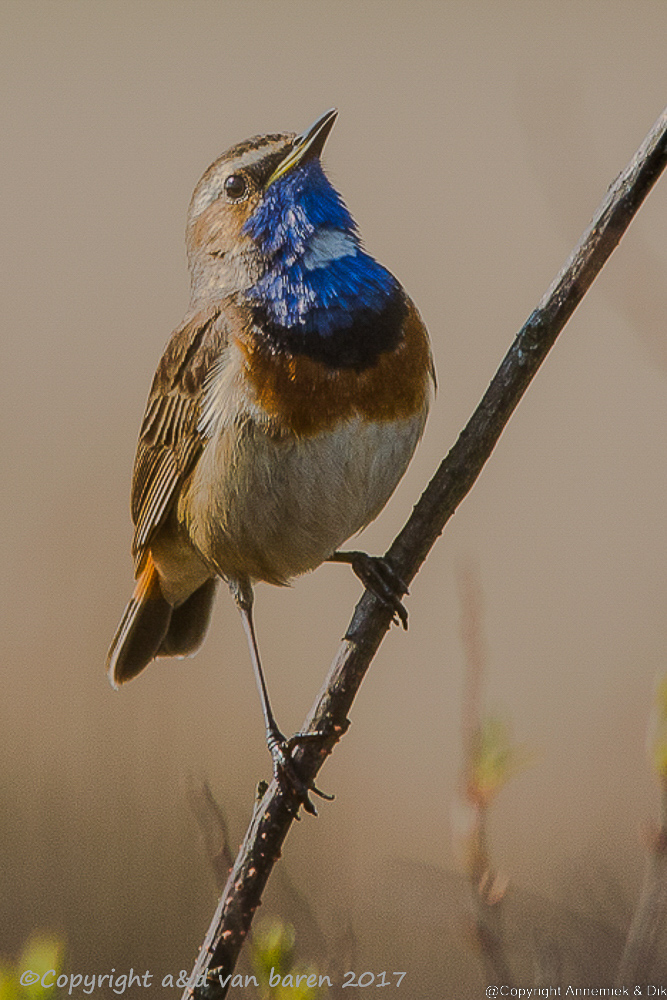
Look at the picture of the Bee-eater below to start with a definition of reach based on practical experience:
| “Reach” of certain equipment in bird photography is the amount of satisfactorily resolved pixels (beeldpunten) of the cropped bird image in the picture of that bird using this equipment. |
In other words – and this is essential in bird photography – the image area (“% crop“) in the final bird picture contains a certain amount of satisfactorily resolved pixels. The more resolved pixels that area contains, the more reach your equipment has/had when the picture is/was made. Reach is the amount of satisfactorily resolved detail. It is not a matter of focus although bird photographers often talk about “sharp” pictures. In this blog we always talk about “in-focus pictures” respectively “out-of-focus pictures” to keep things clear.
Test pictures of different bird species at various distances show that reach in bird photography, as defined above, is determined by four rules as follows:
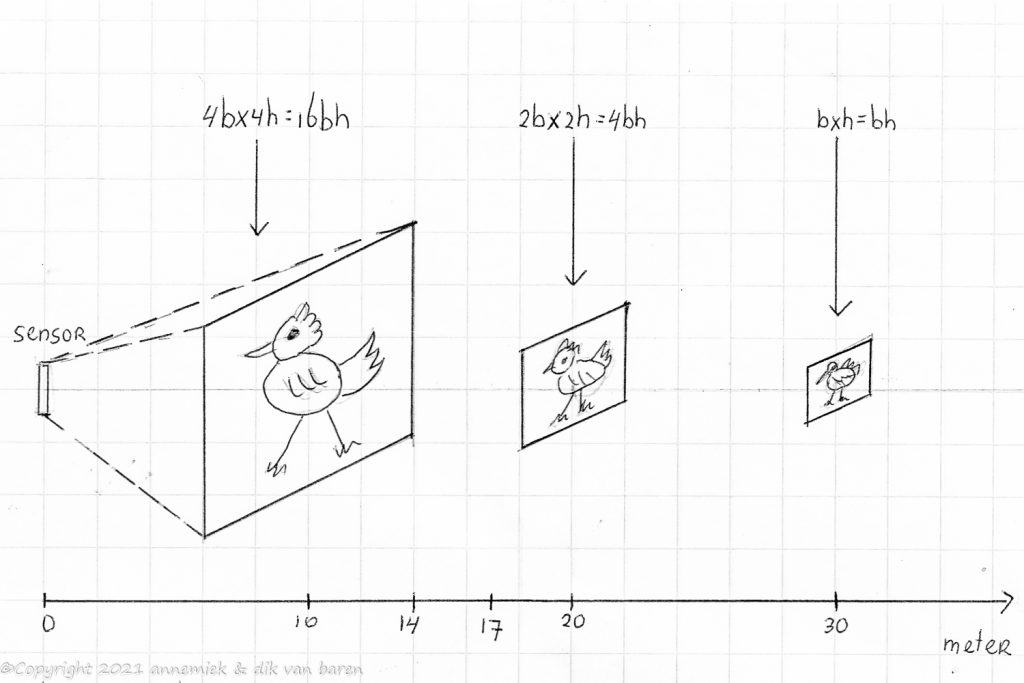
- Reach is quadratically proportional to size bird. See diagram above.
- Reach is inverted quadratically proportional to the distance bird. See diagram above.
- Reach is quadratically proportional to the 35mm equivalent of used equipment. A combination with large equivalent will produce a proportionally more magnified picture of the subject bird: width and height and thus the surface of the bird image in the picture will contain (once more) quadratically proportionally more pixels.
- Reach is proportional to the resolution (pixels/mm2) of the image sensor of the used equipment. If the image sensor is relatively small the bird image in the non cropped picture will of course contain less pixels like 21 Megapixel Z50 than in a picture taken with more pixels like 50 Megapixel Z9.
Sofar we did not talk about cropping! Cropping does not affect reach. However: greater reach of the equipment used during photography makes higher percentages of cropping in post production possible. We will review this more in PART II of this page. If you always are using the same camera this will probably not be very relevant in your photography. If you are using different camera’s with different sensor size you may notice the effect.
We can write all this together down in one reach-formula:
| Reach is equal to the amount of satisfactorily pixels of the bird image in the full picture and is proportional to (size/distance bird x 35mm equivalent equipment)2 and the resolution (pixels/mm2) image sensor. |
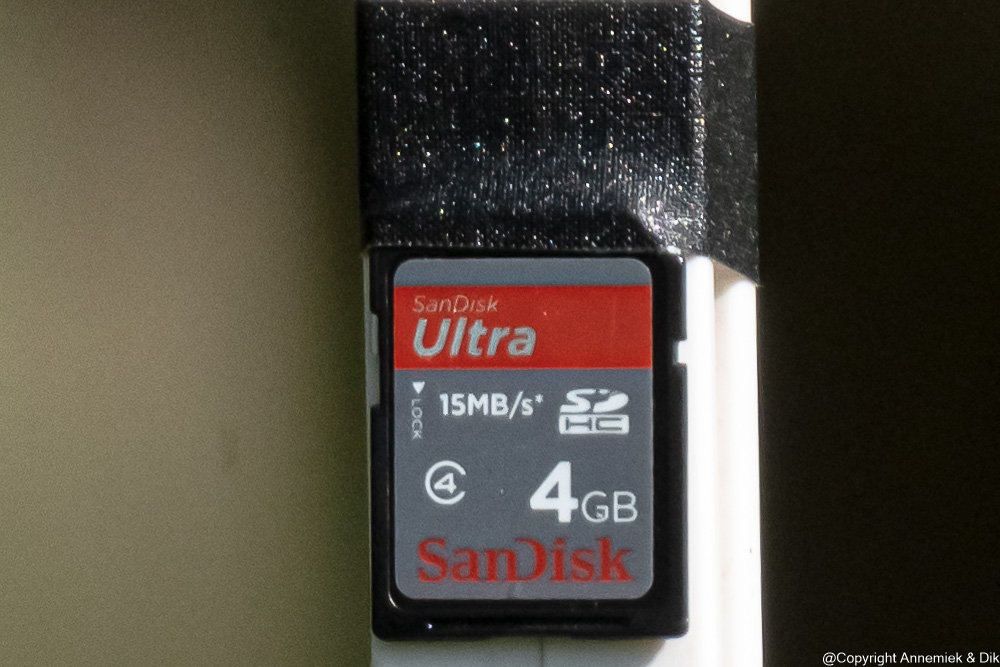
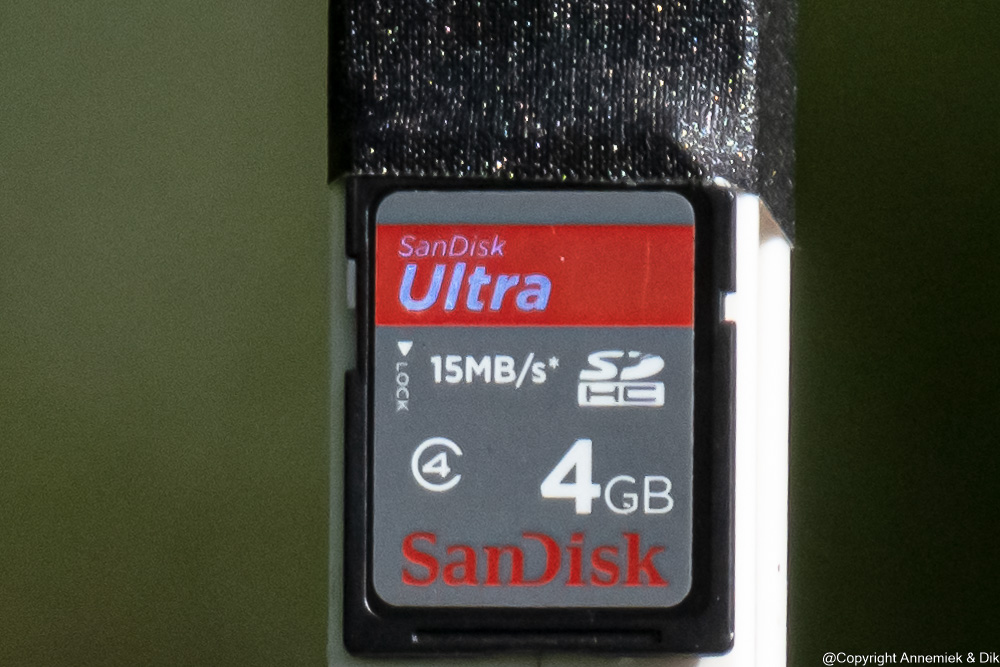
In the following three test pictures of an SD card you can see the importance of the quadratic effect of distance on the amount of detail in the picture even when photographing at distances in plus or minus 10 percent. Pictures of an SD card at distances 13.5, 15 and 16.5 meter show significant amount of detail! We use this “quadratic rule for distance” all the time in the field.
(click -> open picture, > < next/previous picture, i -> info & settings camera & lens, “Full size” -> full screen, x-> Exit picture)

By the way in this blog we always use the official bird size (“s size” in most Bird Guides and often also “w wingspan” as reported in Dutch bird guide “De Nieuwe Tirion Natuurgids“. See 10 Literature This is the “size” or rather the “length” of a vertically or horizontally stretched, standing, swimming, flying or crested bird from top to toe. It includes bill and tail.
Twelve sample pictures
Try to study and imprint in your memory, some or all of, the following twelve “sample pictures” or create your own set. Use this set of sample pictures as a “mental measuring tool” every time you estimate actual reach: small or large bird, bird close by or far, equipment used and possibly extraordinary conditions of available light or atmosphere like twilight, mist or exceptionally clean air. This method has worked for us during years both in our bird photography and when buying new equipment. We know most of these “sample pictures” by heart and use them all the time. You can use this set or create your own set to estimate actual reach of your equipment if you do not need to quantify reach precisely in your bird photography.
Each “sample picture” below shows something that significantly affects actual reach. We have underlined these elements in each of the twelce pictures below. For example in case of exceptionally clean air right after a complete lockdown or heavy thunderstorm and subsequent sunlight we added 15 % to the estimate. We did observe this effect for example after lockdown 2021 in Holland and also after some heavy thunderstorms: temporarily exceptionally (“washed out”?) clear air.
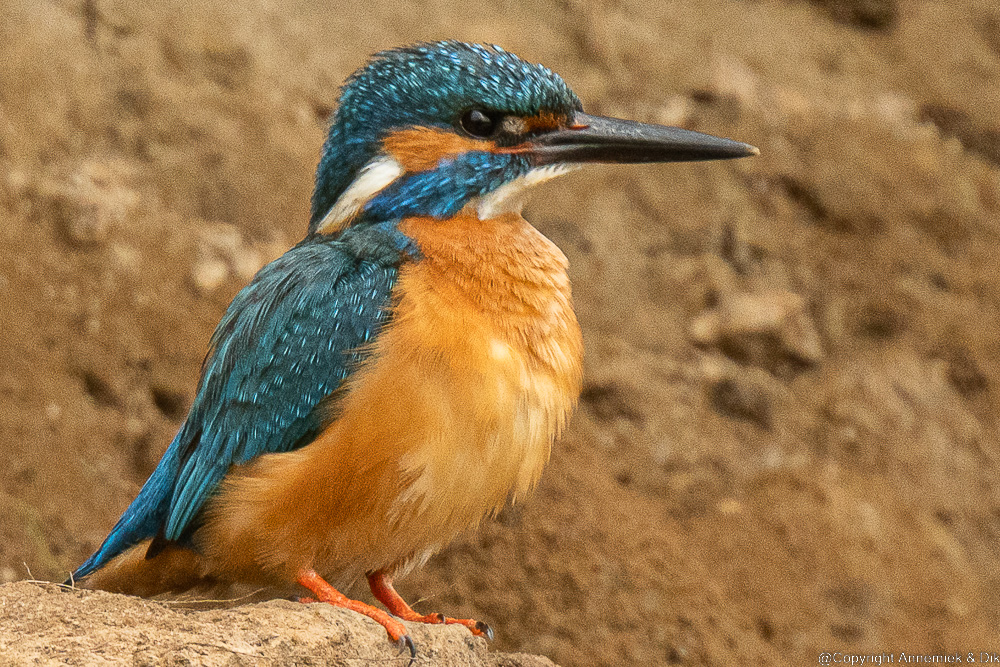
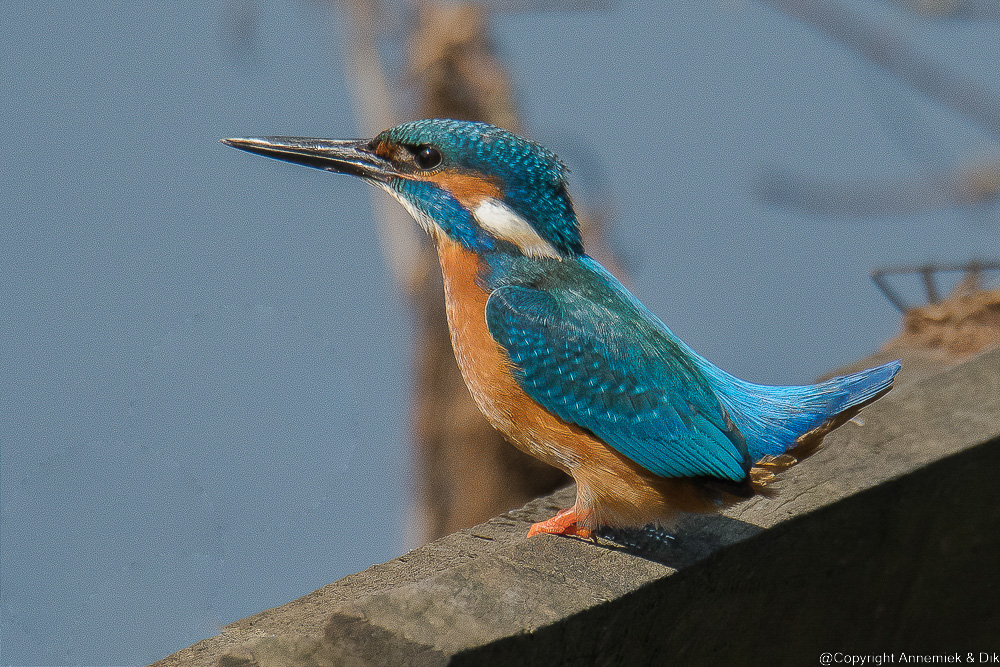
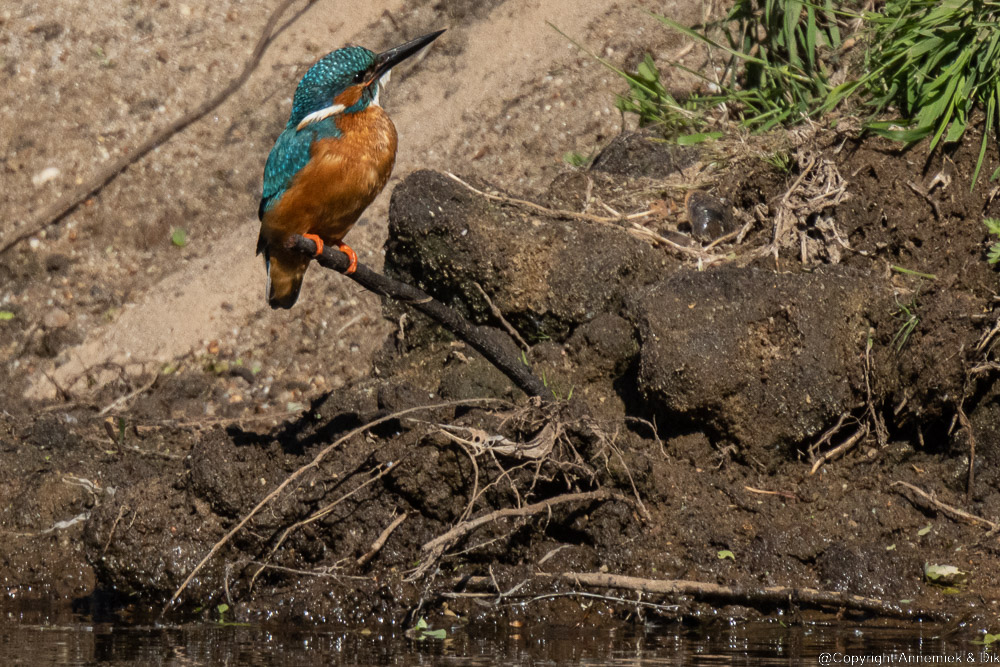
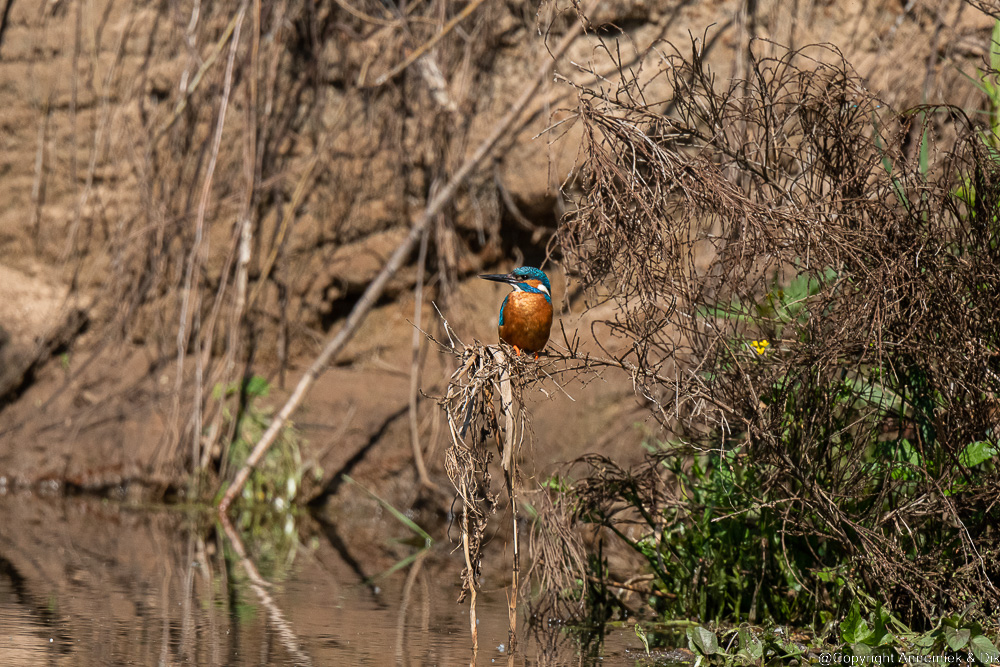
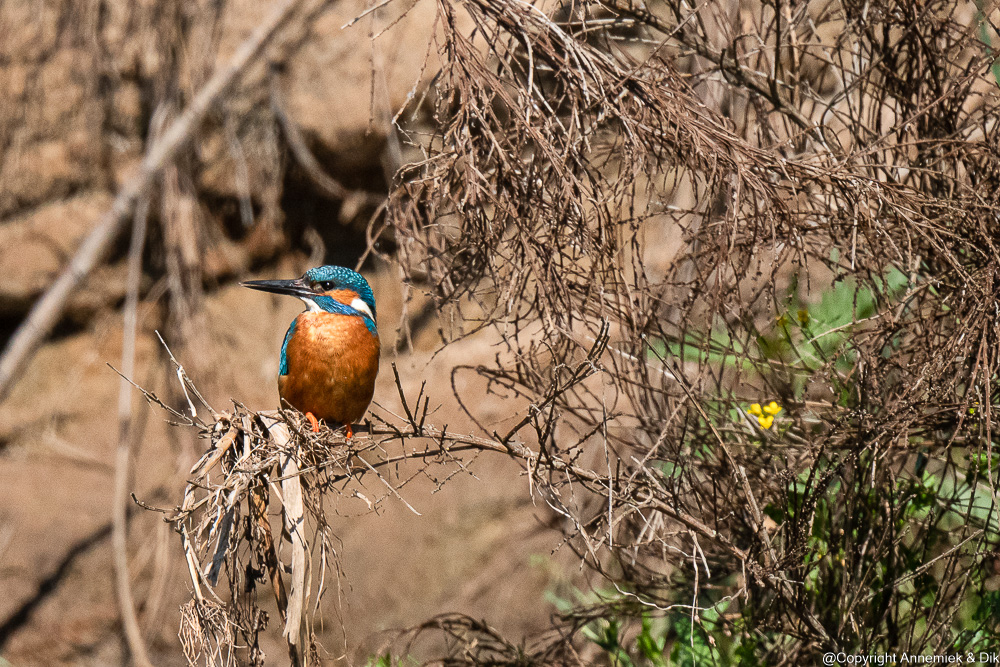
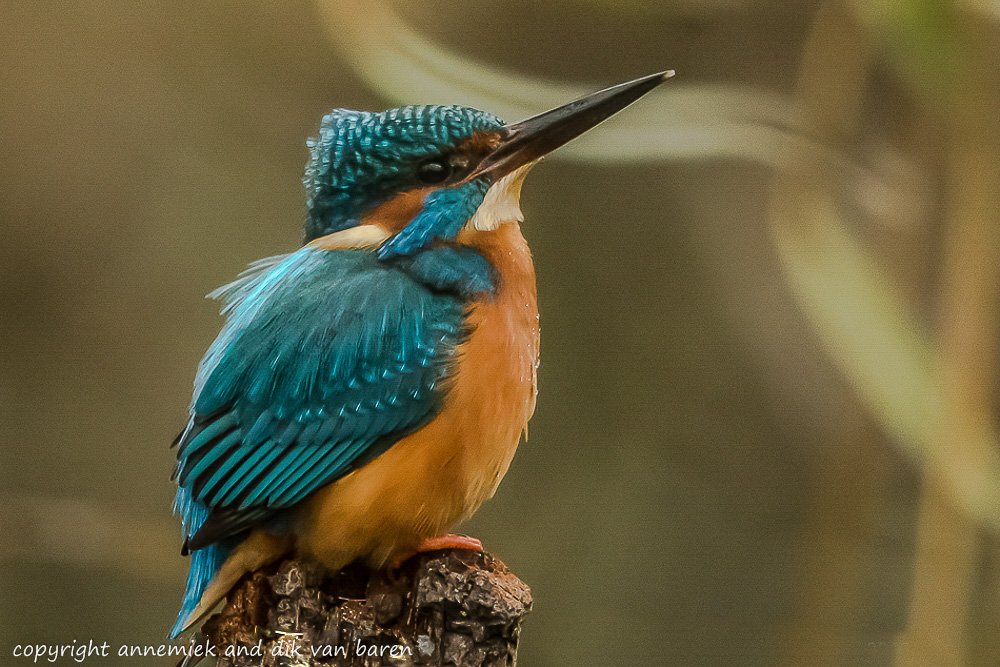
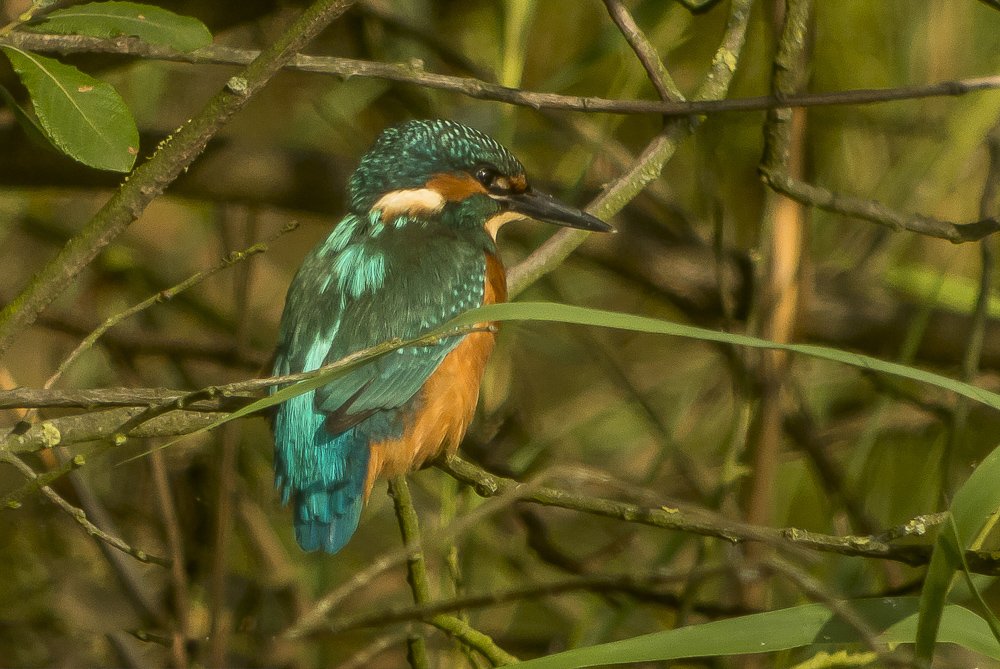
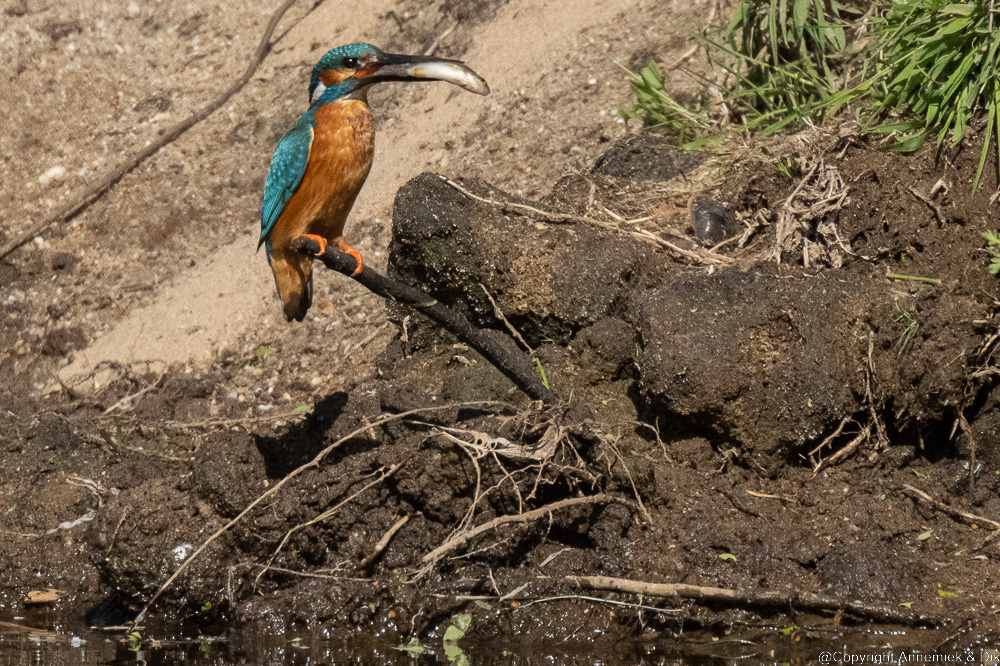
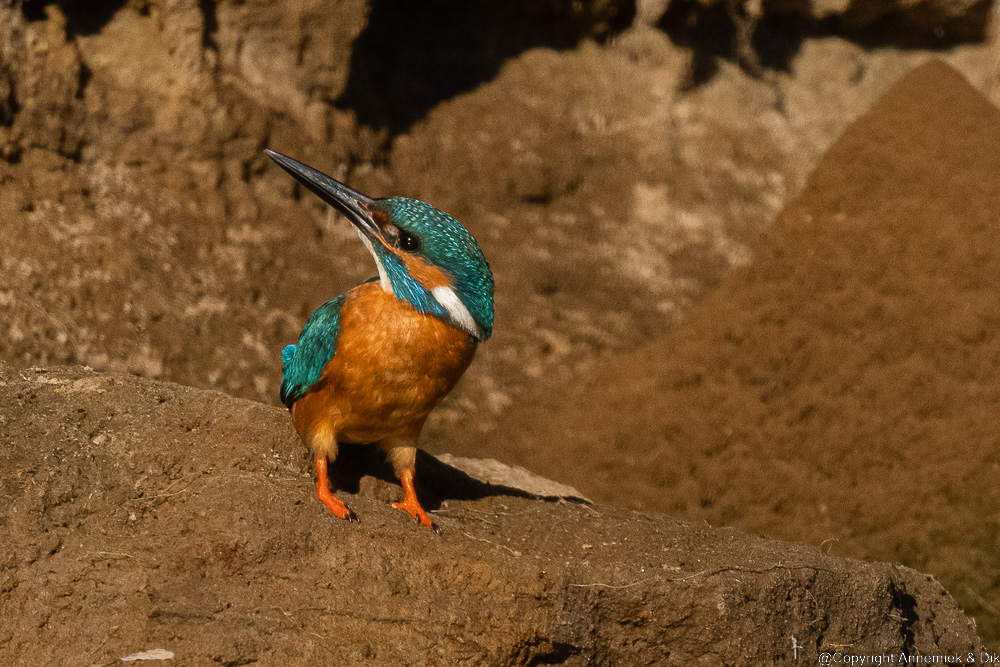
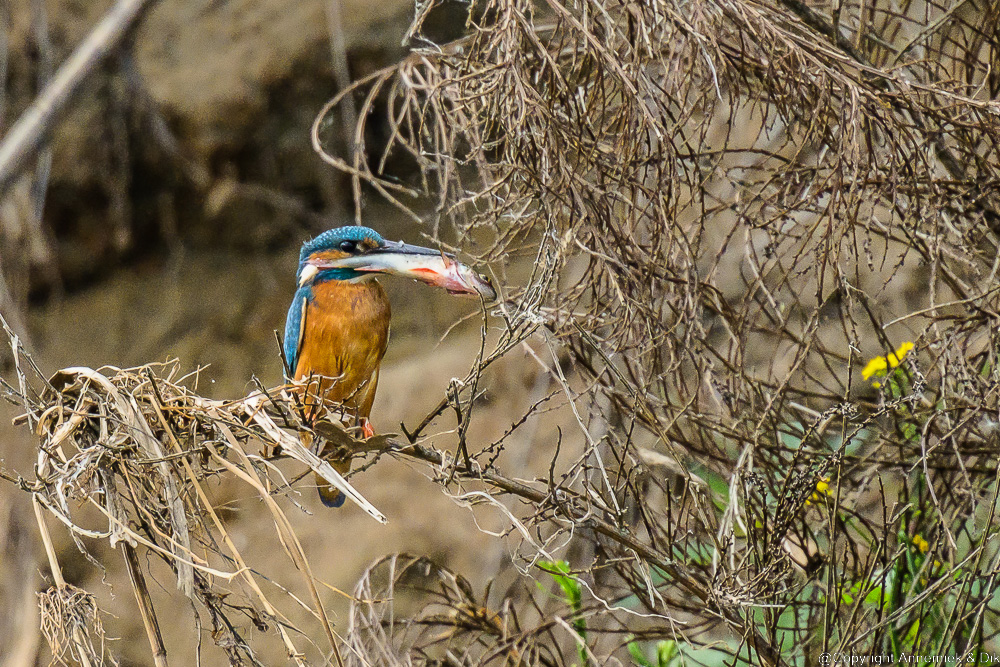
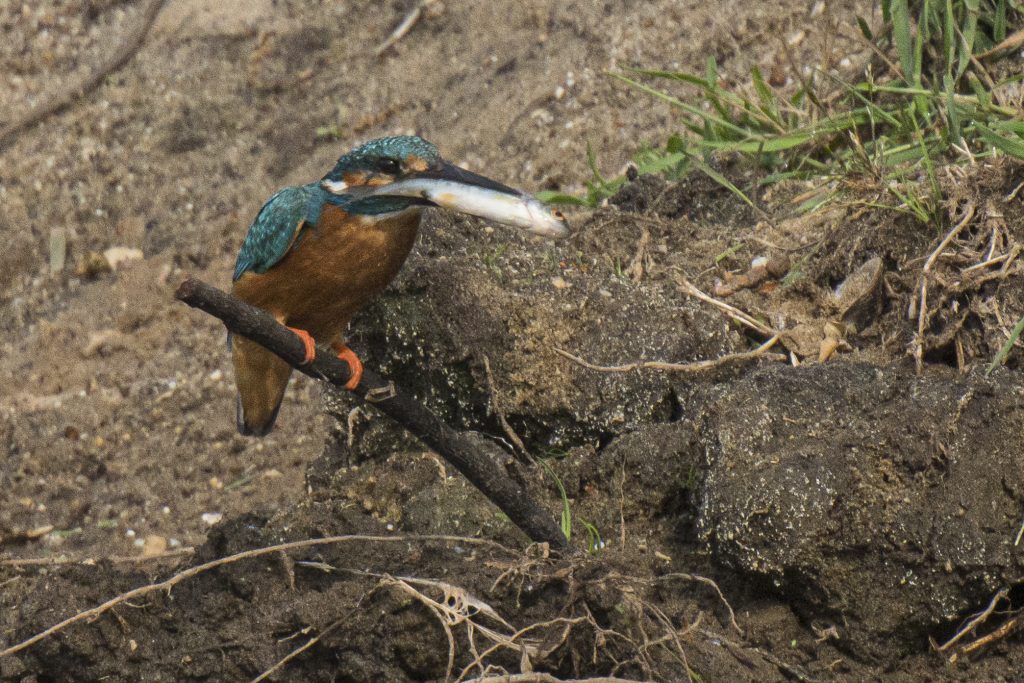
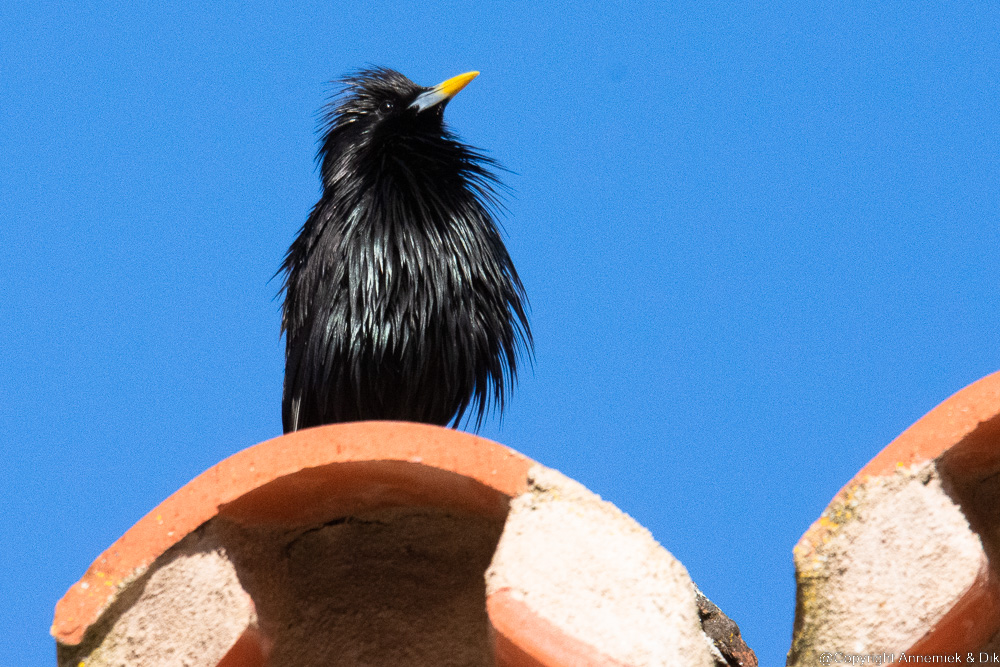
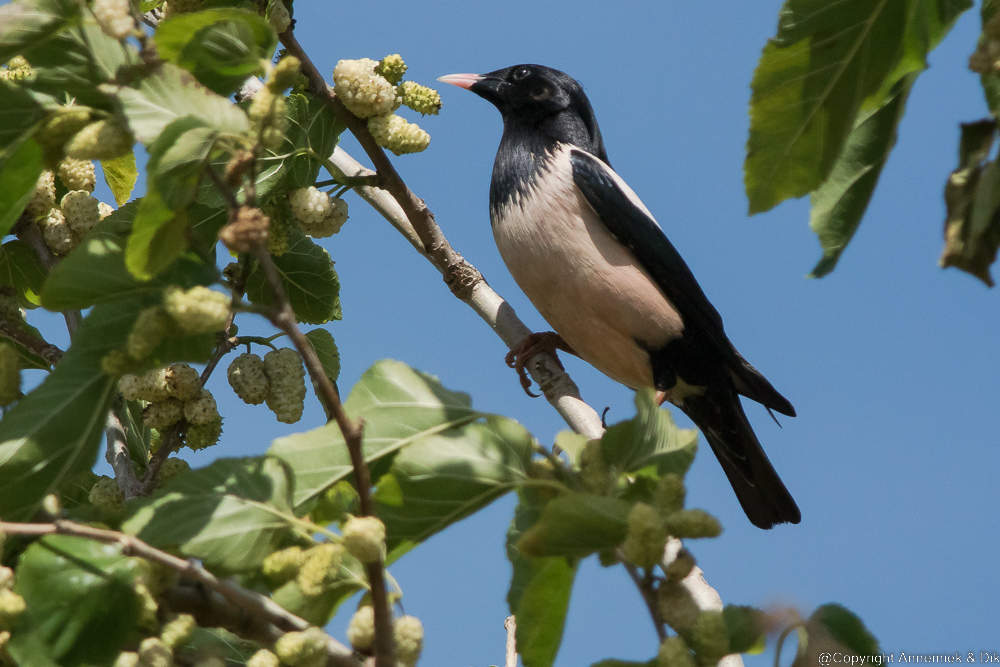
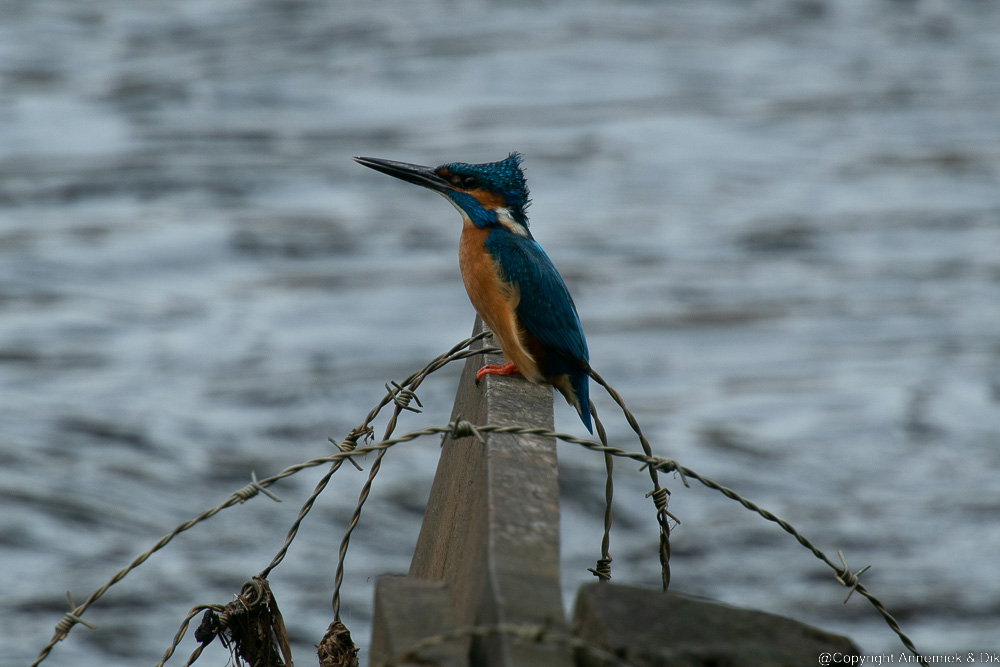
Sample picture 1: Kingfisher at 30 meter. We often compare situations with this benchmark (maatstaf) when we estimate actual reach of our equipment in case of photographing relatively small birds like Kingfisher: Bee-eaters, Shrikes, Starlings, Swifts, Wagtails, Pipits and the like. Up to 30 meter using pro level equipment Nikkor 500mm f/5.6E PF VR TC-14E III. Using this converter you loose no image quality as Nikon claims righteously. Crop 1920 x 1400.
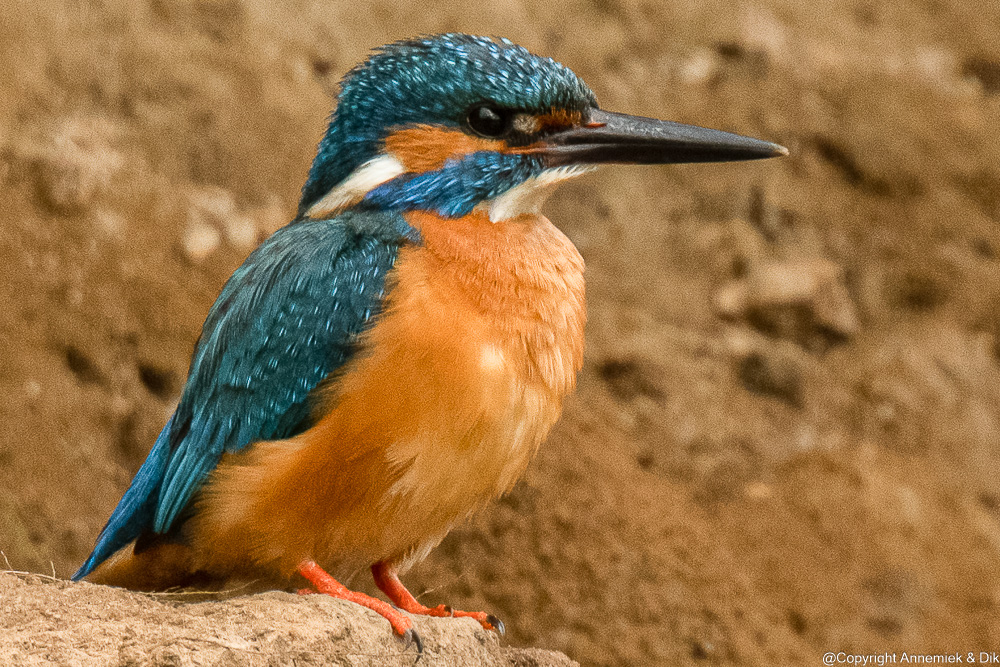
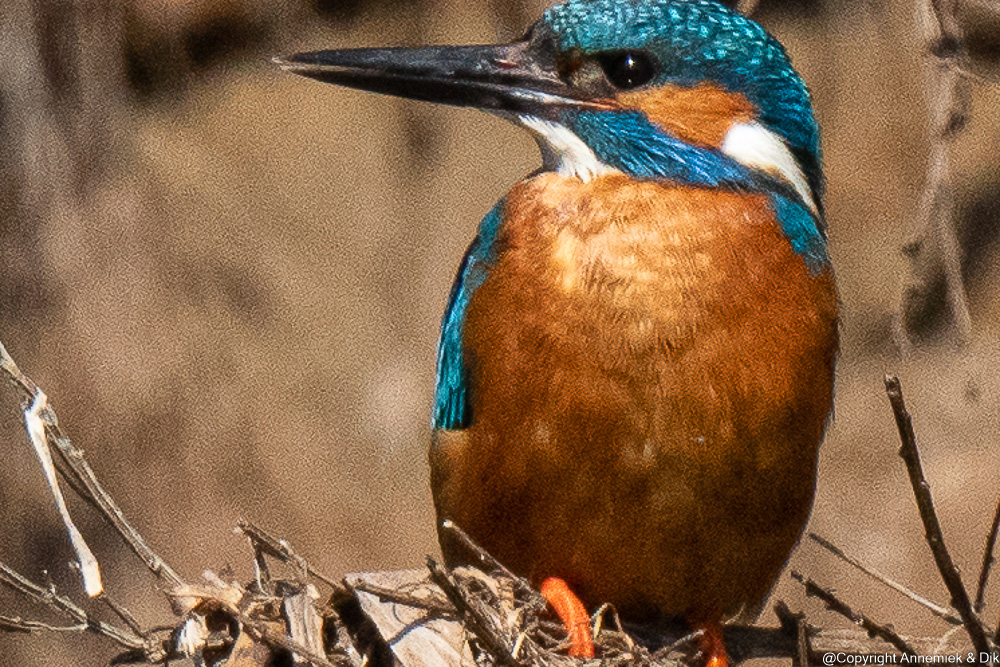
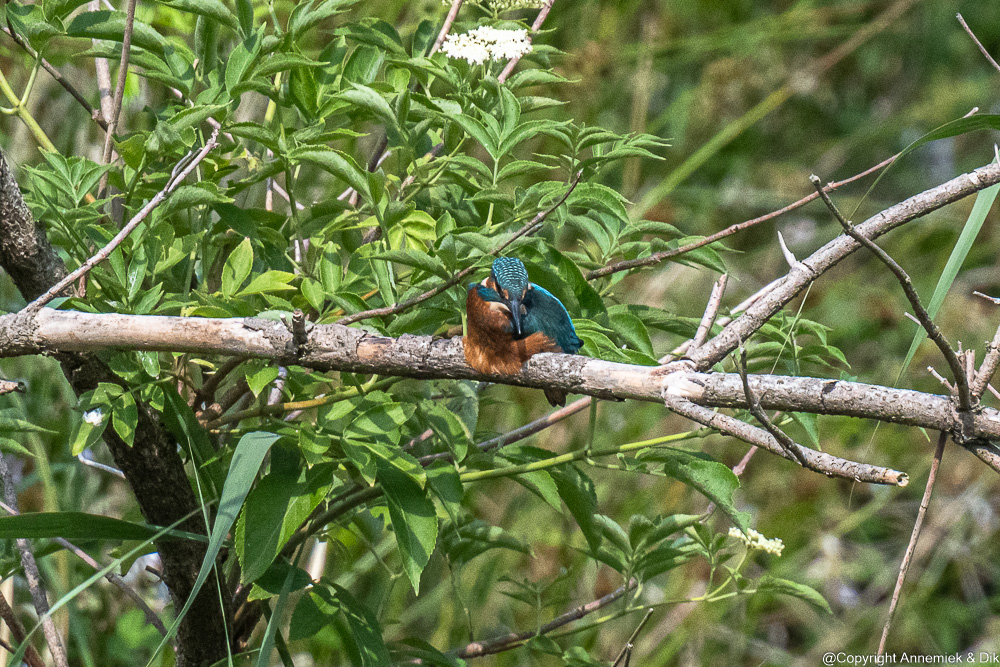
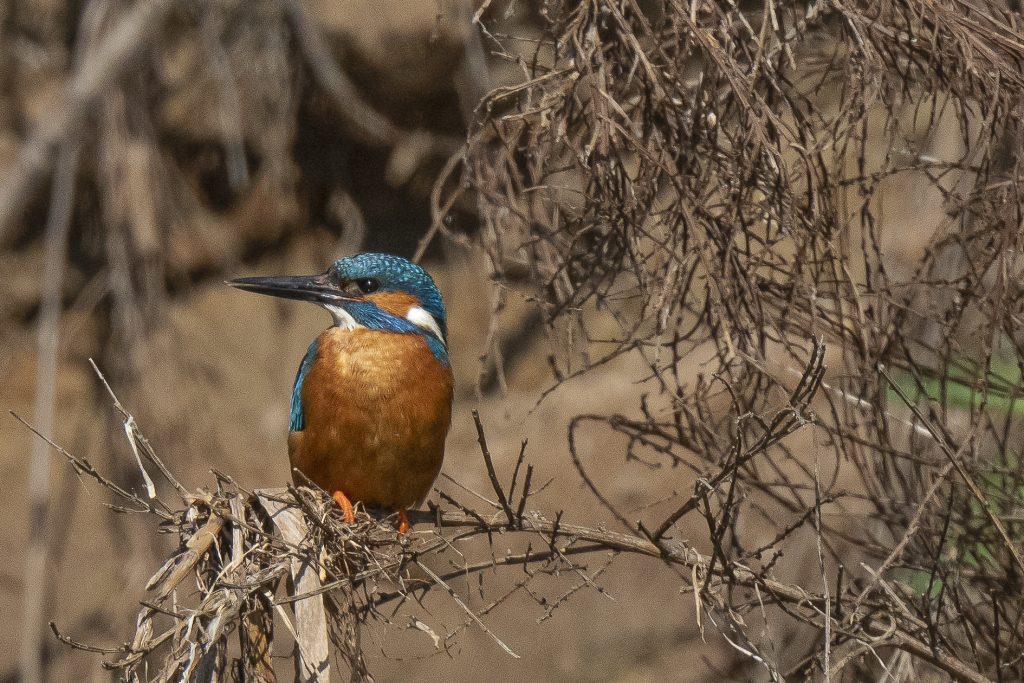
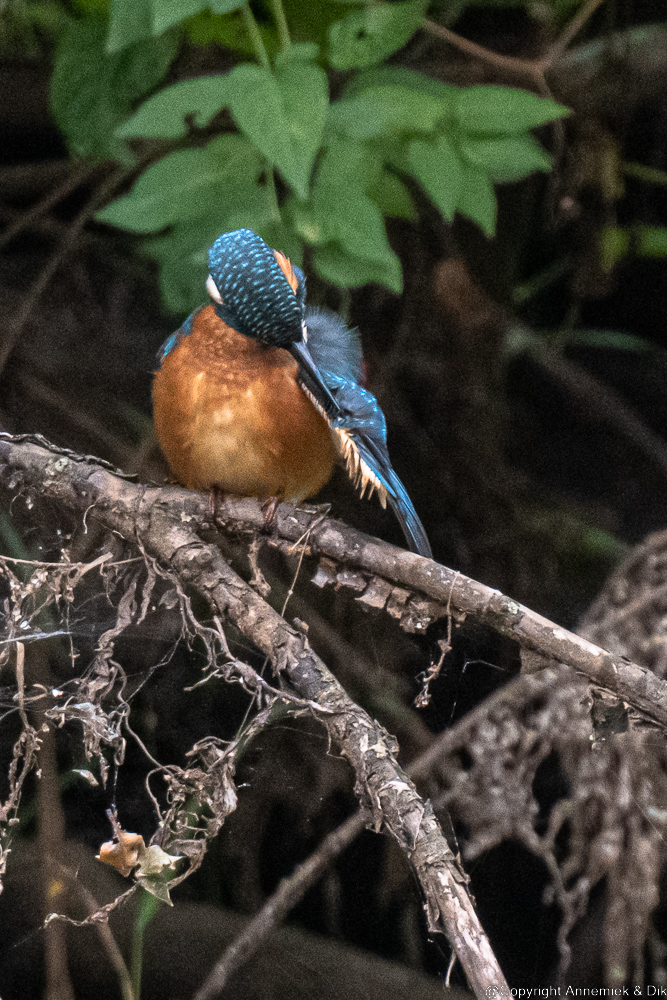
Sample picture 2 Kingfisher at 27 meter shows three things: 1) the substantial quadratic benefit of 10% shorter distance, 2) the also substantial quadratic effect of 1500 equivalent over 1050mm equivalent. 3) the fact that cloudy wheather hardly affects level of detail but does affect light contrast and colour depth. Crop 1650 x 1100.
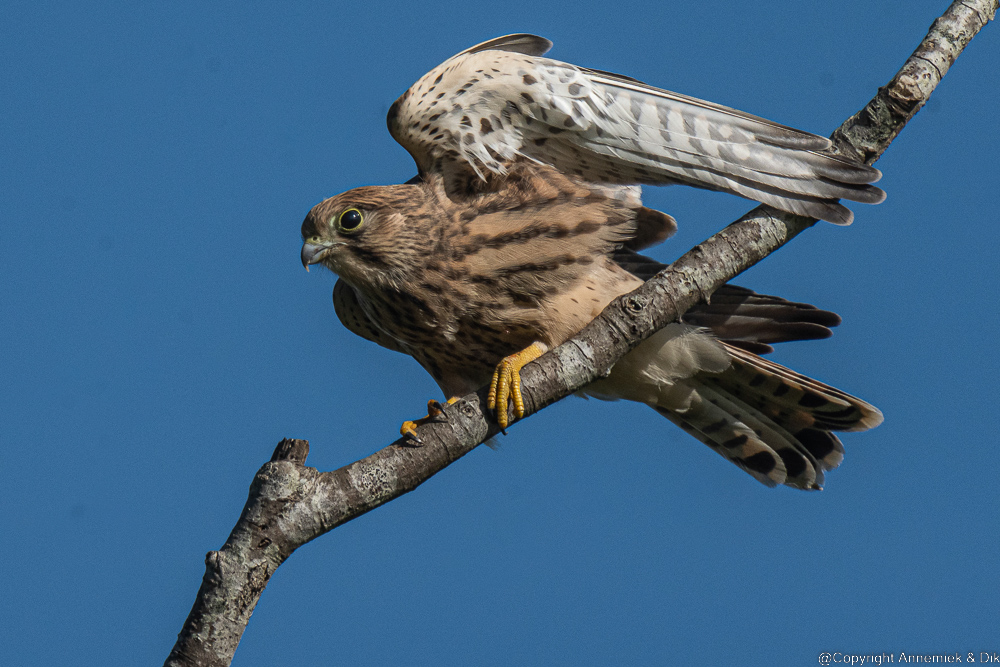
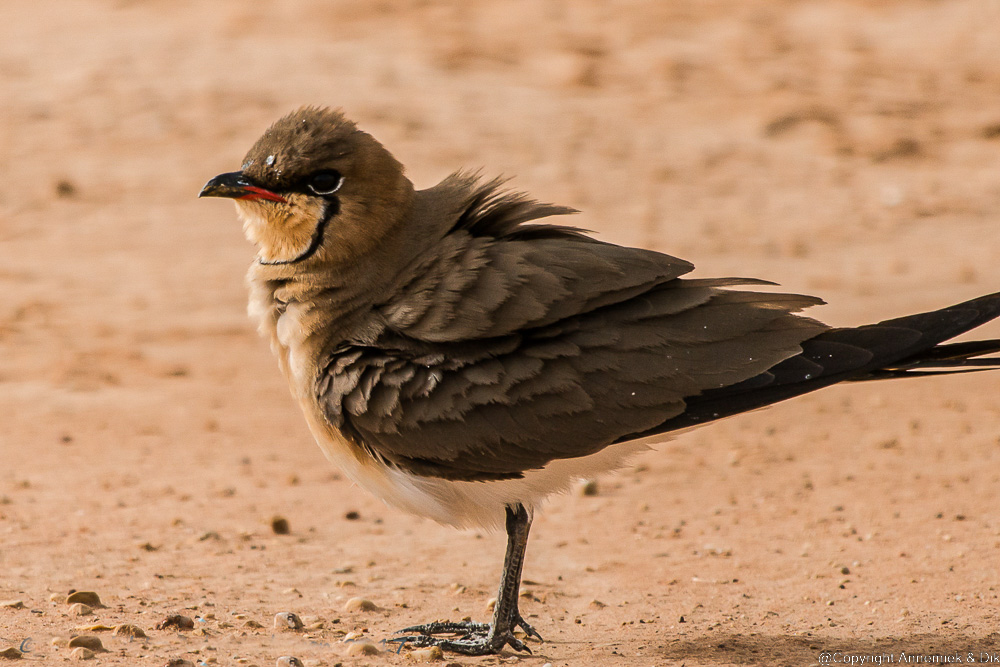
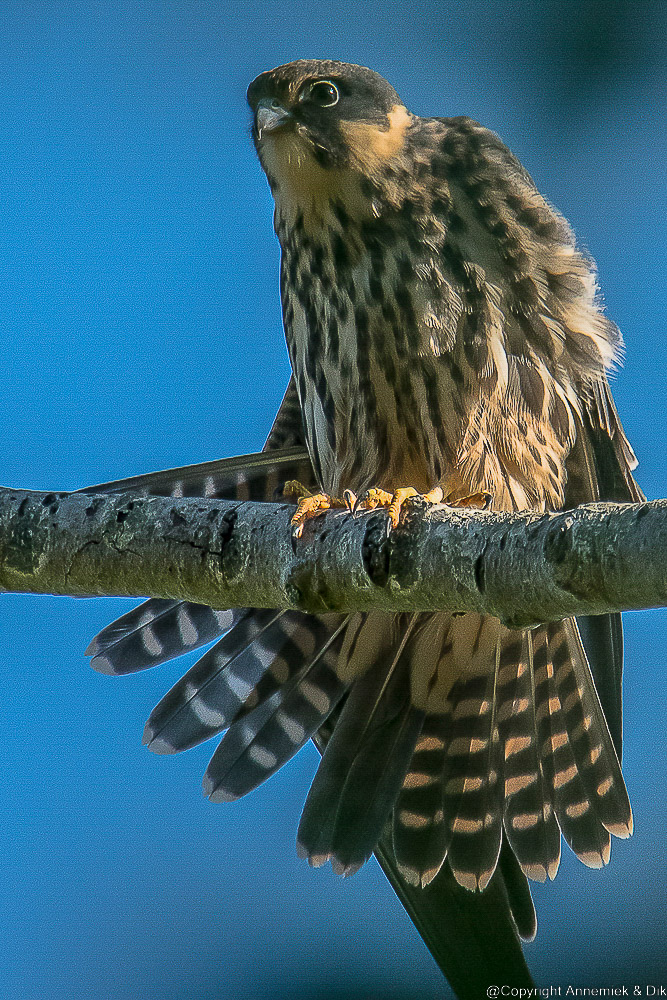
Sample picture 3 Kestrel at 35 meter: you can shoot perfect detailed pictures at 35 meter of larger birds like Kestrel with combination 1050mm equivalent using pro quality Nikkor 500mm f/5.6E PF VR. Crop 1650 x 1100.
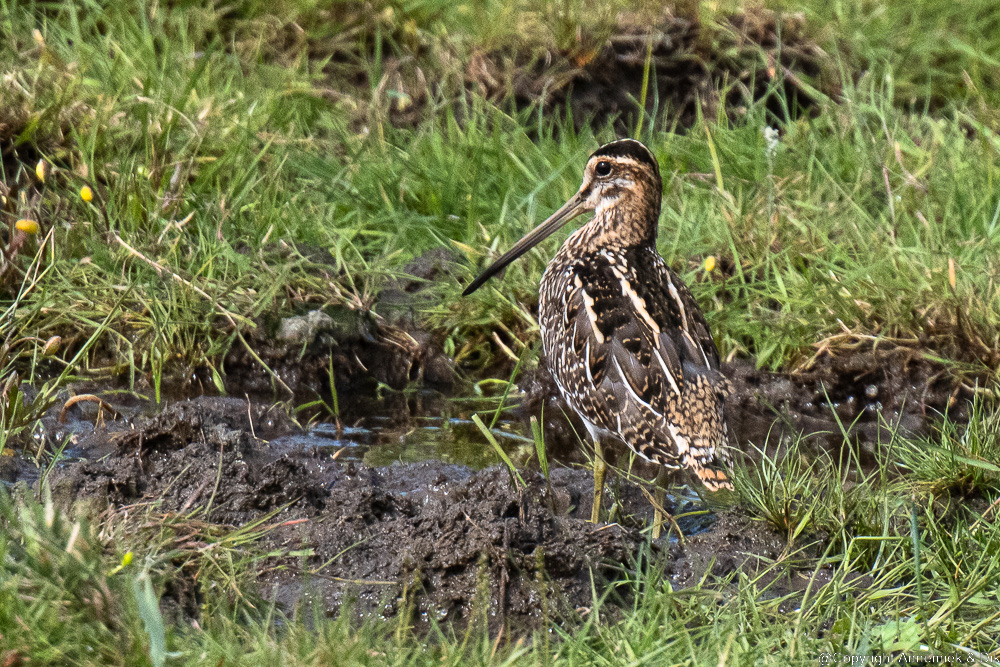
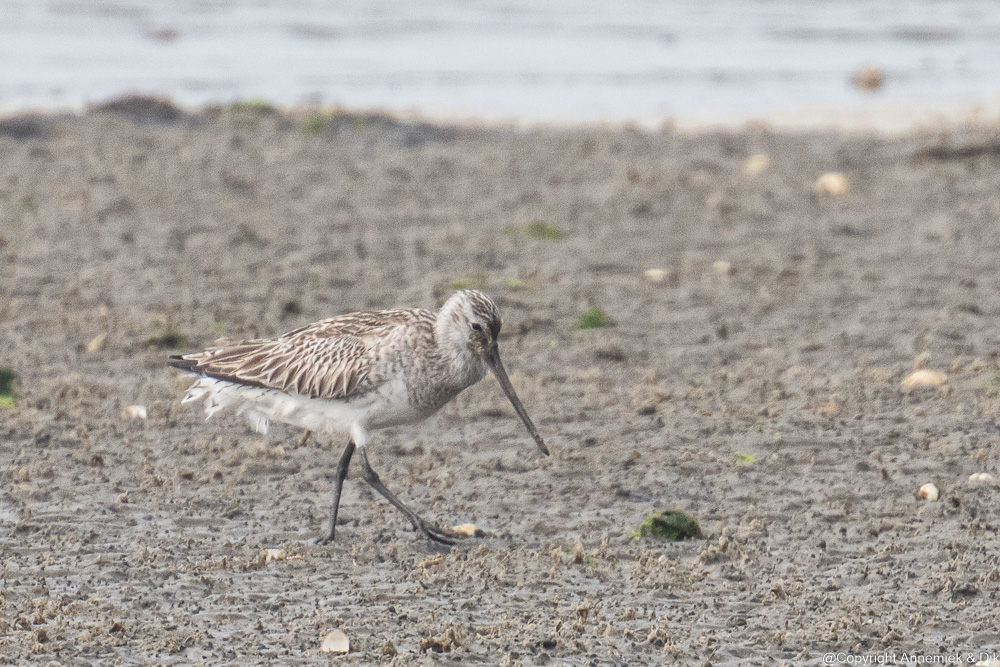
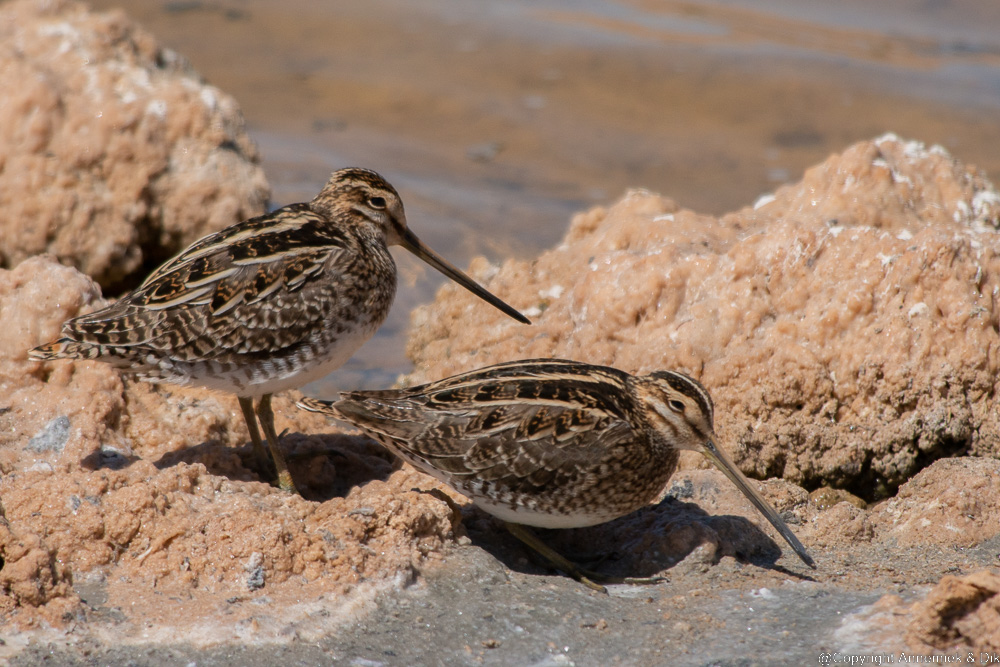
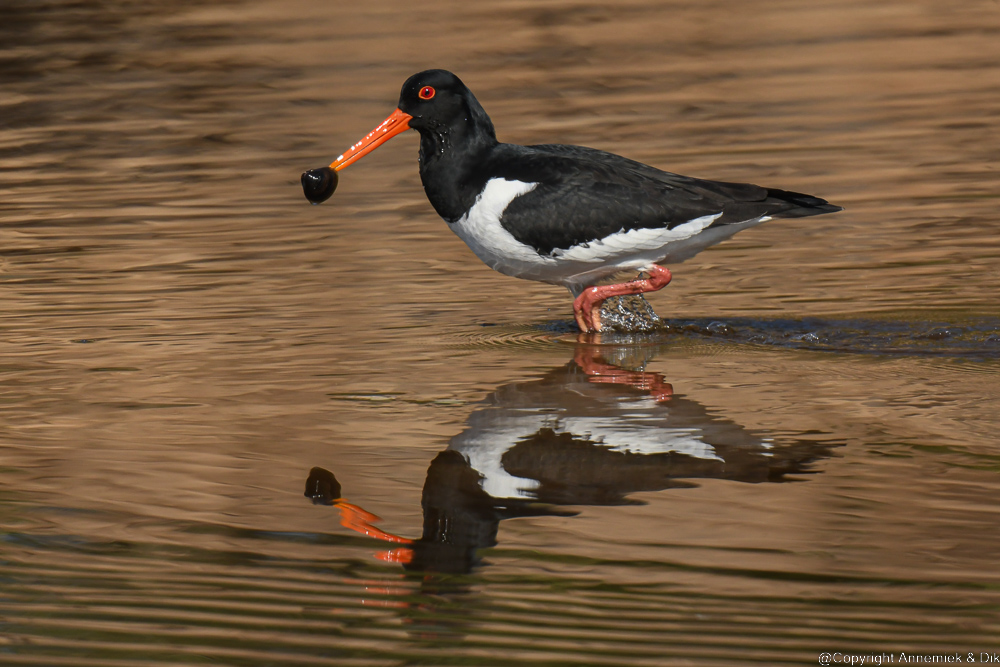
Sample picture 4 Snipe at 25 meter we shoot with our favourite long distance-combination Z50 Nikkor 500mm f/5.6E TC-20E III equivalent 1500mm perfectly detailed colourful pictures at 25 meter and up of larger birds like this Snipe. Crop 2400 x 2600.
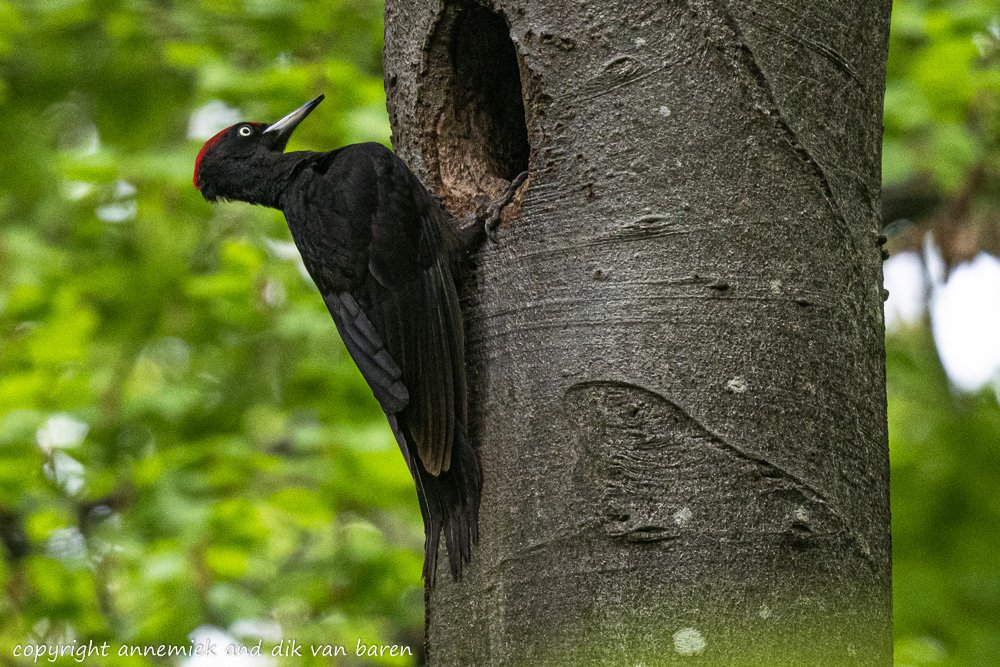
Standard picture 5: Black Woodpecker at 35 meter: cloudy size 50cm equivalent 750mm fits within image frame not using a converter. Z50 Nikkor 500mm f/5.6E PF VR. Crop 2400 x 1600.
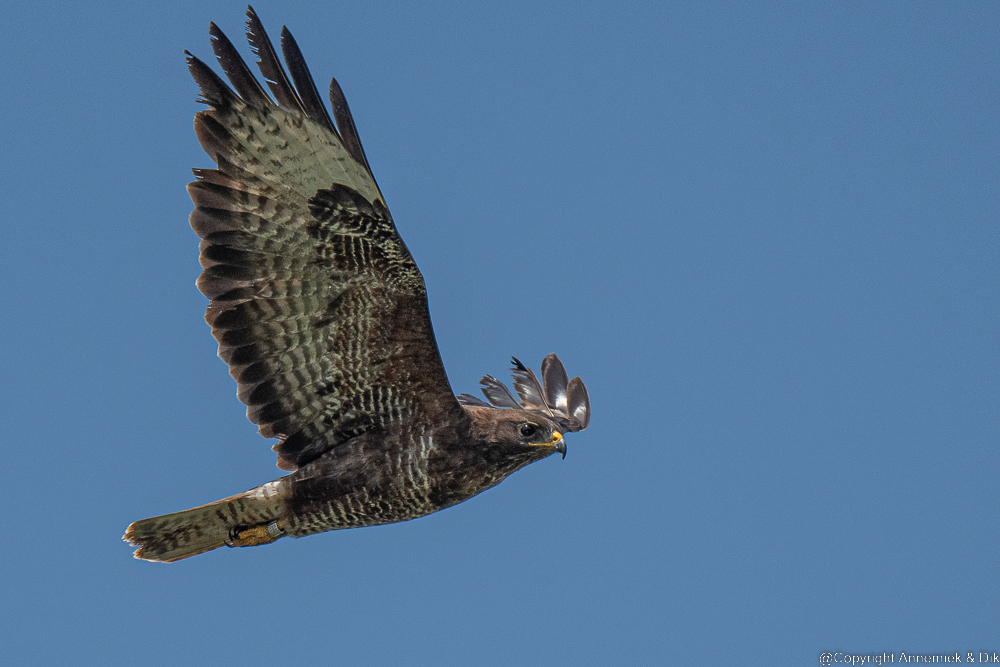
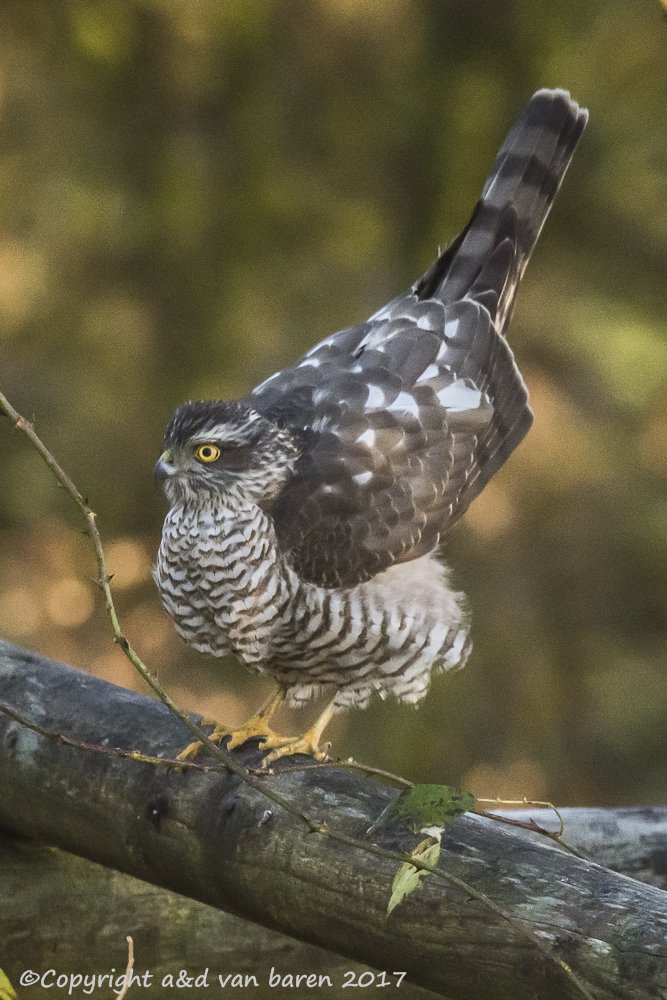
Sample picture 6: Holland Buzzard (buizerd) sun size 55cm distance 50m equivalent 1050mm D500 Nikkor 500mm f/5.6E PF VR. Crop qqqq x qqqq.
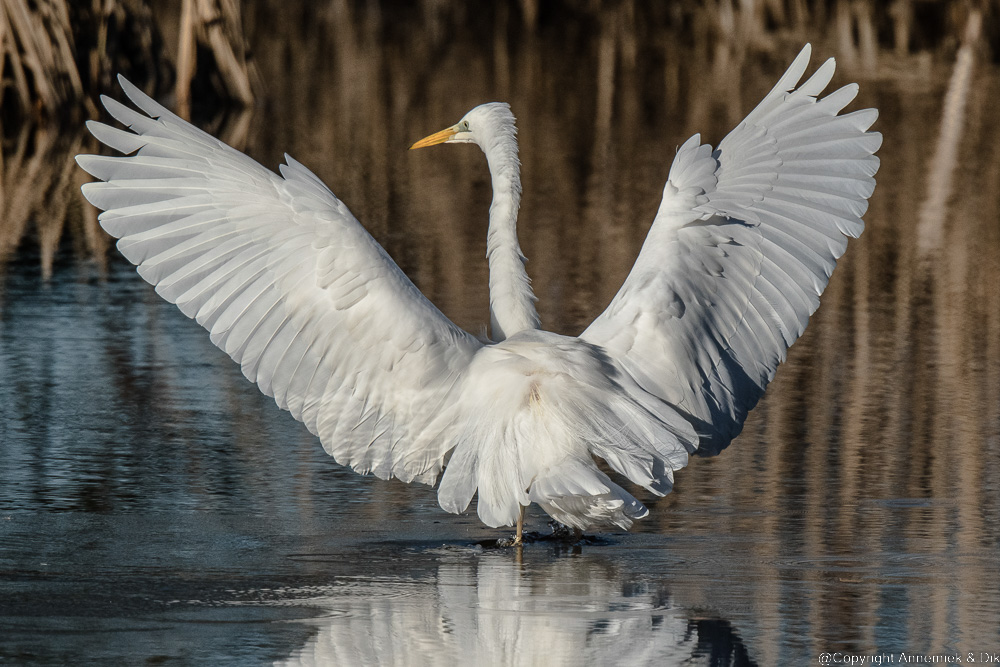
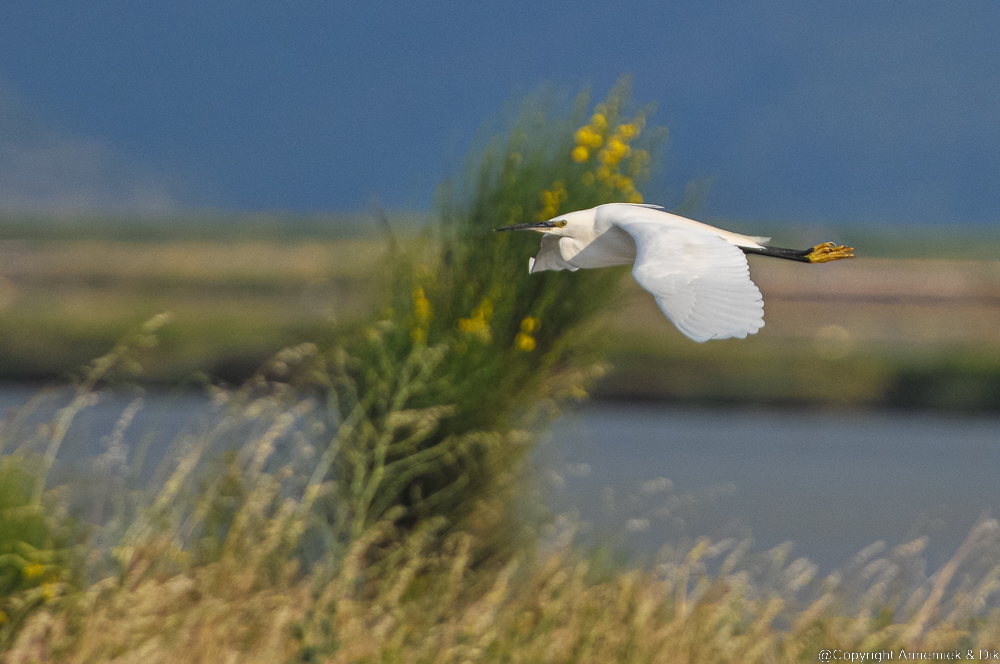
Sample picture 7: White Heron at 40 meter: satisfactory detail and perfect colour contrast even at larger distances with D500 Nikkor 500mm f/5.6E PF VR. Crop 1000 x 667.
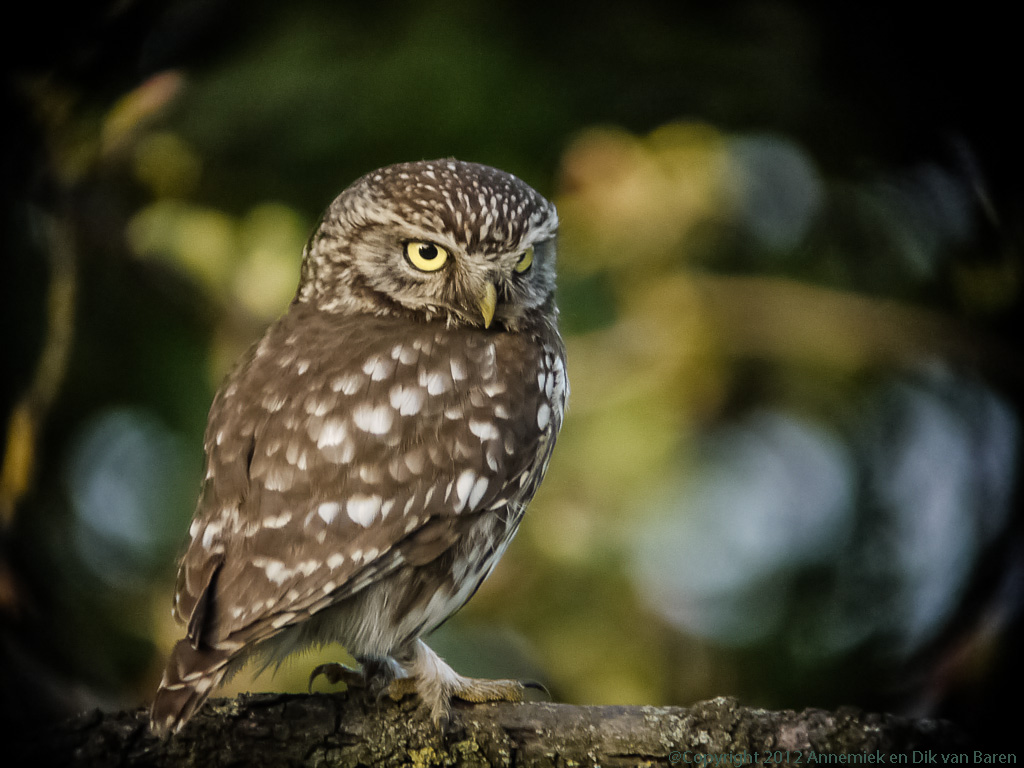
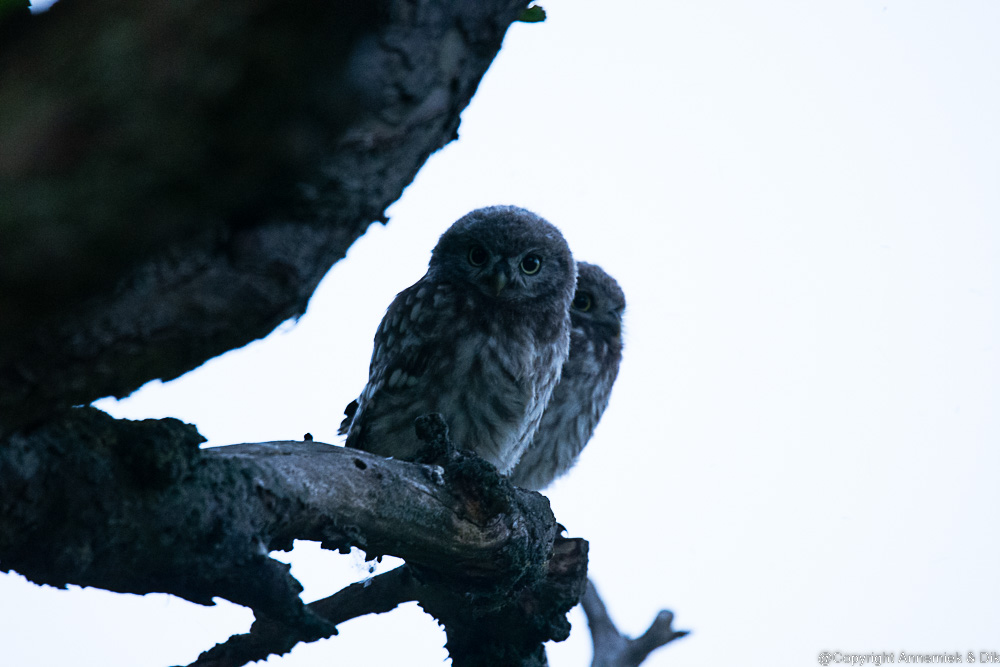
Sample picture 8: Little Owl juveniles at 12 meter demonstrates that shooting near full darkness using tripod is quite possible even at /15 second. Crop 1000 x 667. Manual focus may be required!
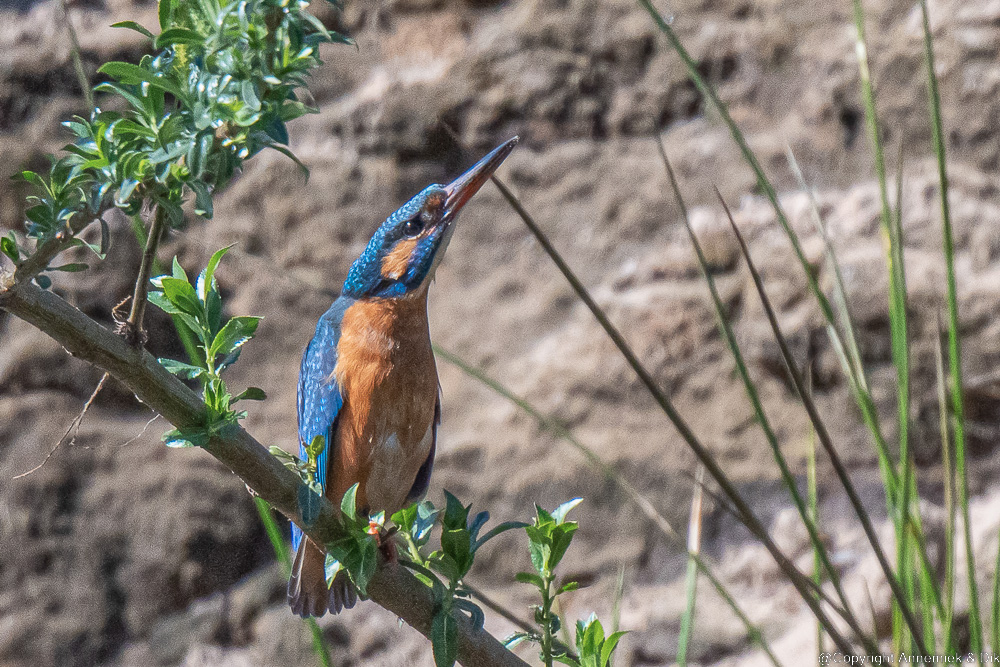
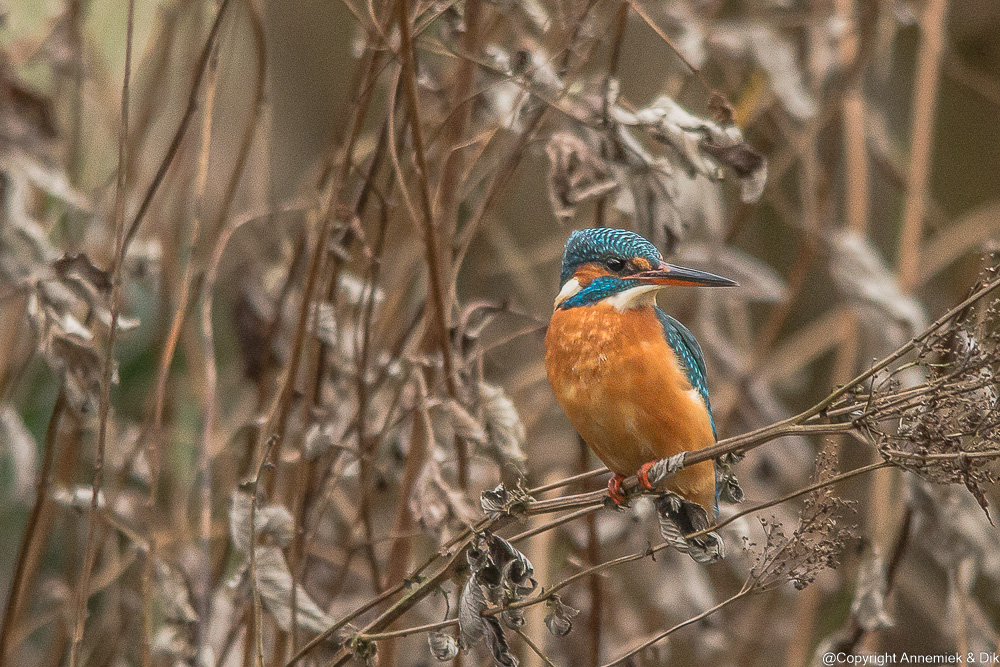
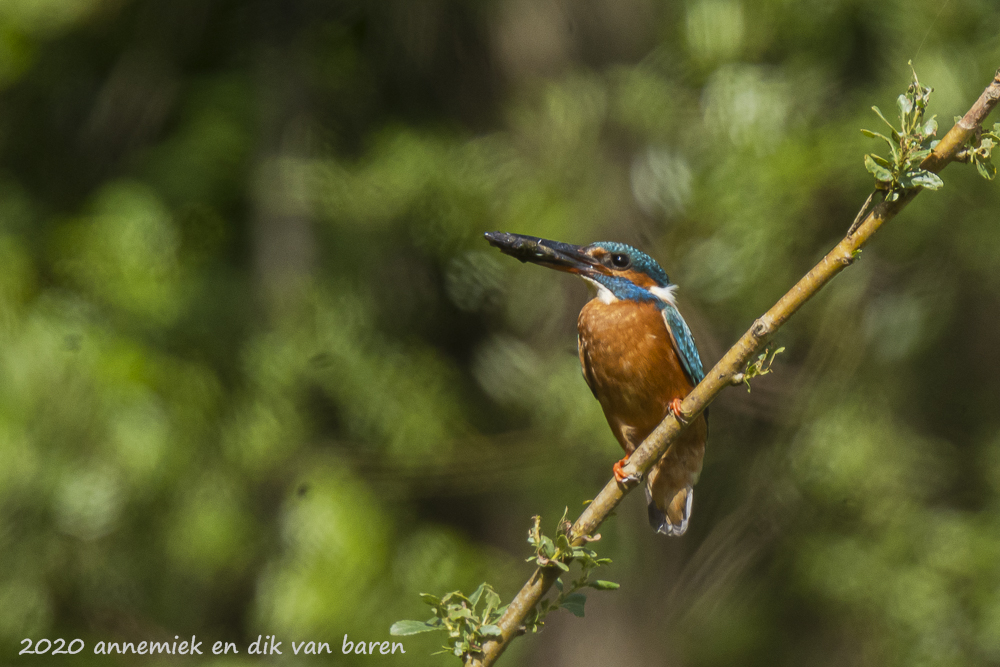
Sample picture 9: Kingfisher (IJsvogel) at 35 meter sun size 16cm within digiscoping range equivalent 1500mm sun Z7 DX Mode Nikkor 500mm f/5.6E PF VR substantial camouflage 1/2000 second f/11 -1.0 EV ISO 560. Crop 1800 x 1200.
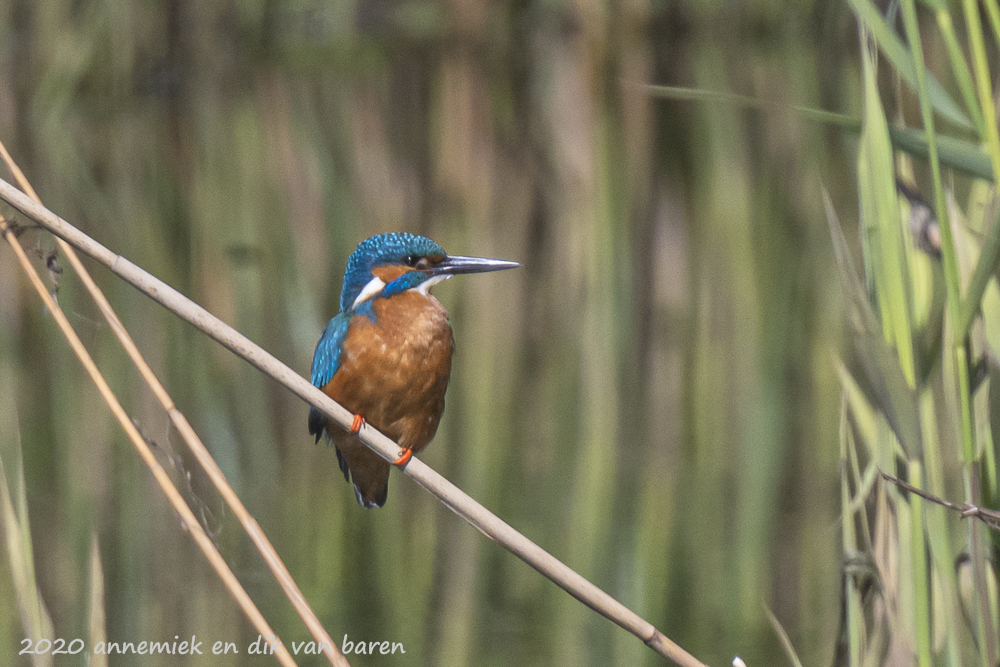
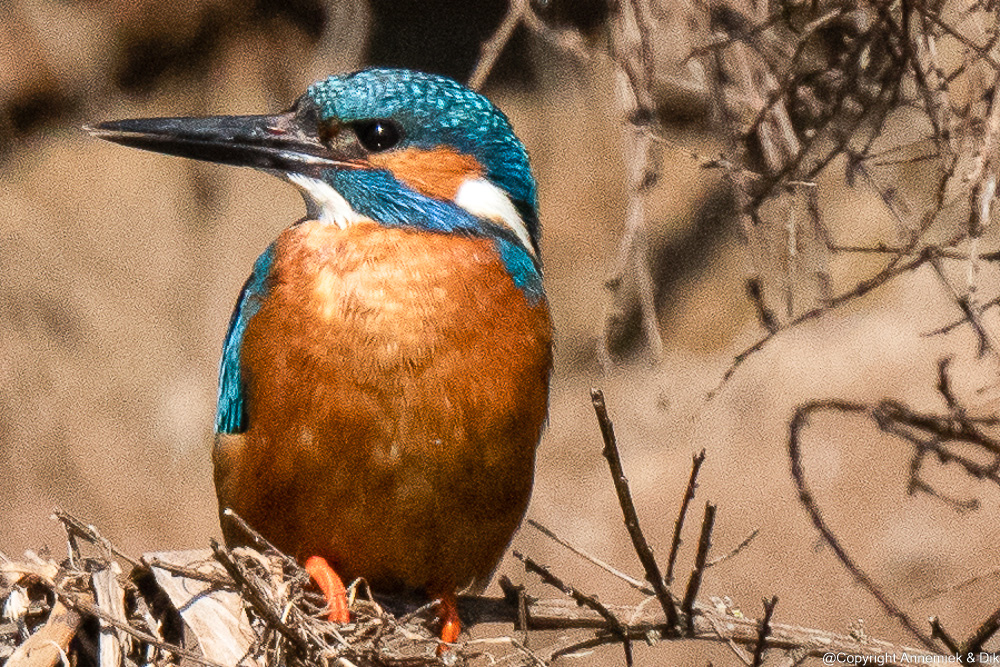
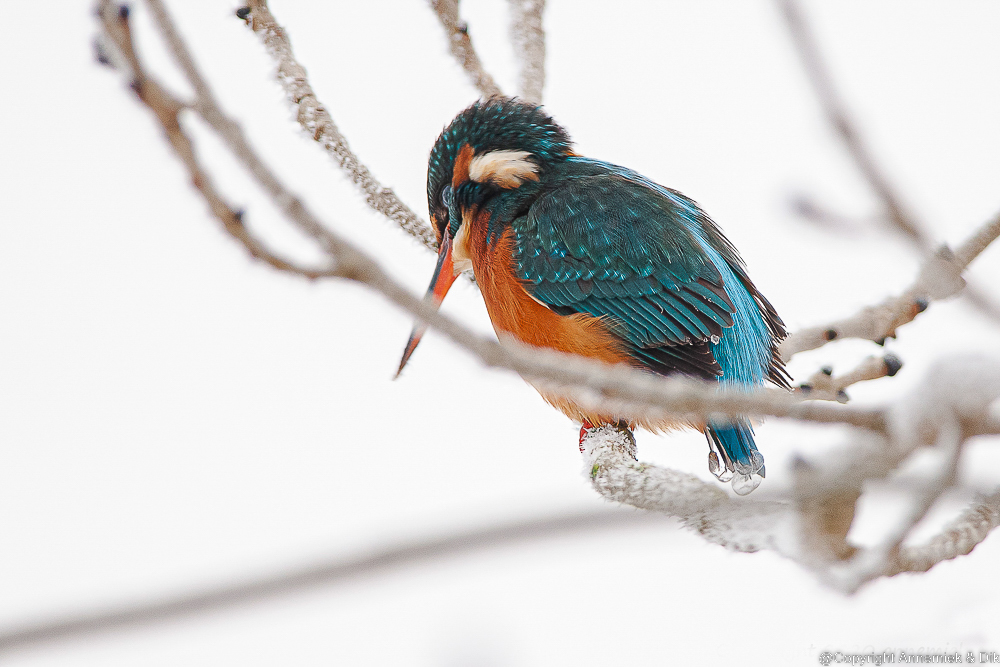
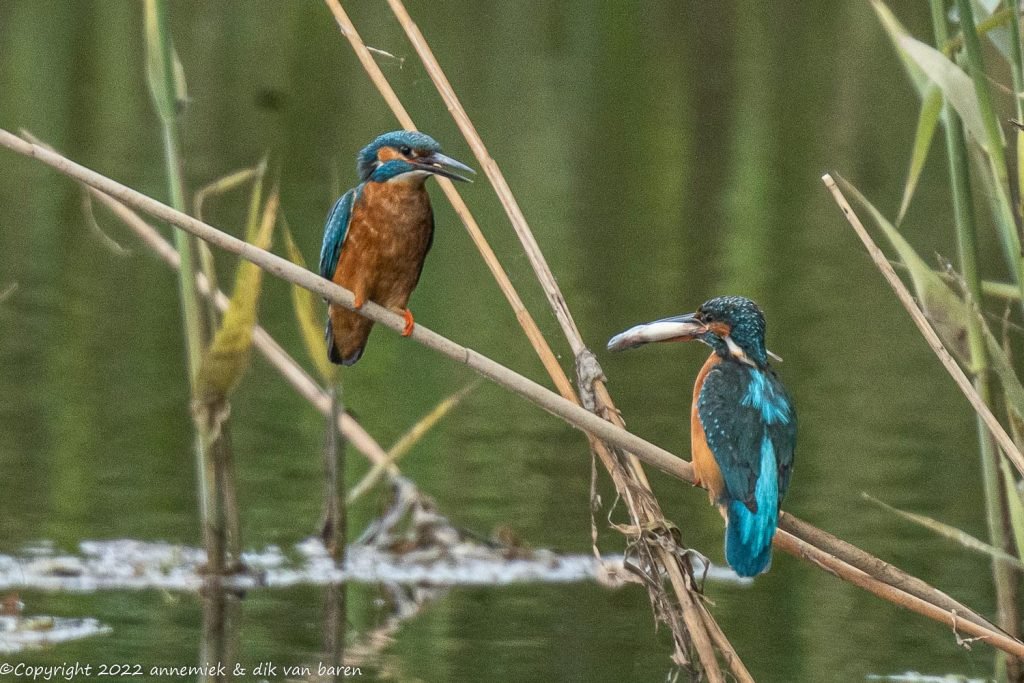
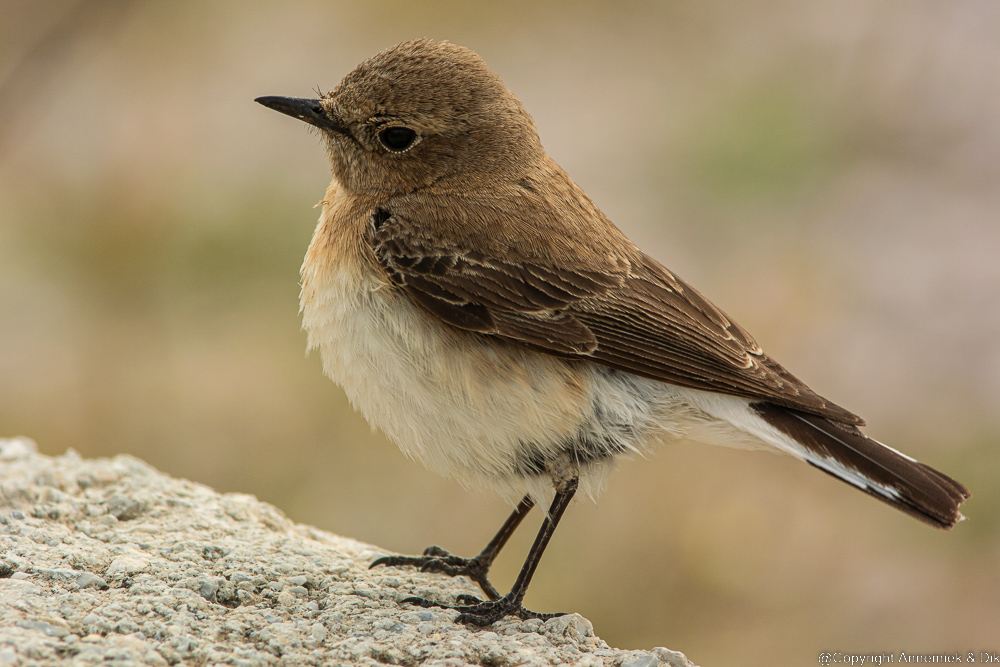
Sample picture 10: Kingfisher at 21 meter size 15cm exceptionally clean atmosphere (after lockdown) splendid detail, light and colour depth. Crop 1500 x 1000.
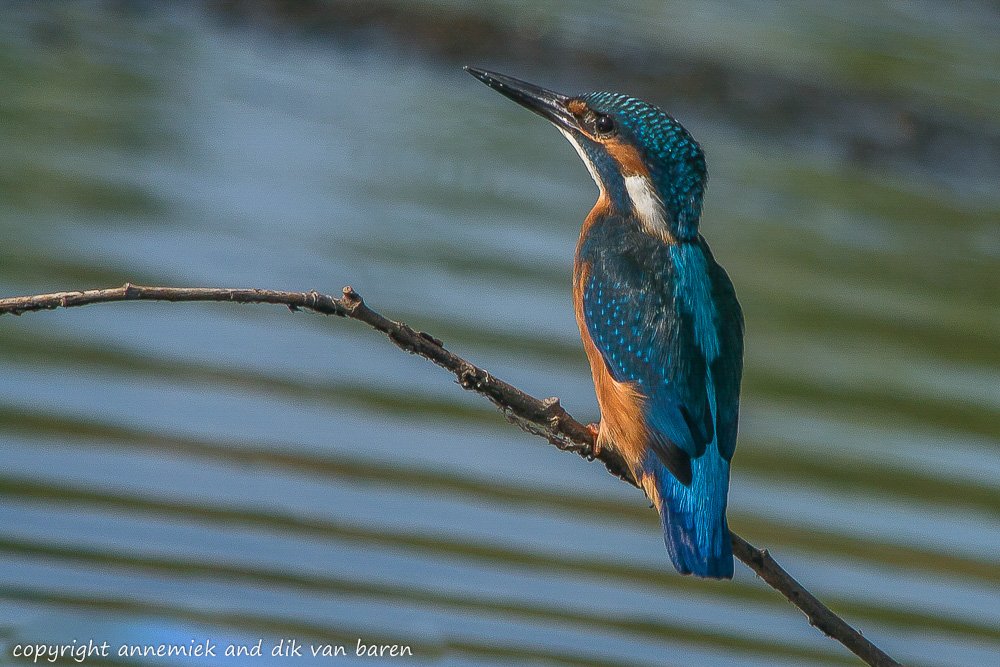
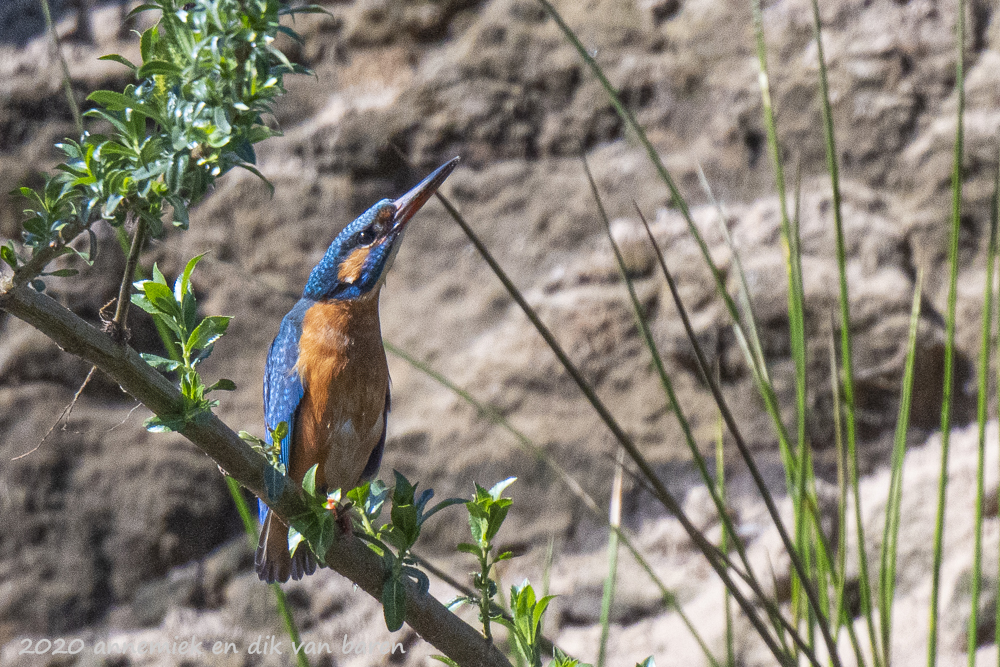
Standard picture 11: Kingfisher at 35 meter size 16cm equivalent 1500mm sun Z7 DX Mode Nikkor 500mm f/5.6E PF VR 1/2000 second f/11 -1.0 EV ISO 560. Crop qqqq x qqqq.
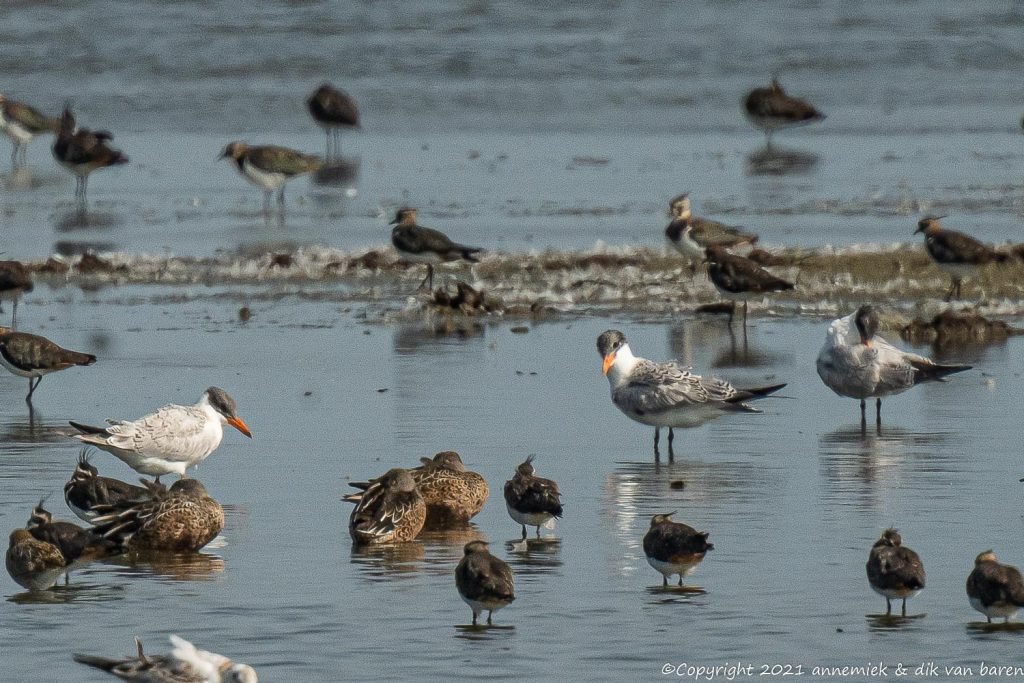
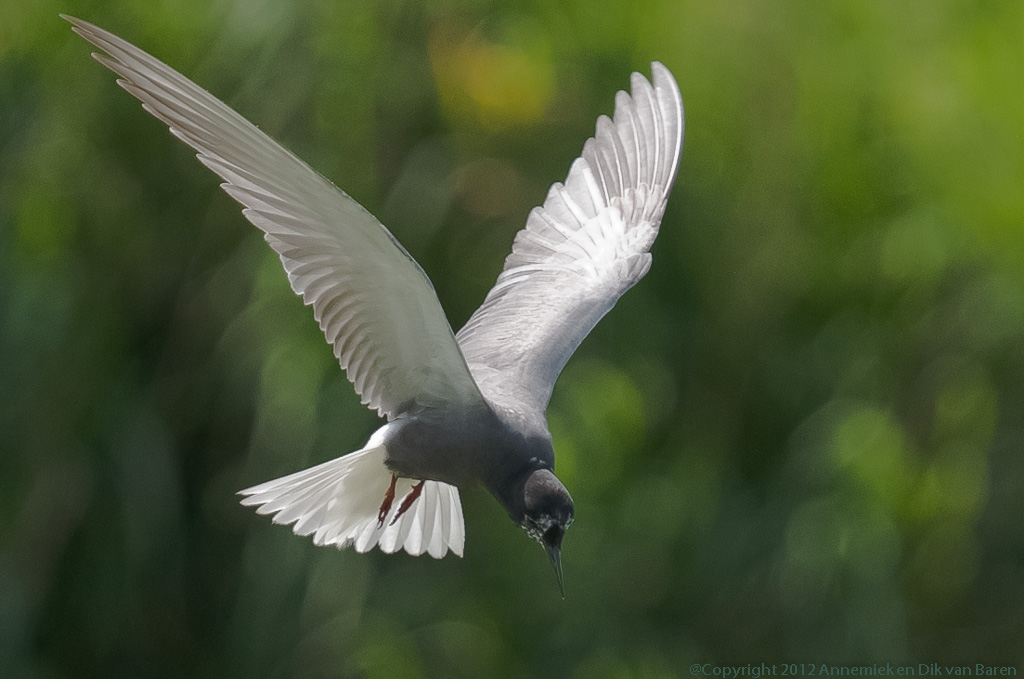
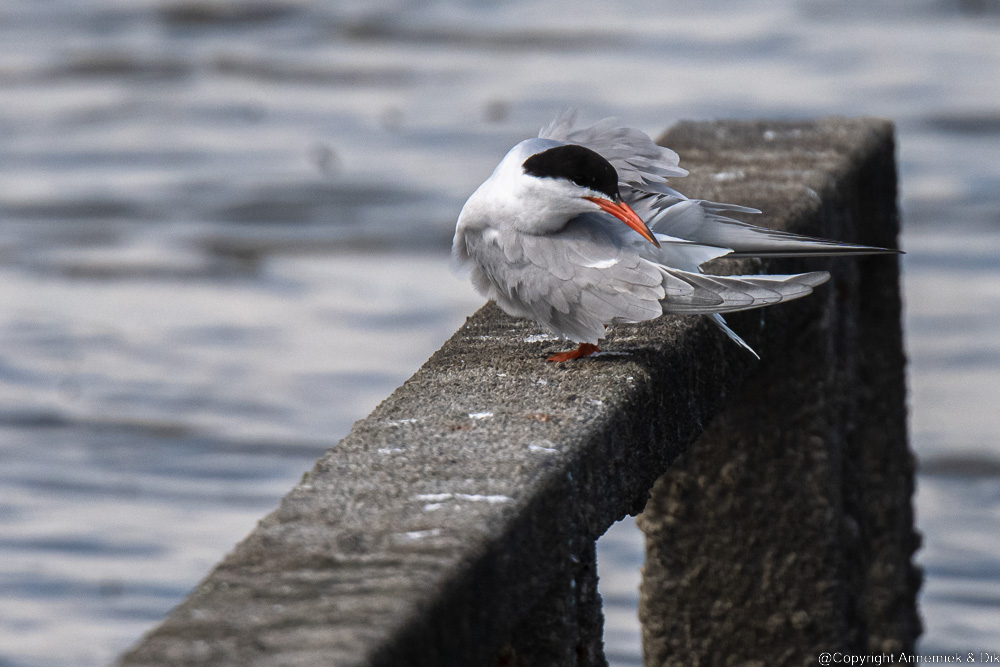
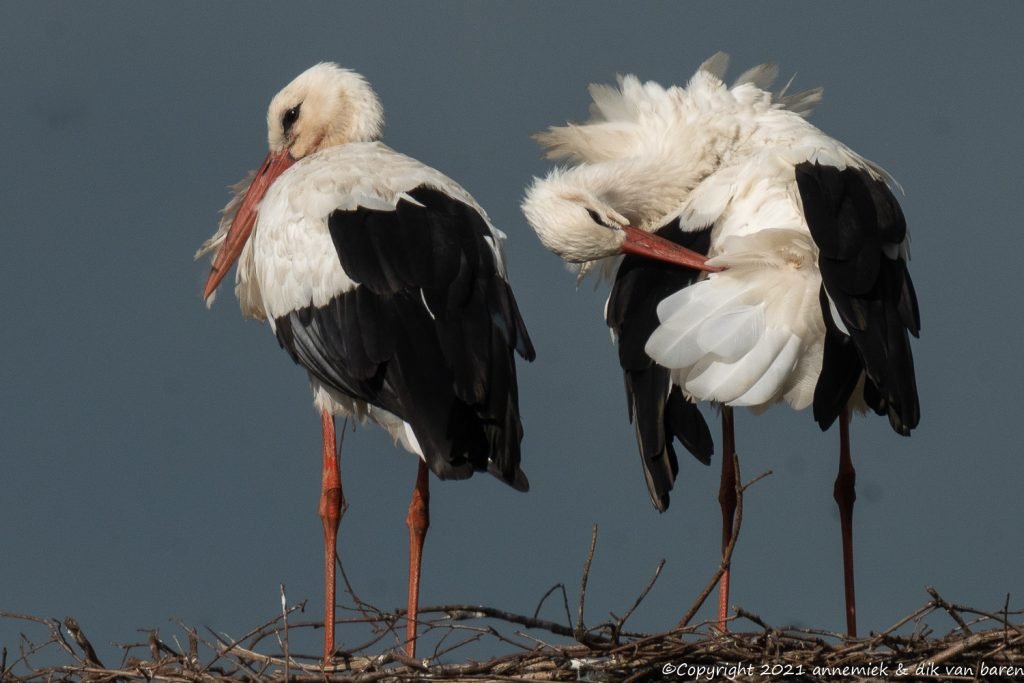
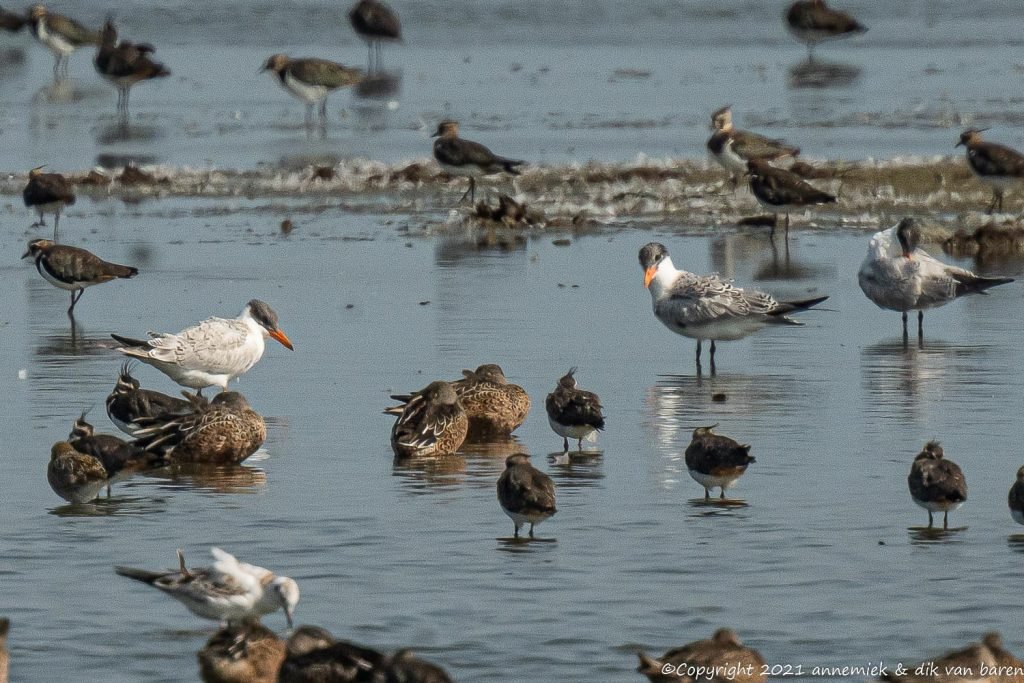
Sample picture 12: BORDERLINE CASE reach Caspian Tern adult & juveniles at 100 meter sun size 51cm equivalent 1500mm Z50 Nikkor 500mm f/5.6E PF VR TC-20E III insufficient but amazing detail of this equipment. Crop qqq x qqq.


Reach PART II: quantifying reach using BENCHMARK PICTURES
First of all …
To understand the following more or less theoretical text it really helps when you first try to imagine in detail what you precisely are doing when start editing you picture for example in Lightroom:
You open the file, let’s say a picture of a Kingfisher (IJsvogel), size 15cm, distance 30 meter and create a virtual copy of it, not yet a real edited picture nor JPG file file but only a prescription to create it. Lightroom will eventually apply this prescription to a copy of your original picture and convert this one to a real JPEG file automatically, as soon as you export the virtual copy being the real edited picture. This file then can be displayed on a computer screen, printed on paper or other media, sent over the internet, etcetera.
During or before your editing you try to find the optimal level of cropping for this picture. This is an important step in the entire photographical process as you probably know. With a rather small bird like a Kingfisher, average size 15 centimeter, you may use a high level of cropping in order to create a relatively large image of the bird itself within the picture. Wit a rather large bird like a Black Woodpecker, average size 50 centimeter, you may try fit the birds image comfotably within the pictur frame leaving some room around the bird to avoid that the bird looks like being “locked up” within a too small frame. We usually try one of a standard set of crop sizes like 4800 x 3200, 3900 x 2600, 3000 x 2000, 2100 x 1400, 1600 x 1500 x 500, 1000 x 667 with DX camera’s like D500 and Z50. The second series of sizes is qqqq x qqqq, qqq … for Nikons FX format camera’s like D750, Z7 II and Z8.
More about Cropping
Look at these two largely different examples:
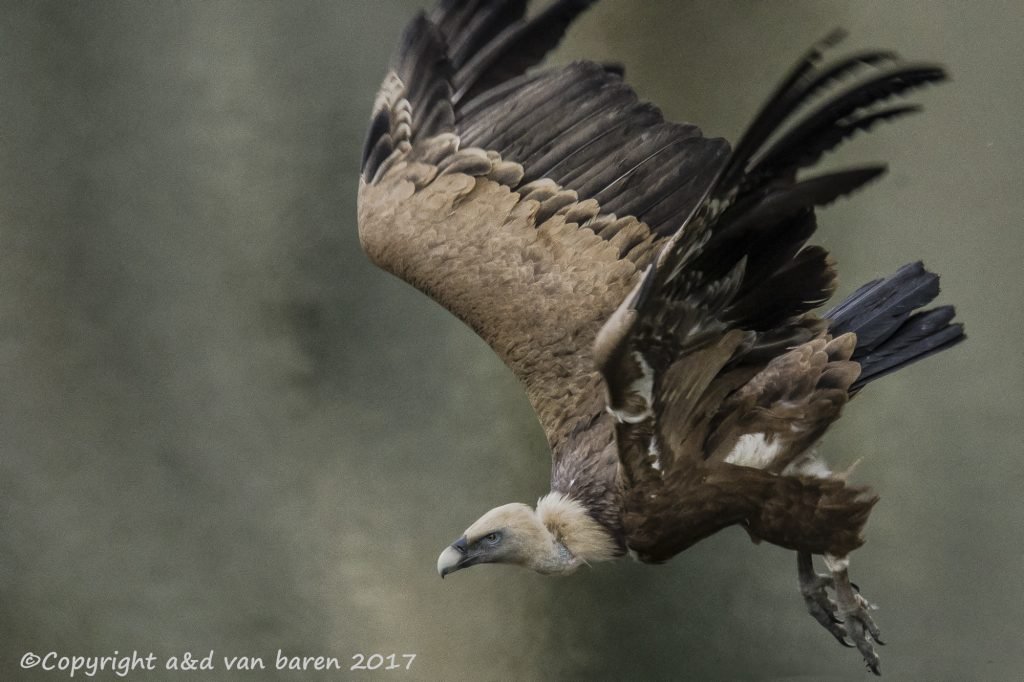
Of course the size of the birds image (determined by the level of cropping) in the cropped picture also determines the amount of pixels in the total picture. Usually a cropped picture of a small bird, for example Kingfisher contains less pixels than the crop of a larger bird-image like a Great White Heron (Grote Zilverreiger) or some Vulture (Gier):
We will get back to this subject below.
Using a benchmark picture (maatstaf voor bereik) when quantifying reach
First of all we need a well defined measure (maatstaf) for what we call satisfactory resolved detail like the “meter” for distance and the “second” for time.
For that purpose we define the following picture of a Kingfisher (IJsvogel) size 15cm distance 30m photographed using equipment with equivalent 1050mm in direct sunlight as our benchmark. This picture, cropped to 2100 x 1400 pixels contains what we call satisfactory resolved detail. Any bird picture we produce that contains an equal or larger amount of detail than this picture, BEING our “benchmark picture”, contains a satisfactory amount of detail, according to our standard. You may very well chooss another picture and another level of resolution as being your standard of satisfactorily resolved detail.

By the way the bird fills about on third of the full image frame. In bird photography one usually leaves some space between the subject bird and all image borders, avoiding to “lockup the bird up in a tight box”.
The cropping level 2100 x 1400 pixels used in our benchmark picture will be the cropping level for all our other pictures below for relatively small birds using this type of 1050mm equipment. More cropping will cause insufficient detail according to our personal standard. As mentioned before thisis this is a personal subjective matter. We though feel that more cropping than this level will degrade image quality too much. This 2100 x 1400 pixels level is our optimal standard cropping level for all relatively small birds like Kingfisher, Starling, Bee-eater, Buntings, Pipits, Swallows and the like. All crops of this level will satisfactory resolved detail (lower cropping level).
Our personal choice when defining this, our benchmark picture of a Kingfisher (IJsvogel) at distance 30 meter, was using a crop 2100 x 1400. Cropping more would result in more noise and less contrast, cropping less would not show a satisfactory amount amount of resolved detail of te bird itself.
Now we can calculate reach in any of our pictures as follows:
| Reach = (actual size/15 x 30/actual distance x actual equivalent/1050)2 x amount of pixels crop x number pixels of benchmark picture. |
(Width)2 because: width and height of crop bird-image are being multiplied by factor (width crop)/(width crop benchmark picture).
| reach = the lowest level of cropping B x H of e.g. D500 or Z50 DX format 5568 – 3712 pixels from high to low: 4500 x 3000 or 3000 x 2000 or 2700 x 1800 or 2100 x 1400 or 1800 x 1200 or 1500 x 1000 pixels which, when the picture is magnified to print size A4, still results in a picture which has satisfactory detail in the bird image wihtin that picture (to our personal taste). |
| Reach = (actual size/25 x 10/actual distance x actual equivalent/750)2 x (width crop actual picture/width crop benchmark picture )2 % of amount of pixels benchmark picture. |
Our working definiton of reach (bereik)
reach = the lowest level of cropping B x H of (e.g. out of total range D500 or Z50 DX format 5568 – 3712 pixels) e.g. from high to low: 4500 x 3000 or 3000 x 2000 or 2700 x 1800 or 2400 x 1600 or 2100 x 1400 or 1800 x 1200 ot 1500 x 1000 pixels which, when the picture is magnified to print size A4 still results in a picture which has satisfactory detail in the bird image wihtin that picture (to our personal taste).


This choice of cropping level is relevant and important because when you will compare with this benchmark picture, other pictures of Kingfisher or other species shot with equivalent 1050mm size arout 15cm at distance about 30 meter, they will also have either more or less amount of satisfactory resolved detail.
Of course a 4500 x 3000 cropped picture will contain significantly more pixels, in fact 1.350.000, of the subject bird than a picture cropped to 1000 x 667 pixels: 667.000. Because this level of cropping appears to work out quite differently in case of different bird sizes we will use five different benchmark pictures determining the optimal cropping level for five size-categories:
This question continues to create confusion: “Does a Nikon full frame camera have more reach when operating in so called FX mode (full frame format 36 x 24 mm) compared to working in in DX mode (APS-C format 24 x 16 mm)? The answer is No!
To visualise th level of cropping of our benchmark picture we show also the original non-cropped picture below also:
Does the size of image sensor contribute to reach?
Look at the diagram below. A full frame camera in DX mode will hard crop, in other words “cut”, a 24 x 16 mm image area out of the full frame sensor area. However, when you switch the camera in FX mode, you can in post production, using software like Lightroom, “soft crop” a similar area of 24 x 16 mm (APS-C format) out off the full frame sensor image area at any position you choose, centre, corner, along one of the sides, anywhere. This “soft cropped” portion will always have exactly the same resolution wherever it has been cut out off the full frame sensor image and always contain exactly (16 x 24)/(24 x 36) = 4/9 of the total amount of pixels of the full frame sensor.
Your soft crop will always have the same resolution in pixels/mm2 like any picture created by this camera, either in DX mode or in FX mode. So”full frame” does not mean more reach, it means that in total more pixels are available to select any APS-C format area. Try it if you want to be sure. We did so years ago with our first full frame camera D800. Look for example at next picture using the wonderful full frame D800.
Choosing cropping levels and our personal best choice of cropping level
All crops of the original benchmark picture of the Kingfisher above, if less cropped, will have a lower amount of satisfactory resolved detail and all crops, more cropped, will contain possibly more noise and not enough satisfactory resolved, not clear, not brilliant detail according to our personal critereria. In other words our benchmark picture and cropping level together are defining our upper limit reach and cropping level for this size of bird according to our personal critereria. Other pictures of birds of similar size 15cm at distance 30 meter shot with equivalent 1050mm will have less satisfactory resolved detail compared to this benchmark picture.
A “sufficient amount of pixels” is a rather vague quantity. So again we will use our benchmark picture to define this. In other words we will define four benchmark picture v for the optimal level of croppin for four different size classes of birds:
- exceptionally large: great white egret, vultures, storks, … .
- small: (our) eurasian kingfisher, house martin, red-rumped swallow, pipits, reed bunting …
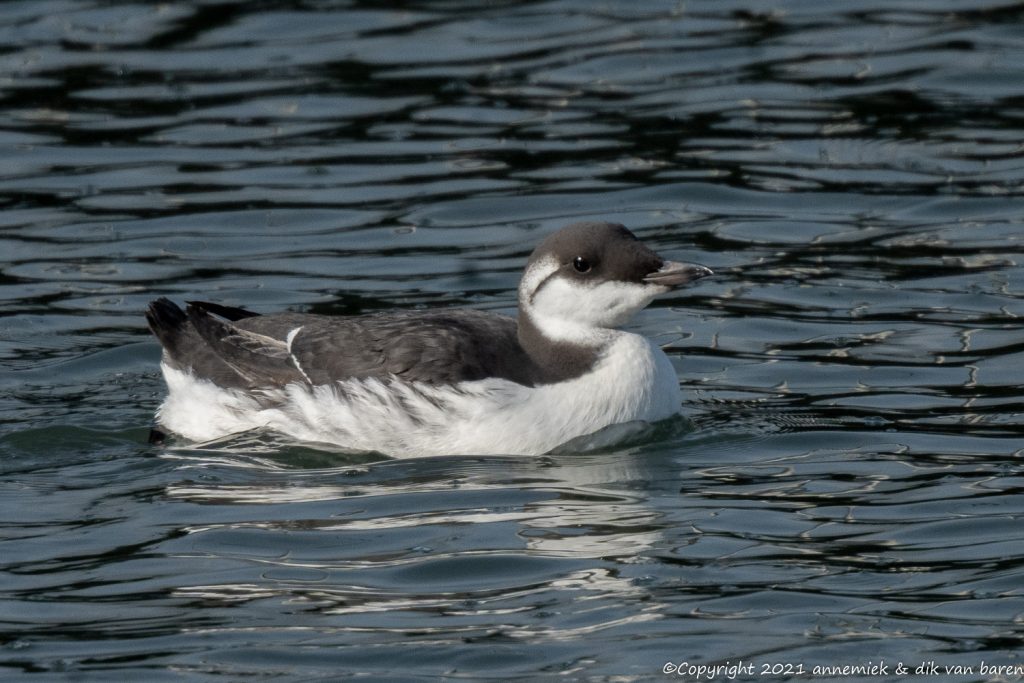
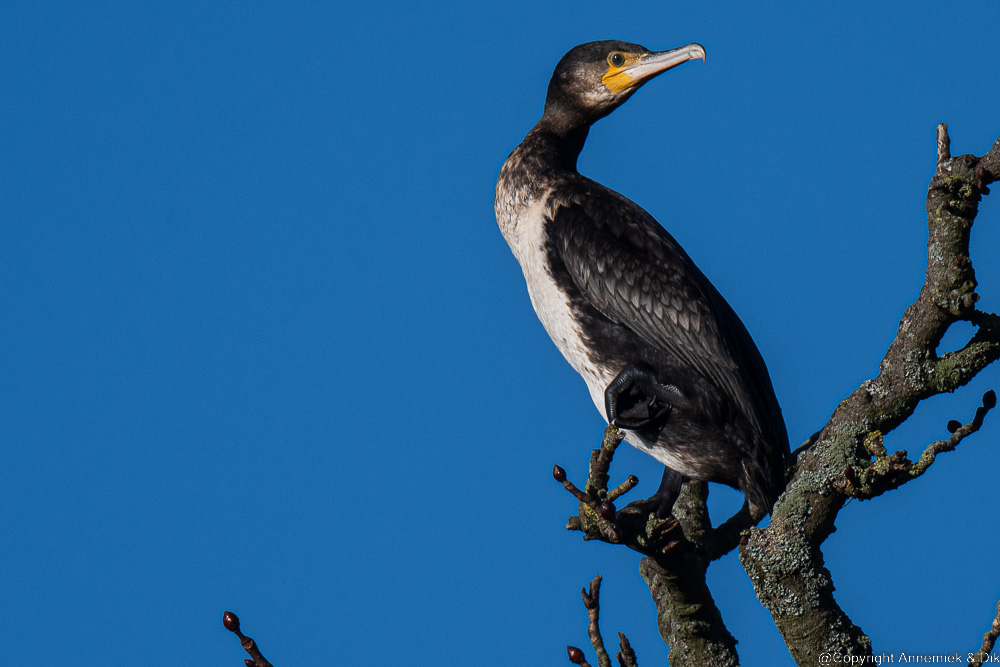
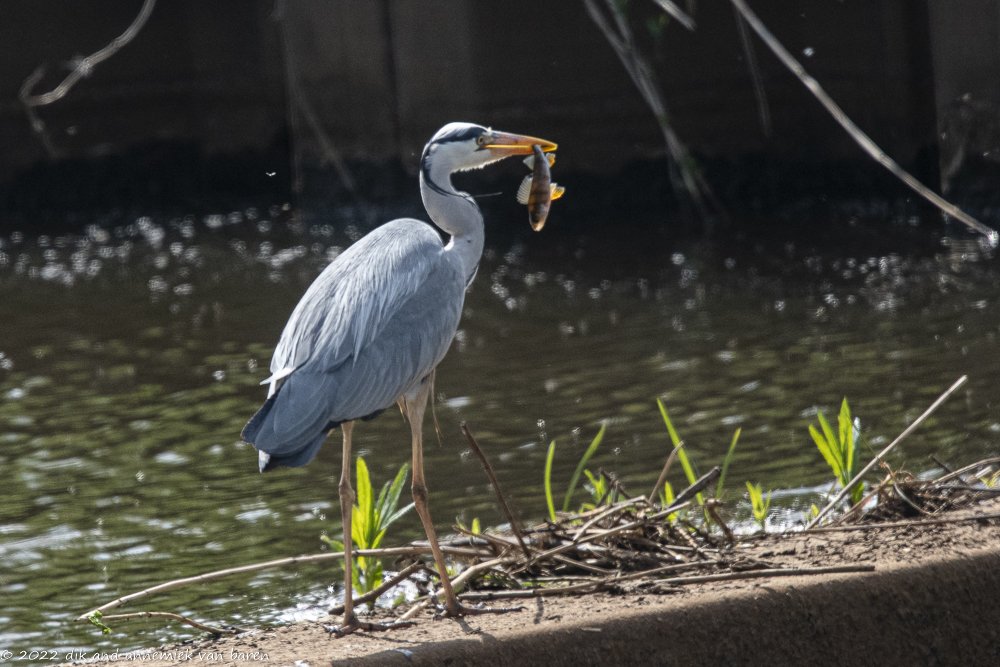
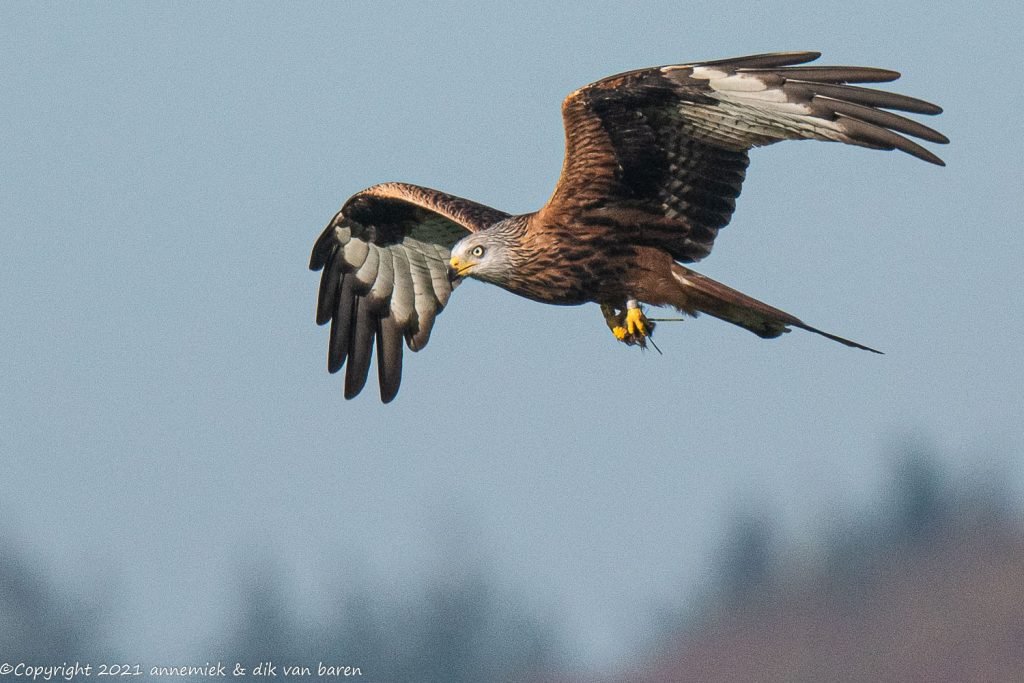
- large: cormorant, grey heron, small white egret, buzzard, red kite, …
- average: starling (spreeuw), song thrush (zanglijster), ouzel (beflijster), field fare (kramsvogel), …
Some examples
Example 1 of calculating reach. Let’s first try this formula out on some of our sample pictures to get more acquainted with the idea of comparing an actual situation with this one benchmark picture:
reach = (15/15 x 30/30 x 1050/1050)2 x (2100/2100)2 = 1.0 => 100% of the detail in our benchmark picture.
Of course the result in this example is that reach is equal to 100% of the amount of pixels in the benchmark picture. This is trivial but it also makes sense.
Example 2 calculating reach.
reach = (15/15 x 27/30 x 1500/1050)2 x (1500/2100)2 =>200 % detail benchmark picture. qqq
This evidently richer detail is a consequence of lower distance and larger equivalent. This testcase by the way also shows that cloudy wheather does not significantly affect the level of detail. It causes a somewhat lower light contrast and colour depth but does not sinificantly affect the amount of resolved detail. The picture thougs also clearly demonstrates the great quality of Nikkor 500mm f/5.6E PF VR and aspherical TC-20E III converter. We used no tripod and were relying on Nikkors 500mm vibration reduction only. Z50 has no in-body stabilisation. The resulting picture has technically great image quality and fantastic detail considering this size of bird, distance and cloudy wheather.
Example 3 calculating reach.
reach = (35/15 x 35/30 x 1500/1050)2 x (1000/2100)2 =>510 % detail benchmark picture.
reach = (35/15 x 35/30 x 1500/1050)2 x )1000/2100) x 667 x 20 MB/(24 x 16) =>510 % detail benchmark picture.
x 667 x 20 MB/(24 x 16) =>510 % detail benchmark picture.
qqq
Example 4 calculating reach.
reach = (25/15 x 27/25 x 1500/1050)2 x 2400/1200 => % detail benchmark picture.
Example 5 calculating reach.
Example 6 calculating reach.

Example 7 calculating reach.
Example 8 calculating reach.
About cropping, size bird and amount of pixels
Of course also the size of the bird-image in a cropped picture (with the bird more or less in its centre,) also determines the amount of pixels in the total picture. For example a 4500 x 3000 cropped picture will contain significantly more pixels of the subject bird than a picture cropped to 1000 x 667 pixels. Mind you: but both differently cropped pictures will still have he same resolution in pixels/mm2. However if printed or displayed on the screen the resolution of these media may chage the resolution. “Resolution” is a somewhat tricky subject.
Below we demomstrate this using examples of different bird species in five different categories of bird size:
- S small: (our) eurasian kingfisher, house martin, red-rumped swallow, pipits, reed bunting …
- AV average: starling (spreeuw), black bird (merel), song thrush (zanglijster), blue rock thrush (blauwe rotslijster), ouzel (beflijster), field fare (kramsvogel), redwing (koperwiek)
- L large: cormorant, grey heron, small white egret, buzzard, kites
- XL exceptionally large: great white egret, vultures, storks, etcetera.
(adik add above “proportionally” qm)

reach = (15/15 x 30/30 x 1050/1050)2 x 2100/2100 = 1.0 => 100% of the detail in our benchmark picture.
Reach-formula using our benchmark picture
About resolution
The resolution of a picture usually changes when the picture is printed on a printable medium or displayed on a screen. This may have consequences, for example if you print or display a picture of relatively large birds you may need to use larger crops to make the subject bird still have sufficient detail or, the opposite, fits within the image frame.
Examples calculating reach using the reach-formula
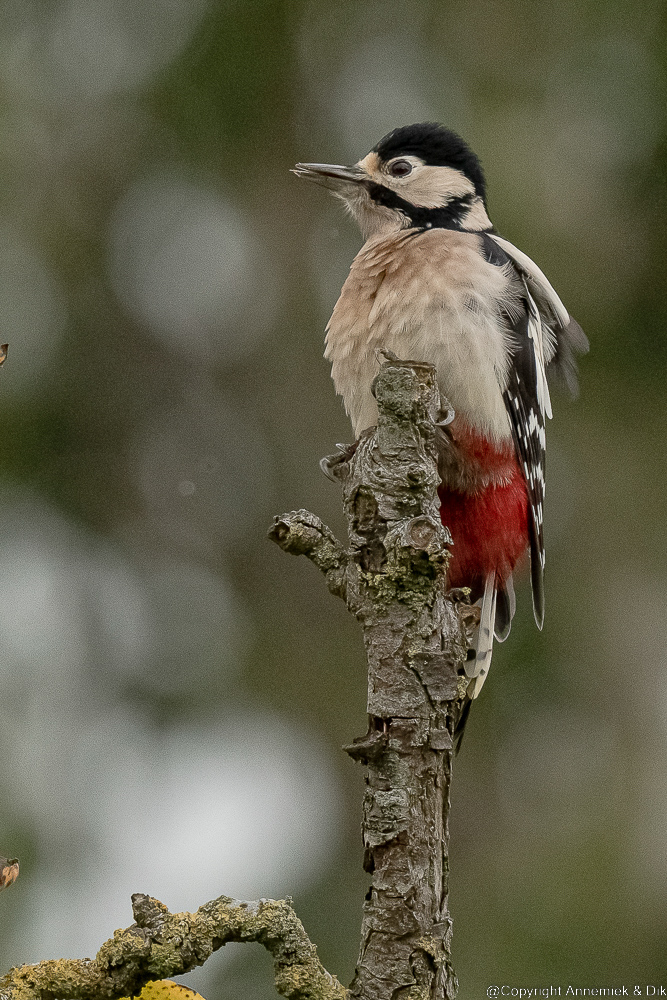
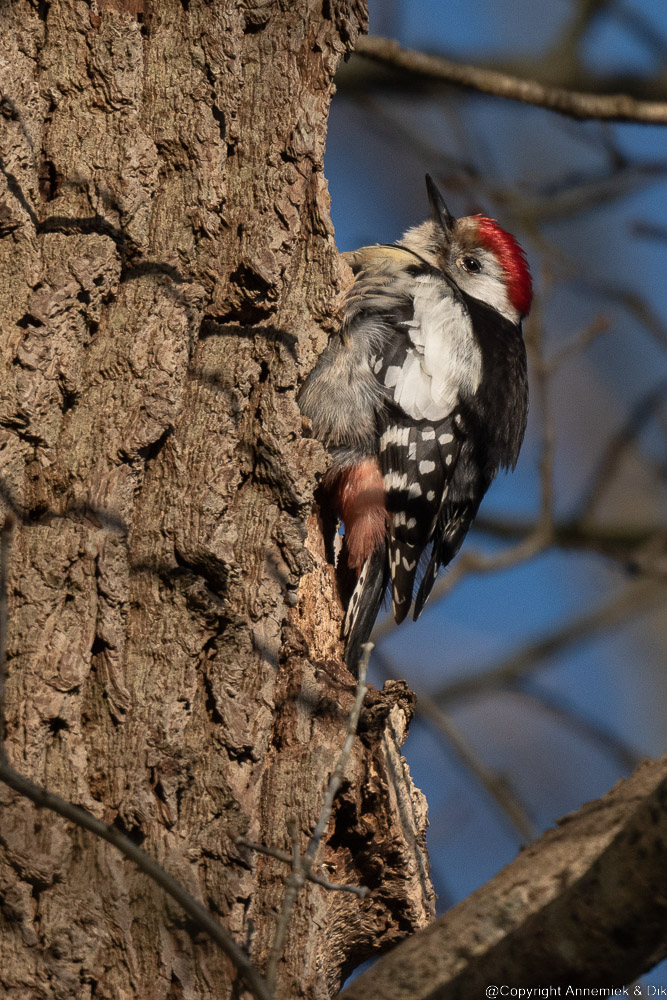
1. Great Spotted Woodpecker 10 meter equivalent 1050mm (using 1.4 converter):
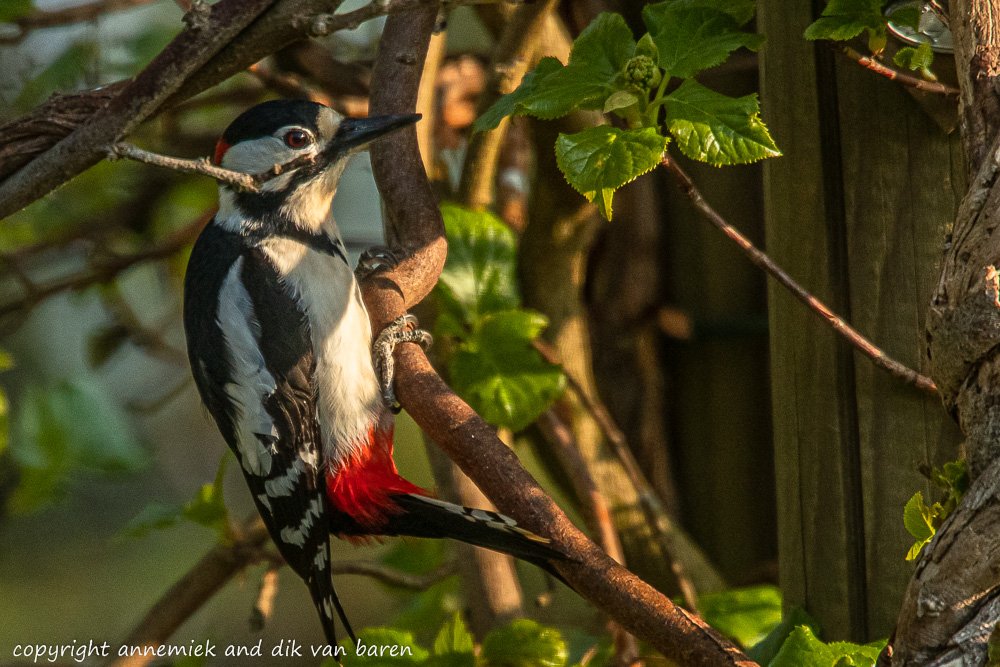
reach = (25/15 x 30/10 x 630/1050)2 x (3000/2100) => % amount detail benchmark picture.
@dik check example
1 qqq
reach = (25/25 x 10/25 x 1050/750)2 x 2400/2100 => 3/7 amount detail benchmark picture.
3. Black Woodpecker 35 meter equivalent sun
reach = (50/25 x 750/750 x 10/35)2 x qqq =>(2 x 1 x 2/7)2 x (2400 x 1600)/(2100 x 1400) = >% Benchmark picture.
reach = (50/25 x 750/750 x 10/35)2 =>(2 x 1 x 2/7)2 x (2400 x 1600)/(2100 x 1400) = >% Benchmark picture.
Actual reach may also be affected by quality Light, Atmosphere, Lens and or Sensor.
Reach may occasionally also be affected by another four correction factors.
- CLight being 0.0 (total darkness), 0.5 (almost darkness), 0.75 (light darkness) 1 (sun or cloudy).
- CAtm being 0.9 (fog, heavy rain, snow), 1.0 (average air), 1.33 (exceptionally clean air like after lockdown).
- CLens being 0.9 (semi pro quality), 1 (pro quality for example Nikon gold ring optics).
- CSensor being 0.9 (D300 or lower), 1 (Nikon D500, Z Series, etcetera).
If you feel (some of) these factors carry weight in the actual situation or your pictures happen to be important, then try estimating the effect and do account for them. We only consider them in exceptional or extreme situations as you will see in the following examples. You do as you prefer.
Two sets of pictures with al kinds of species, distances and equiment
These two sets are example pictures demonstrating the use of the reach-formula using different species at various dizsances using a variety of camera’s, lenses and converters.
- In the first set Kingfisher (IJsvogel) is used as small testbird because this bird is year round present in Eurasia and is breeding in Holland from March through September. The Kingfisher pictures demonstrate the effect of varying distance and 35mm equivalent.
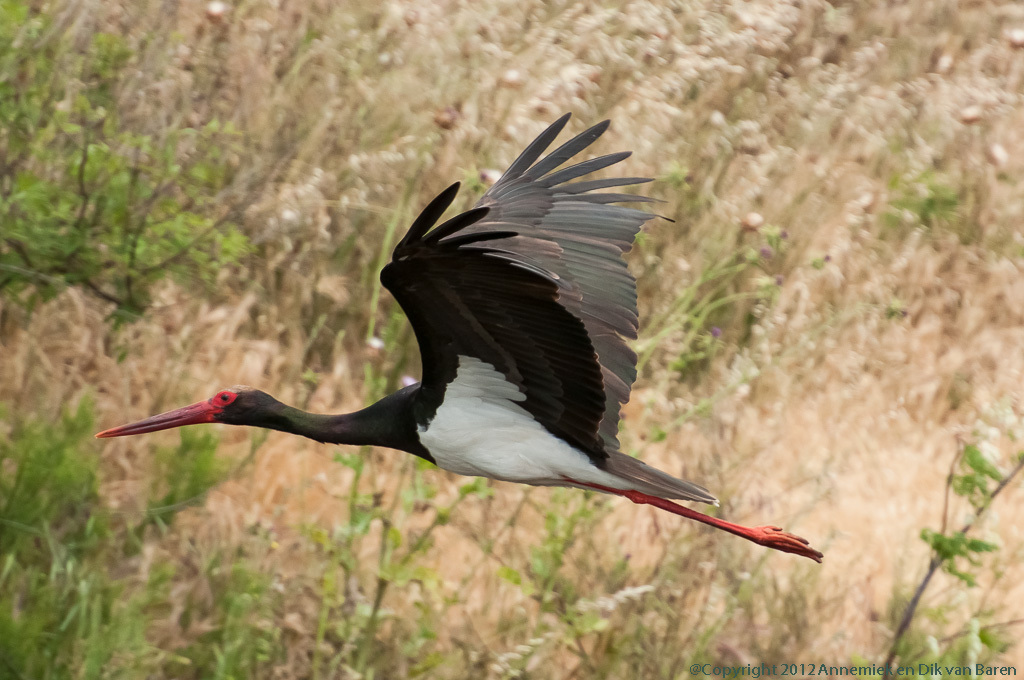
- In the second we use akso birds like Black Woodpecker (Zwarte Specht), Kestrel (Torenvalk) as average sized testbirds and for example Cormorant (Aalscholver), Red Kite (Rode Wouw) and Buzzard (Buizerd) as large testbirds and Grey Heron (Blauwe Reiger), White Stork (Ooievaar) and Great White Heron (Grote Zilverreiger) as very large testbirds.
When potographing relatively large birds another question about reach often is “Will this this large bird at this distance fit within a full image frame?” An example: some day in a forest we were expecting a Black Woodpecker (Zwarte Specht) size 50cm to show up soon. We expected to get but few seconds to shoot pictures when the man would arrive at the nest where his wife was breeding in the tree. The exchange the breeding job several times a day. We could hear the characterisric shouting of the mand from a distance announcing its arrival so we desperately needed to know whether we should use or not use 1.4 converter with our Z50 Nikkor 500mm f/5.6E PF VR (on tripod aiming at the right spot high up the tree) if we wanted a detailed frame filling image of this Woodpecker.
Comparing the situation with our fixed benchmark picture Great Spotted Woodpecker size 25cm distance 10m Nikkor equivalent 750mm in mind we figured something like this: This Black Woodpecker has about twice the size of Great Spotted Woodpecker but about three times distance to our camera and we are using 500mm tele lens so the Black Woodpecker may fill more than full frame, which would be a real shame. So we quickly removed our 1.4 converter and shot the picture. The reach formula later confirmed that taking the converter had been the right thing to do:
Reach = (50/25 x 10/35 x 750/750)² x 1.0 => 60 % detail benchmark picture. A Black Woodpecker at 35 meter will fit in a full frame image showing the same amount of detail. This picture became one of our ten standard pictures.
| Collection of pictures showing reach of one species, Kingfisher, varying distance and equivalent |
In order of ascending distance:
@dik add j5
| Large collection of pictures showing reach of varying species, distances, equivalents |
In order of ascending distance:


Your own set(s) of standard pictures
Of course you can define your own personal set of benchmark picture and or satandard pictures of any bird(s) you like at any level of resolution you prefer. Just pick bird pictures you can easily remember and bring back in mind every time you estimate reach of some equipment. Try to select pictures with nicely rounded numbers of size, distance and equivalent. It will make your future estimates far more easy.
Low light perfornce of modern digital cameras
We show some of the “bad wheather” originals used above demonstrating the fantastic low light performance of modern camera’s we used. By the way Nikon System 1 J5, system camera MLC Z50 and DSLR D500 are featuring an image sensor of similar architecture of 5568 x 3712 pixels.
qqq
Contribution to reach of image sensors of different type and some advantages of a full frame camera
Finally some words on a subject that still creates confusion: “Does a Nikon full frame camera produce more resolution when operating in so called FX mode (full frame format 36 x 24 mm) compared to working in in DX mode (APS-C 24 x 16 mm)? No!
Look at the diagram below. A full frame camera in DX mode will “cut” a 24 x 16 mm image area out of the full frame sensor area and by the way always at the very centre of this sensor. However you can, using software like Lightroon, “soft crop” an area of 24 x 16 mm (APS-C format) out of the full frame image area at any position you wish, centre, corner, along one of four sides, anywhere. This APS-C size “soft cropped” portion will always have exactly the same resolution being (24 x 16)/(36 x 24) Megapixels/mm2 of full frame area, 4/9 of the total amount of pixels of the full frame sensor. So your soft crop will always have the same resolution like any picture created by this camera either in DX mode or in FX mode. So”full frame” does not mean more reach, it just but means in total more pixels available for you for selecting any APS-C format area. Try it if you want to be sure. We did so.
However – and this is an essentially different phenomenon – using a camera in full frame FX mode will give you a larger field of view in your camera viewer. This means for example that a fast flying bird does not “leave” you viewer a soon as it will do when you use an APS-C mode camera. This can be a prevailing argument for buying a full frame camera for your bird photography. Besides the image quaility of a full frame sensor, lik higer pixel pitch and lower noise/signal ratio, is often higher than the quality of an “ordinary” APS-C type camera. Anobvious exception is Z50 featuring a sensor of same archtecture as the great chamion D500.
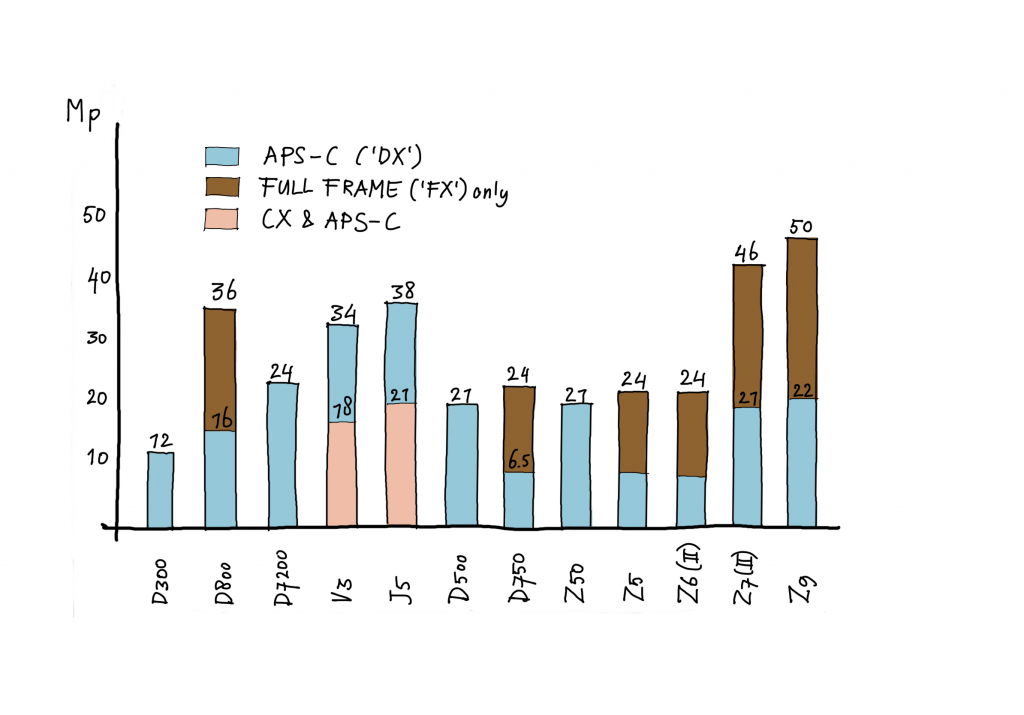
When you “normalise” the output af a digital camera to 24 x 16mm image area you can compare the contribution in megapixels to reach of full frame and other camera types with the output of an “APS-C type camera” like a D500 or Z50. You can see this APS-C-normalised contribution to reach of a few Nikon camera’s used in lightweight bird photography in the diagram below.
This diagram can help you decide which camera you should buy if reach is important. Anyway bear in mind that it is not only the sensor output but often also the field of view of the viewer of the camera that you should take into consideration.