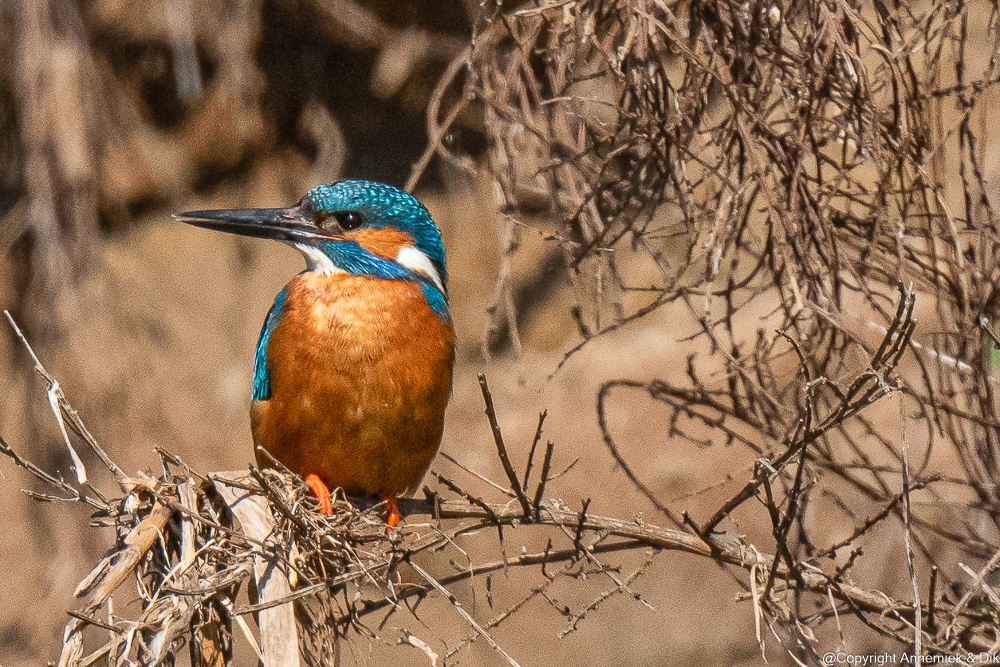
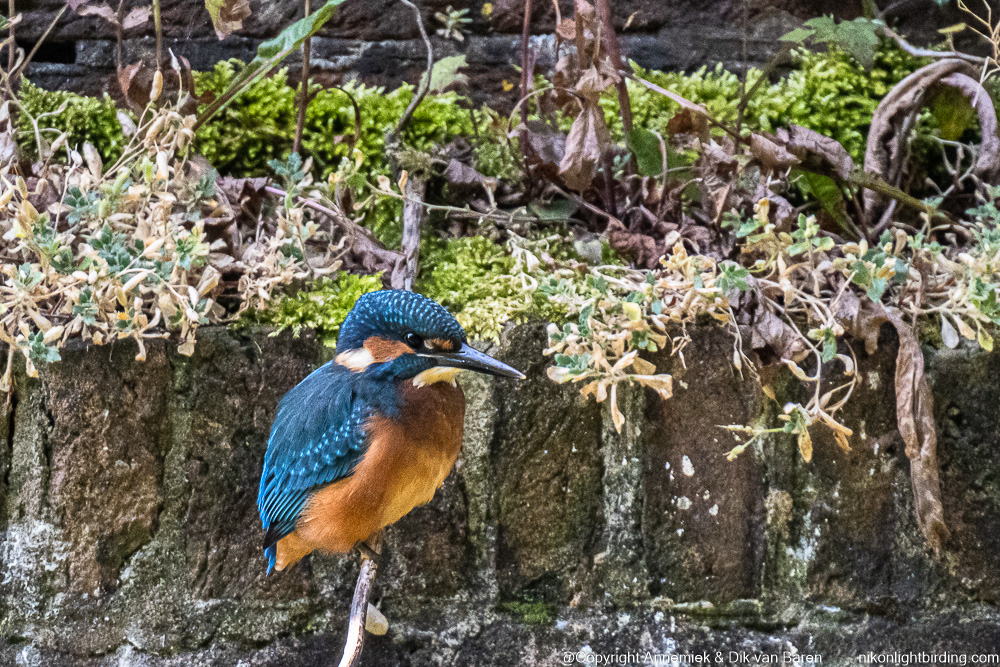
Photo at top: Holland direct sunlight Kingfisher (IJsvogel) Length 16 cm distance 30 meter (measured) equivalent 1050mm D500 Nikkor 500mm f/5.6E PF VR TC-14E III total camouflage, tripod, crop 2100 x 1400 pixels. And by the way, splendid detail, am[le light and colour contrast of this excellent lens-converter combination using this cropping level).
F11: full screen
What precisely is “reach” (bereik)in bird photography?
All bird photographers talk about it however it seems difficult to exactly define what “reach” is in bird photography. Some salesmen of photographic equipment and birders may have their own ideas about “sufficient” reach, but as a “serious enthousiast” bird photographer you should know everything about “reach” yourself. It is definitelty important when photographing small birds. Also adequate lightweight photographic equipment costs considerable money. So in these two pages, Reach and Reach examples, we are going to find out how you define and even quantify (!) “reach” in bird photography, in case of small birds far away up to large birds close by. These two categories require two essentially different approaches concerning reach as we will see.
This page about “reach” may be the most important page in this blog but also the most difficult one to understand. R read and reread until you are sure that you can answer practical questions in the field like “What level of detail can I expect of this Common Tern (Visdief) at this 40m with my D500 Tamron 150-600mm? “Should I use (or remove) my 1.4 converter?” “Do I have a chance at all to get a detailed picture of this Middle Spotted Woodpecker (Middelste Bonte Specht) at 45 meter or should I try to get more close and take the risk that this rare bird has left?” “Can I shoot a good picture of this Great White Heron at 50 meter in this light fog with my Z50 Nikkor 500mm f/5.6E PF VR TC-20E III? That kind of painful questions may be with you when you there in the field and you may need an immediate answer …
Quantifying reach
Quite a few factors determine actual “reach” in bird photography:
- “Reach” is quadratically proportional to three physical factors: size bird, 35mm equivalent equipment used and distance bird-camera.
- The type of wheather and amount of light like direct sunlight, clouds, heavy overcast, rain, haziness, fog, twilight, almost dark, etcetera also determine how detailed and colourful your picture will be.
- The cropping level that you choose in post production also determines the total amount of resolved pixels. (By the way: not the level of resolution of these pixels!)
We need to define three important items before we can quantify reach (bereik)
Trying to quantify reach (bereik) we found that we first had to define three other key items in this context:
1. The size of a bird.
2. The “bird-image-area” of a bird picture being the “space” the bird takes within that picture.
3. A well-defined measure (maatstaf) for quantifying bereik (reach), preferably in one simple formula, like meter, gram, second, etcetera.
We will define them one by one:
(1) The “size” of a bird is the total “length” of the bird in centimeters from bill through tail as reported in the dutch bird guide “De nieuwe Tirion natuurgids vogels“. In this blog we will always use the “size” reported as “L” for “length” of a bird in “Nieuwe Tirion Natuurgids“. Look at this picture:
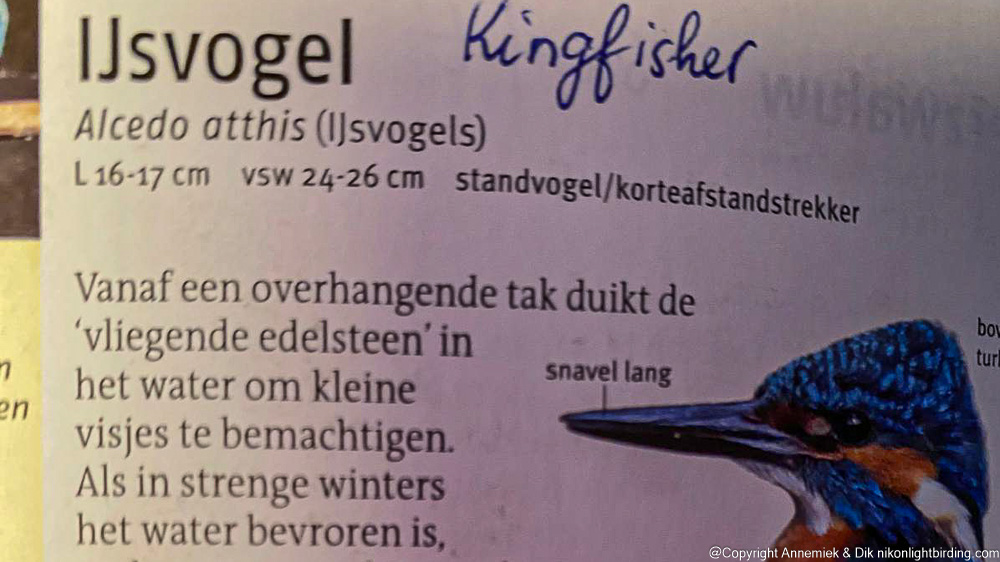
This booklet by the way is a perfect compact bird guide mentioning Dutch, English and German bird names, which comes in handy when birding abroad. See Literature. This “L” in this guide represents “Length” of a vertically upright standing, resting or horizontally stretched flying bird. It does not include an extraordinary long bill (e.g. Heron, Kingfisher) or long legs (e.g. Stork, Heron, Black-winged Stilt). L is about the body of the bird.
(2) What we baptised the “bird-image-area” in a bird picture. This is the minimal rectangular part in a bird picture, containing all pixels (beeldpunten) of the photographed bird. Like this:
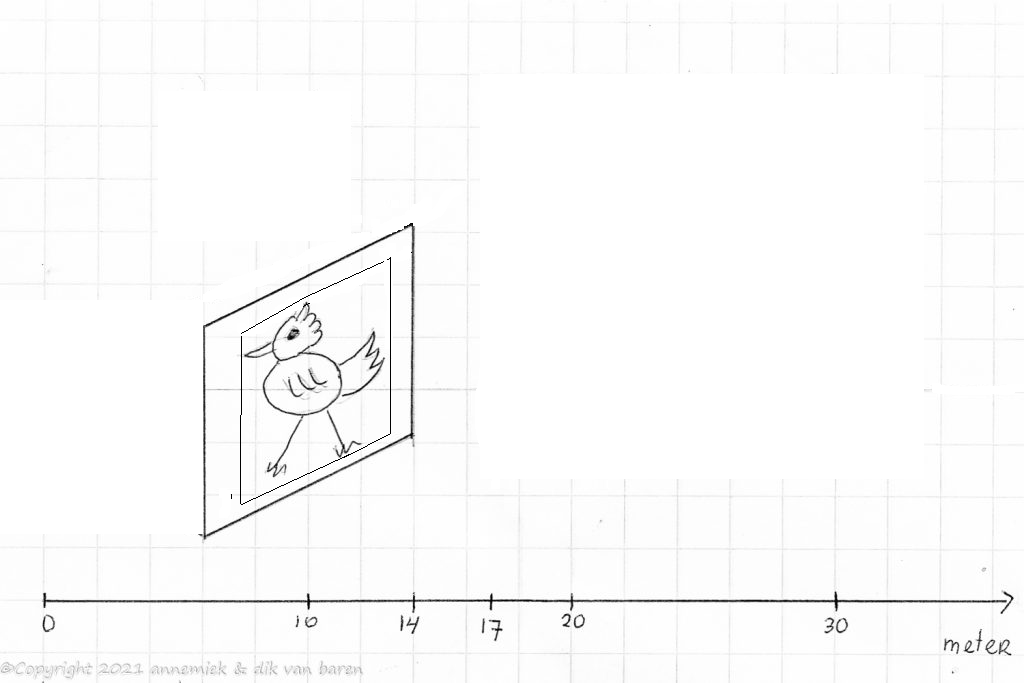
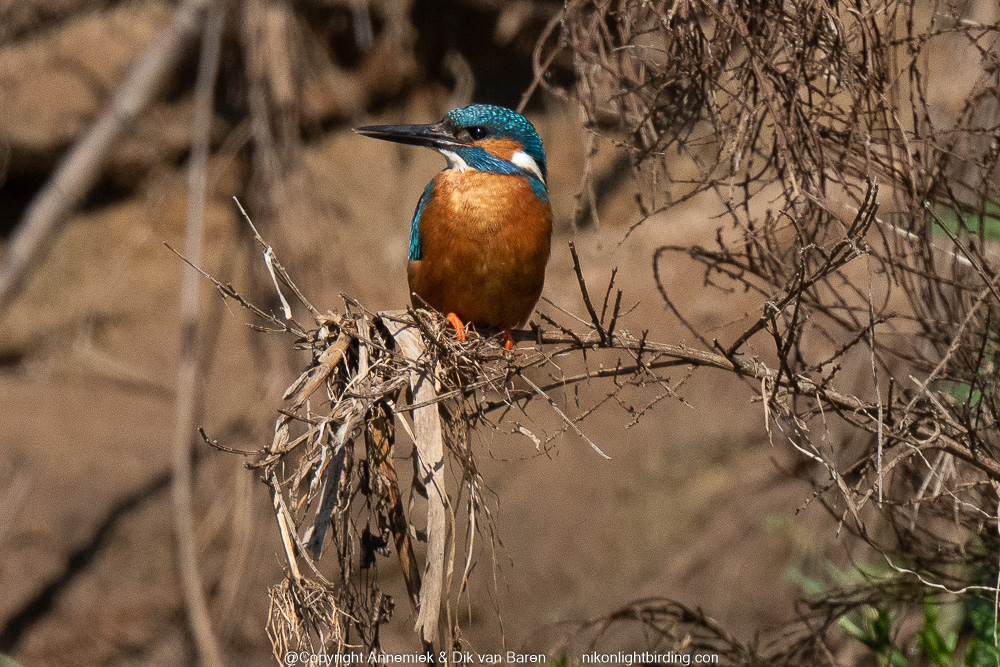
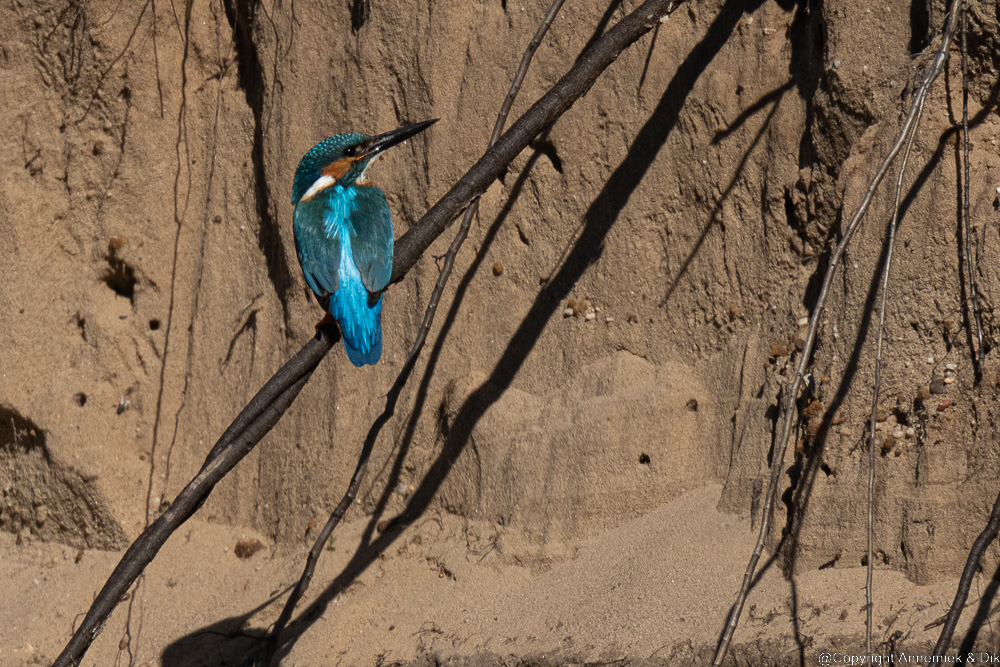
(3) We will use the following important picture as our standard measure (maatstaf), our benchmark picture, for measuring reach (bereik). It is the picture of a common Kingfisher (IJsvogel), size 16 cm (“L” in Tirion Bird Guide), at distance 30m, photographed using equipment with equivalent 1050mm in clear atmosphere and direct sunlight. The bird image area in this picture contains, by our personal definition, a sufficient amount of sufficiently resolved pixels of the subject Kingfisher, This bird is common in Eurasia and North Africa. Consider the resolution of the Kingfisher in this benchmark picture as part of the collection of standard measures like meter, second, percentage, gram, etcetera.
“Sufficiently resolved” is of course a subjective personal quantification, so we have to define it. We did so by choosing this benchmark picture as our definition of “sufficiently resolved“. We will structurally compare and quantify the level of resolution of every bird picture with this benchmark picture. That is our idea behind quantifying reach (bereik). This approach worked out perfectly for us as you will see in the examples below.
When comparing the amount of detail with other pictures, like in these examples and at Examples reach or during actual photography in the field, we roughly compare the length of the actual bird with the length of this upright sitting Kingfisher in this benchmark picture. This length is about one third, 33% of the total height of the picture. We say “roughly” comparing because estimating reach in the field is not a matter of centimetersor even meters of course.
(3) Combining three “quadratic rules” in one “reach-formula” that quantifies reach

Many test pictures of different bird species of different size at varying distance, using photographic equipment with different 35mm equivalents, consistently showed that the amount of sufficiently resolved pixels, in other words the amount of detail in the bird-image-area, is always quadratically determined by three factors:
1. The size, (width x hight), of the bird (cm): (quadratically proportional).
2. The 35mm equivalent (mm) of equipment used: (quadratically proportional).
3. The distance (m) of the bird: (inversely quadratically proportional).
We can combine these three “quadratic rules” in one reach-formula:
| Reach (bereik) is the amount of sufficiently resolved pixels (beeldpunten) in the bird-image-area of a bird picture. This amount is quadratically proportional to the size *) of the bird and 35mm equivalent of the equipment used and inversely quadratically proportional to distance bird-camera. |
*) size corresponds to L in dutch Tirion Bird Guide (or whatever it is called in any other official Bird Guide of course).
Cropping level: another subjective matter
Yet another factor determines the amount of pixels in the bird-image-area. When image editing a RAW or JPG picture, we choose a cropping level to get a picture wich has, in our view, an optimal amount of sufficiently resolved detail in the bird image-area of this picture but also fits optimally within that picture regarding position and relative size of the bird within the total picture. This fitting may implicitly define the amount and quality of detail in the final picture and the final number of dots per square inch (DPI) of the picture. Look at the following example of different cropping levels:

Picture Kingfiser (IJsvogel), size 16cm, distance 30 meter, sun, D500 Nikkor f/5.6E PF VR, equivalent 1050mm, at different crop levels: 3000 x 2000, 2100 x 1400, 1500 x 1000, 900 x 600 and 750 x 500.
Until now at this page we always suggested cropping level 2100 x 1400. This choice of 2100 x 1400 was a subjective choice. In our view more cropping of this Kingfisher picture would degrade the level of detail of the bird-image area in this picture too much, which might result in more noise and or less contrast and possibly a “soft” picture and also make the bird dominating its environment too much in stead of being part of a natural situation. Cropping less would make the bird occupy a too small portion in the picture, not really being the main subject in this picture.
In this example of the Kingfisher we feel that cropping levels 2100 x 1400 and 1500 x 1000 both would have been a good choice. We chose 2100 x 1400 and consequently the height bird-image-area benchmark picture was about 33% (1/3) of the height total picture. If we would have used another cropping level, the total amount of pixels in the cropped picture would have changed and accordingly the relative amount of detail in the bird-picture-area also. It is up to the photographer to apply an optimal cropping level in a given situation, This is a personal subjective matter and as such independant of the actual reach (bereik) of the used equipment in the given situation-bird-size-distance-to-bird.
Combining the three “quadratic rules” in one “reach formula“
If we use our definiton of reach (bereik) exclusively for birds with size 15-35cm (like from Kingfisher up to Common Tern), it makes sense to combine these three “quadratic rules” in one reach-formula where reach (bereik) is a quantifiable entity with a maximum of 100%.
| reach (%) = (size/16 x 30/distance x equivalent/1050)2 x 100% *) |
*) 100% is by definiton the amount of reach (bereik) as represented in the benchmark picture of the kingfisher.
So anytime, when photographng birds, we want to estimate the actual reach (bereik) in he situation, we roughly compare the percentual height of the bird-image area in the picture (in the viewfinder of the camera) with the 33% of the total height of the Kingfisher in our benchmark picture.
Using this formula we can quantify “reach” in the given situation using the given combination camera-lens-converter, telescope-digicompact as follows:
| “Reach” of certain photographic equipment in bird photography is: the amount (0-100%) of sufficiently resolved detail in the “bird-image-area” of a bird picture, as compared to the amount of sufficiently resolved pixels in our benchmark picture, which by definition contains a sufficient amount of sufficiently resolved pixels of a Kingfisher (IJsvogel), size 16cm, at distance 30m, in direct sunlight and clear atmosphere, equivalent 1050mm cropped 2100 x 1400 pixels. The height of this bird in the benchmark picture is about 33% of the height of the total picture. |
Only birds in the range 15-35cm
Using the reach-formula for birds smaller than size 15-35cm close by or for birds larger than size 15-35cm like Storks, Herons and most birds of prey apparently does not make sense. In those situations the bird-image-area may fill the entire picture or even not fit in the picture frame. You can compare it with using binoculars and zooming in too far and unnecessarely at a small bird or zooming in at a very large bird. Both may not make sense any more.
In those cases reach (bereik) is not a critical item as such and irrelevant. So this restriction has no significant impact if we only use our reach-formula for birds of size 15-35cm. Our reach formula is perfectly usable in case of relatively small birds like Kingfisher, Bee Eater, Bearded Tit, Blue Pipit, Spotte Woodpeckers, Common Tern, etcetera, generally speaking birds in the range of 15-35cm. And precisely that range happens to be the range where reach has weight and is a critical item.
Finally some extra notes about reach (bereik)
1 Reach in bird photography is determined by three factors: size of bird, distance camera-bird and 35mm equivalent equipment used. Sometimes reach will also be affected by image sensor quality or the amount or type of available light or state of the atmosphere. Usually these factors do not have significant impact and the quadratic rules suffice. Only in cases of heavy rain or dense fog, etcetera, quantification of reach (bereik) using the quadratic rules does not any more produce usable results. However then the entire situation is different and still applying the quadratic rules may be providing you some indication of actual reach (bereik) under the given circumstances.
2 You can of course define your own benchmark picture or any cropping level as being your standard of sufficiently resolved detail. Choose a species that is common in yoour local area and or abroad. To give an example: another choice here in Holland would be a Meadow Pipit (Graspieper) size 15cm at 10 meter.
The good news: de facto we use only one or two of the quadratic rules!
@dik qqq

Other examples of using the Reach formula
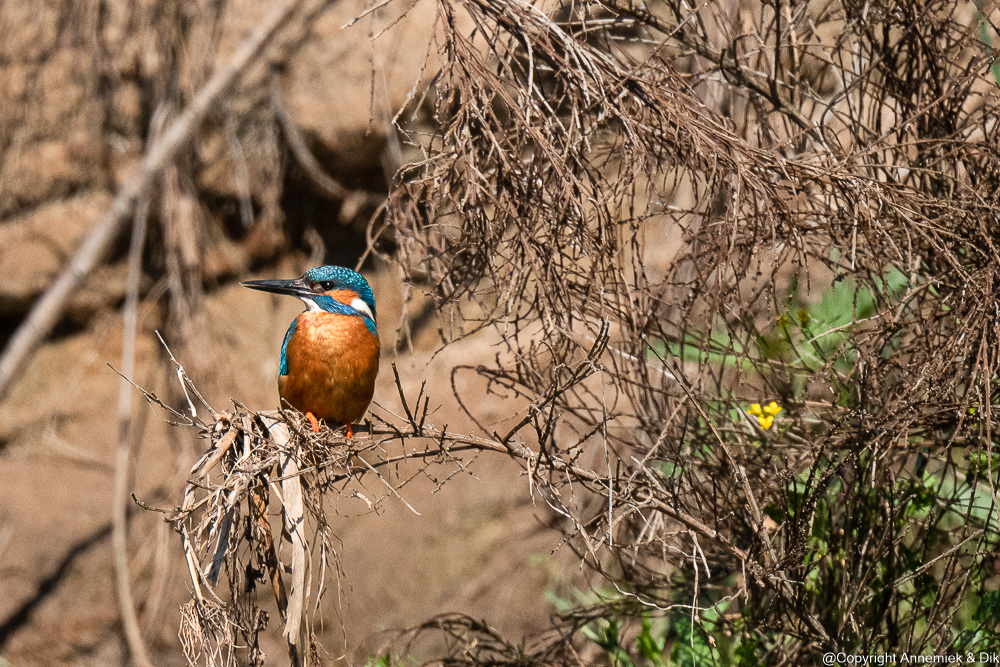
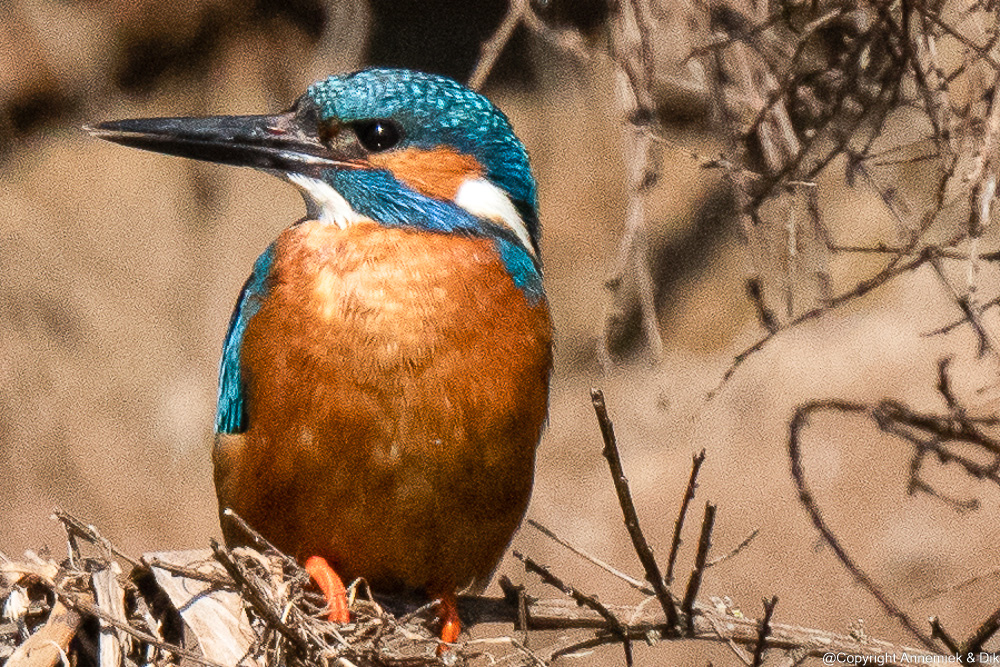
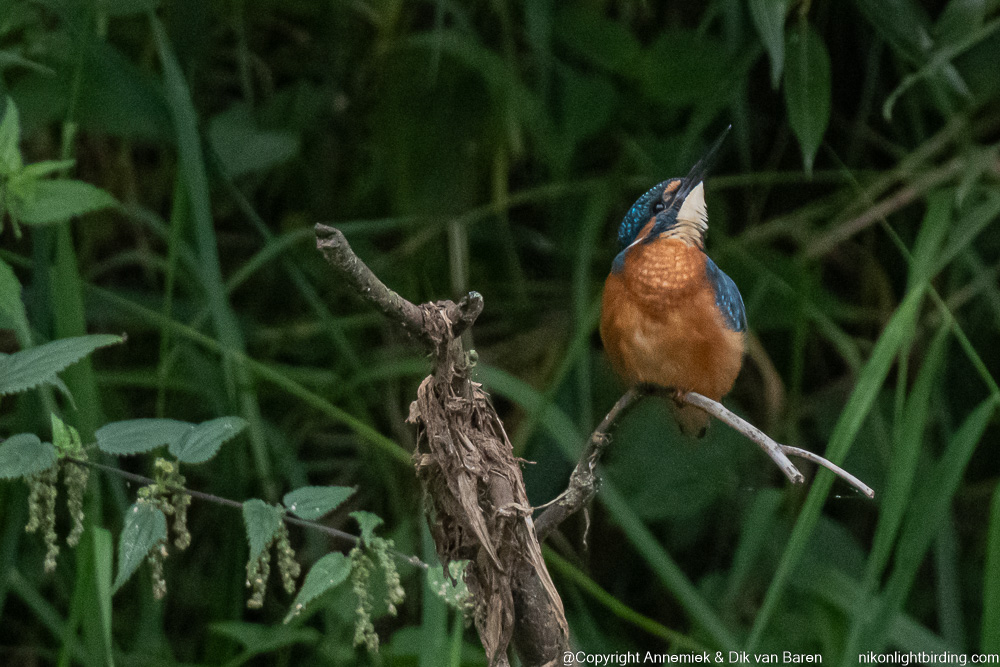
Example: Kingfisher (IJsvogel), direct sunlight, size 16cm, distance 24m, 35mm equivalent 1500mm, D500 Nikkor 500mm f/5.6E PF VR. Crop 2100 x 1400 pixels.
This is a quite different situation! It shows clearly the quadratic effect of two of the three quadratic rules:
reach (%) = (16/16 x 30/22 x 1500/1050)2 x 100% = 66%
The height of the bird-image area in the picture is slightly more than 2/3 of the height of the entire picture. And also the light and colour contrast seem to be greater.
This same Kingfisher: at 40 meter you get roughly (30/40) 2 = 9/16 = roughly 50% amount at 30 meter!
This same Kingfisher: atAt 15 meter you get roughly (30/15) 2 = 4 = roughly 800% amount at 30 meter!
A sparrow, size 22cm, at about 40 meter, will contain 22/6 being about the same amount of detail, etcetera. qqq ??? qqq
So, after some time you will be not any more using the entire formula but only one or more factors size, distance and equivalent do have quadratic effect.
Reach = (17/17 x 30/30 x 1050/1050 x 2100/2100)2= 1.0 x height bird benchmark picture = 1/3 height total picture.
Reach and Nikon equipment
Working out a solid quantification expressed in one compact formula of “reach (bereik)” is quite some effort as you could see, but the odd thing about all this is that in the end you do’nt need the entire formula as such! After some time you use only one or two parts of it! Either bird size or distance are differentbut equivalent is mostly constant when photographing with only one combinaton of photographic equipment. For example we ourselves often carry only our beloved Z7 II with DX/FX-switch via menu with us. And then we automatically only use one or two quadratic rules deciding whether we will shoot or not shoot a picture. We are assured that our photography is based upon this reach formula. It works perfect!
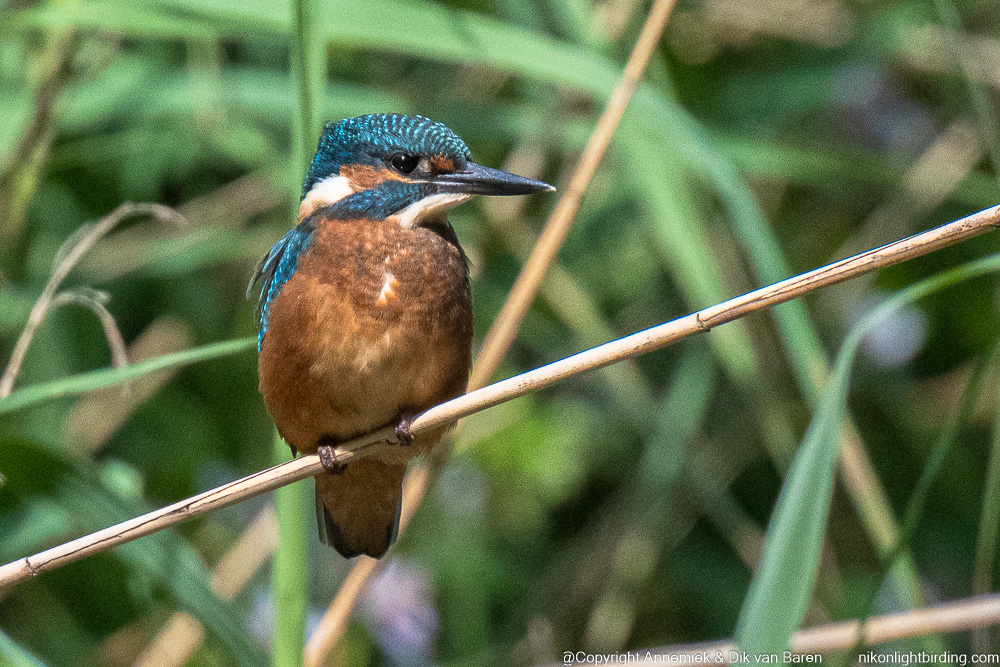
Take a close look at the picture of the Bee-eater at the top of this page. “Reach (bereik)“is about sufficiently resolved detail in your pictures. It is not a matter of the bird being in-focus. By the way some bird photographers tend to talk about “sharp” pictures. We do so too incidently, however keeping matters well defined in this blog we will structurally talk about “in-focus pictures” versus “out-of-focus pictures” and “sufficiently detailed” pictures and about “insufficiently detailed” pictures versus “insufficiently detailed” pictures. To get sufficient reach in bird photography you need high quality, semi pro equipment particularly when photographing small (shy) birds far away. Over many years we have experienced that Nikon photographic equipment, camera’s, lenses and converters were surprisingly well fit for serious lightweight bird photography. Outstanding examples are:
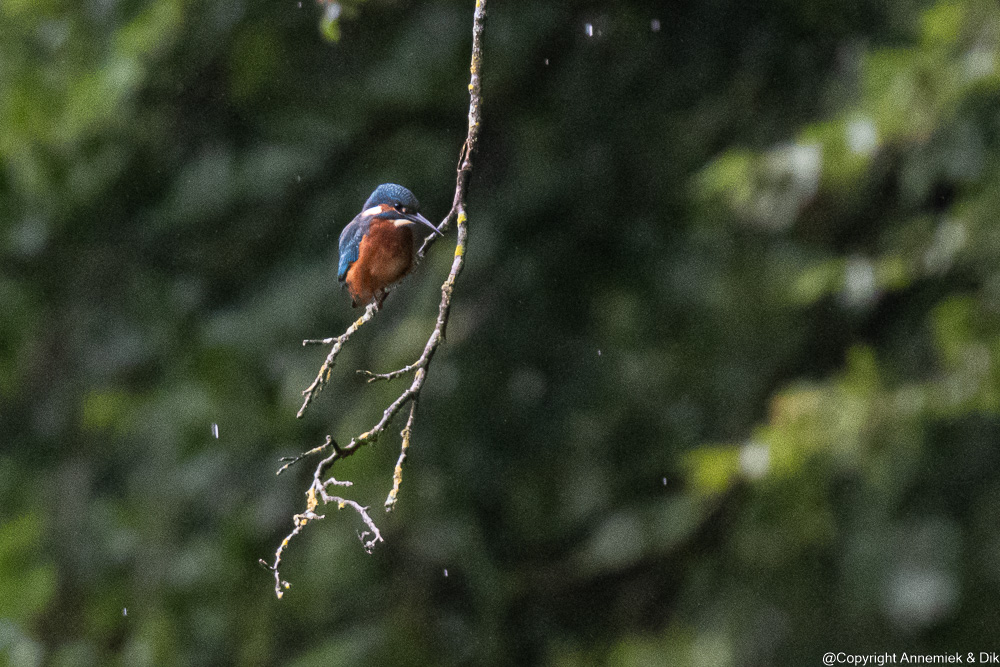
Photographing another Kingfisher at qqq meter distance – like in the picture above – the height of that Kingfisher in the resulting picture will amount up to quadratic rule (qqq)2 = 60% height Kingfisher in the actual picture. The relative size in the resulting picture is indeed about 75% of the total picture.
- Nikkor 300mm f/4E PF VR, uses phase Fesnel technology, is not cheap, but the best lightweight 300mm prime we ever used, the only one of this quality being Nikkor 300mm f/4E PF VR, but extremely light, fast focussing, extraordinary detail.
- Nikkor 500mm f/5.6E PF VR, uses phase Fesnel technology, is not cheap, but the best lightweight 500mm prime we ever used, the only one of this quality being Nikkor 300mm f/4E PF VR, also extremely light, fast focussing, extraordinary detail.
- Nikons top quality aspherical converter TC-20E III.
- Nikons second generation mirrorless camera’s Z50 and Z7 II feature the largest opening for light transmission in the smallfilm world. Although fast, they are not the fastest. This may improve over time when Nikon gathers more experience in affordable mirrorless autofocus technology. Their Z8 and Z9 already feature extremely fast and reliable autofocus, but are not affordable for medium-budget serious enthousiast bird photographers.
If you want to use only one combination then use one high quality zoom lens like Z Nikkor 180-600mm f/4.5-f/6.3, to avoid frequent switching converters in the field. Mind you any full frame camera, for example a Z7 II, has a “built-in” 1.4 converter! If you switch it back and forth from FX mode to DX mode, you have exactly the same effect as removing or adding a “hard” 1.4 converter! If you leave the camera in the “Menu item = Choose size Image Area -state” you are able to add or remove a “1.4 soft converter” without mounting or dismounting (and potentially exposing the sensor to dust!!! Look at http://Settings Z7 II.

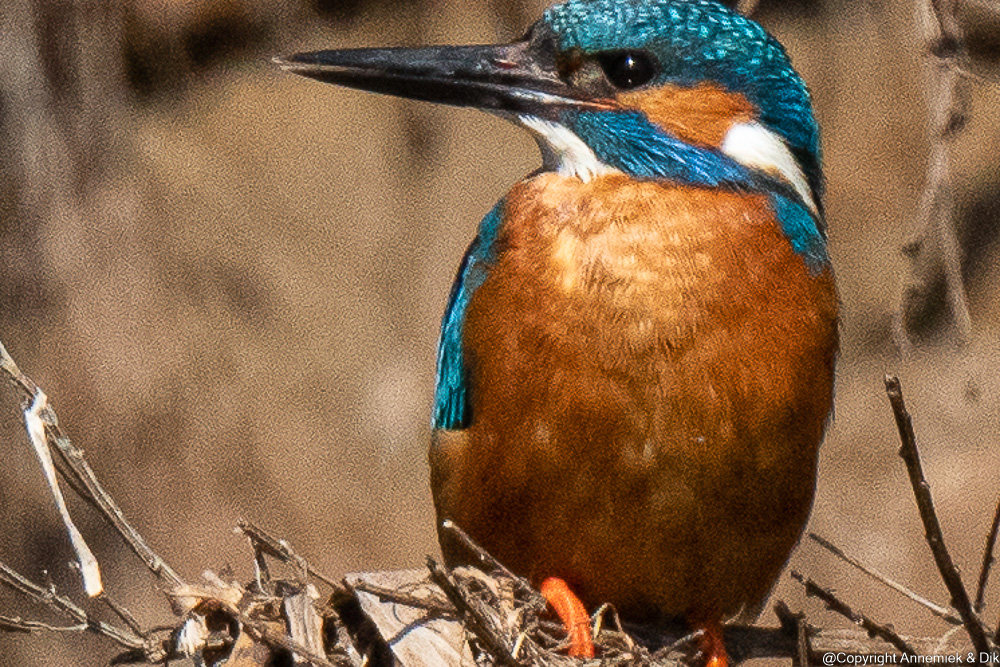
Reach = (16/16 x 30/27 x 1500/1050 x 2100/2100)2 = 2.5 x height bird benchmark picture = 5/2 x 1/3 = 5/6 height total picture.
The main factor in this example is the larger equivalent.
Reach = (35/16 x 30/24 x 1050/1050 x 2100/3900)2 = 2.0 x height bird benchmark picture = 2/3 height total picture.
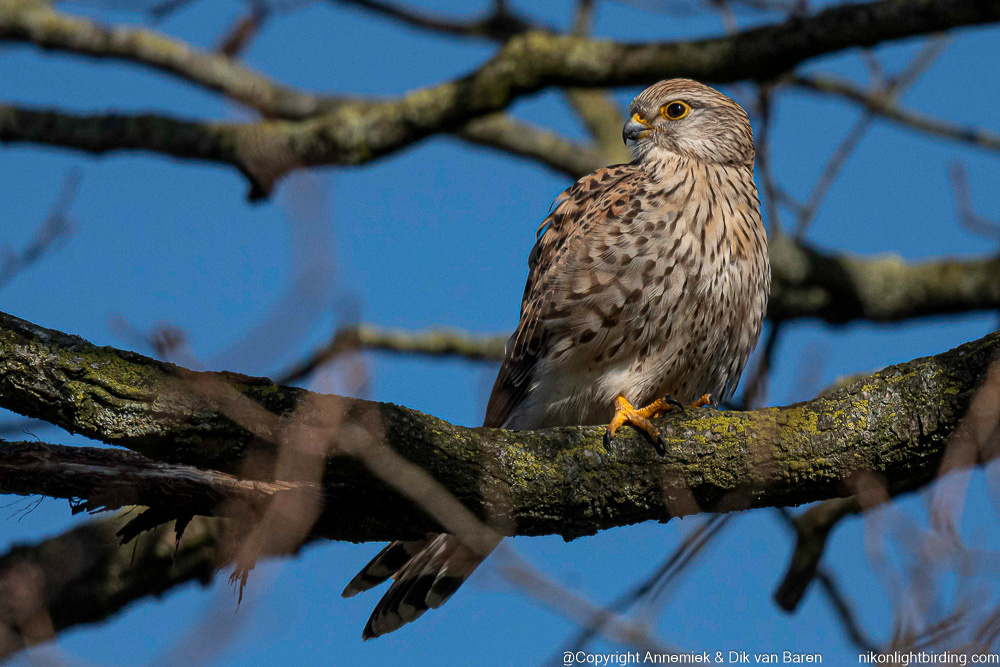
By the way this is a good example of using Silent Mode Z50. What helped also was that Kestrel female was used to our presence, breeding in our garden year after year.
More examples at Examples reach.
So, after some time and hopefully but pretty soon you will be using not the entire formula but only part(s) of it: the factors size, distance and equivalent do have quadratic effect.
Digiscoping
In this context some words about digiscoping: birders use expensive binoculars and telescopes, photographers have their tripods, camera’s, favourite expensive lenses and converters, however “real” birders use a special combination of all this: digiscoping. We do so too sometimes: quite some extra effort but exceptional reach. Interested? Look at Digiscoping.
===============================================================
copy of for,er page Reach II:
Amount of detail picture is equal to amount detail benchmark picture. No wonder, this is the benchmark picture!
Reach II
Photo at top: Israel Green Bee Eater (Grone Bijeneter) size 14cm distance 40m.
F11: full screen
Introduction
In this second Reach-page reach we will review some special items that may be of interest to you.
Quadratic effect of distance
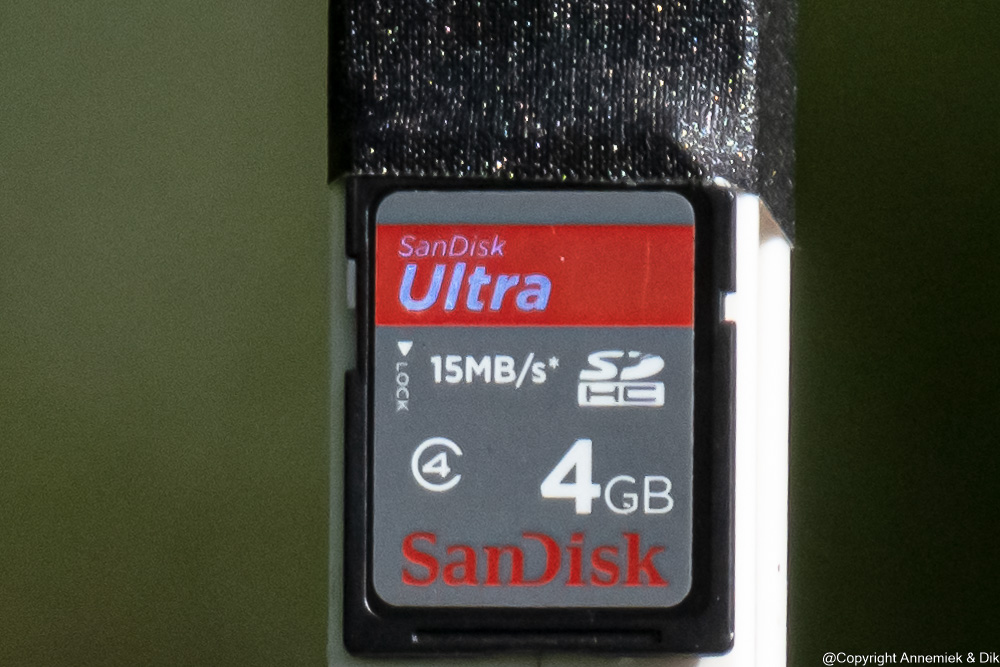
Once more: wou may never really use our reach-formula as such in the field. We use but one or more of our “three quadratic rules” all the time, particularly one or more of the “three quadratic rules” about size of bird, distance camera-bird and 35mm equivalent. Thes effect ooof distanceis for ecmple nocel illutratrd in the following picture of and SD card:The pictures of an SD card photographed at successively 16.5 meter, 15 meter and 13.5 meter, illustrate this substantial effect:
(click -> open picture, > < next/previous picture, i -> info & settings camera & lens, “Full size” -> full screen, x-> Exit picture)
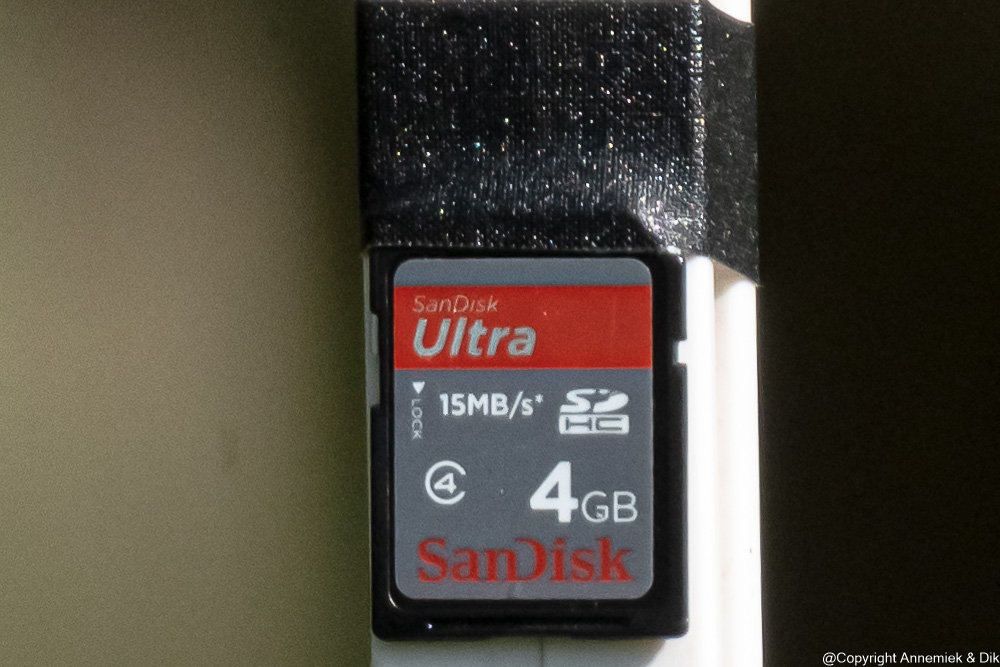
Plus or minus 10% distance results in significantly less or more detail! (size card is about the size of a small birds head).
(click -> open picture, > < next/previous picture, i -> info & settings camera & lens, “Full size” -> full screen, x-> Exit picture)

You can find many examples of estimating reach with our reach-formula at Reach examples. They may give you some idea of reach in bird photography and the effect of one or more of the quadratic rules when you are actually photographing.
The “30 meter border” in bird photography
During many years of bird photography we found that, using modern photographic lightweight equipment, over 30 meter the amount of reach gets progressively lower, especially when photogaraphing small birds. Probablu over larger distances the amount of dust, air pollution, humidity, haze etcetra accumulate and progressively block a significant portion of the light. Particularly photographing birds like Wren, Bearded Tit, Kingfisher, Shrikes or Bee-Eaters in direct sunlight is all right up to about 30 meter. At larger distance the pictures become less detailed. One typically needs equipment with 35mm equivalents over 2000mm, including digiscoping.
Shooting pictures of large or extraordinary large birds
When shooting pictures of large or extraordinary large birds the primary concern sometimes is: “Will this large bird fit in the picture frame?” for example when expecting or hoping that a certain bird will soon arrive at the scene. Look at this example. We were expecting the Woodpecker near its nest soon (they often loudly announce from a distance their arrival We but had no idea whether this large bird would “fit” in the picture frame using 1050mm 35mm equivalent. However we did remove the 1.4 converter, equivalent 1050mm => 750mm, and we shot this picture: we had made the right decision.
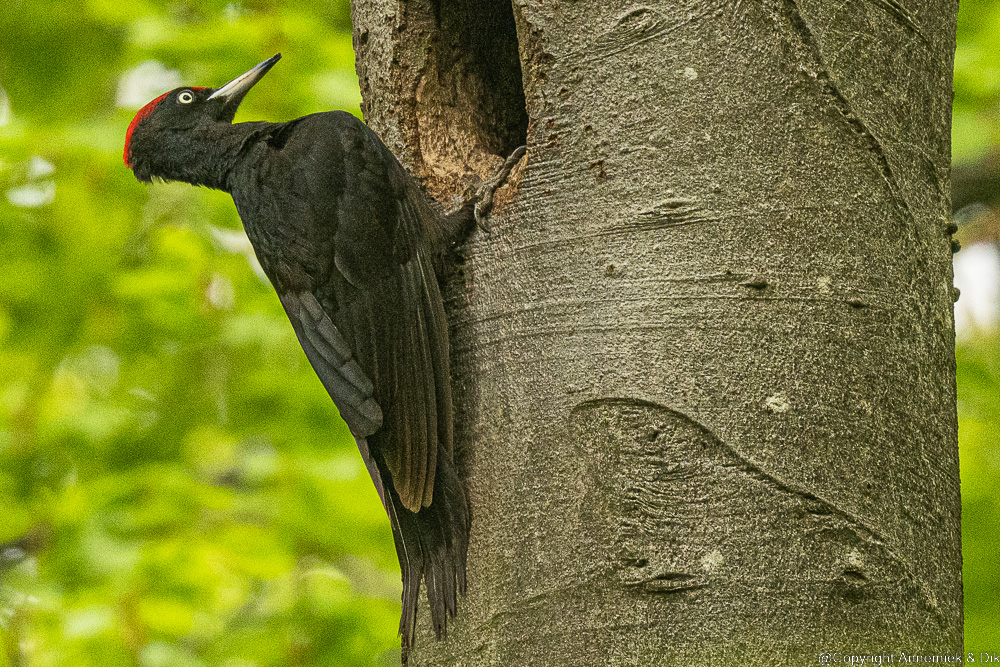
Reach = (51/16 x 30/35 x 750/1050 x 2100/2400)2 % => 2.5 detail benchmark picture = 2.6 x 33% = 85% detail benchmark picture
The Woodpecker fitted in the picture frame!
“Does sensor size contribute to reach?
Does a camera with a full frame sensor have more reach (bereik) than a camera with for example an APS-C type sensor? In other words: “Does a Nikon full frame camera have more reach when operating in what Nikon calls “FX mode” (full frame format 36 x 24 mm) compared to working in “DX mode” (APS-C format 24 x 16 mm)? This type of question continues to create confusion. Some may feel inclined to answer this question positively but the answer is No!
A full frame camera in DX mode will “cut”, “hard crop”, a 24 x 16 mm image area (APS-C format) out of the full frame sensor area (by the way at the very centre of this sensor). However you can also, using software like Lightroom, “soft crop” any area of 24 x 16 mm (APS-C format) out of the full frame image area when you switch this camera in full frame FX Mode, at any position you wish, centre, corner, along a side, anywhere. Any APS-C size “soft cropped” portion will always have exactly the same resolution of (24 x 16) / (36 x 24)Megapixels = 4/9 part of the total amount of pixels of the full frame sensor. So your crop will always have the same resolution (pixels/square millimeter) as any picture created by this camera either in DX mode or in FX mode. Conclusion: “Full frame” does not necessarily mean more reach but it means: camera output may contain more pixels (to optionally select an APS-C format area from). Try it if you want to be sure.
However – and this is something essentially different – using a camera in full frame mode, “FX mode”, will give you a larger, 9/4, amount of detail and also a larger field of view in your camera viewer, which is extremely welcome when photographing fast flying birds, because they stay longer in the “full frame view”. Amongst other features like two card slots and two processors an usually higher sensor quality this may be a sound reason to, sooner or later, go for a full frame Nikon MLC like Z7 (II) or Z6 (II) if you can afford it.
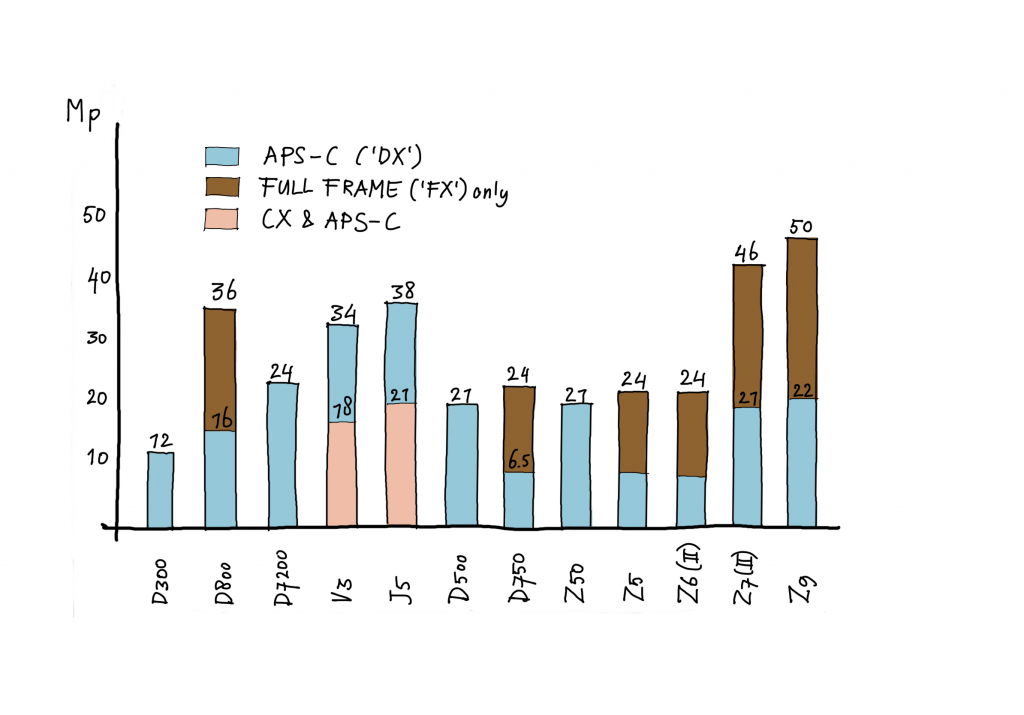
Only when you normalise the output of a digital Nikon camera to a 24 x 16mm APS-C format image area, you can compare the contribution in megapixels to reach of Nikons full frame Z7 II. Nikons mirrorless System 1 CX, Nikons mirrorless Z camera’s like Z50, APS-C type D300, D500, full frame D800, etcetera. You can see this APS-C-normalised contribution to reach of some Nikon camera’s used in lightweight bird photography in the informative diagram below. It may help you decide which camera you should buy if you consider reach to be a priority.
@dik restant:
By the way once you have understood this formula, you will after some time notice that during actual photogaphy you are not really using this formula as such any more but almost automatically use only one or more of three factors in the formula: size of bird, distance to bird or 35mm equivalent of equipment used and estimate your actual reach by estimate the effect of only one or two relevant factors in stead of exactly calculating reach using the entire formula.
Pingback: Literature, links, etc. – LIGHTWEIGHT BIRD PHOTOGRAPHY (F11 full screen!)