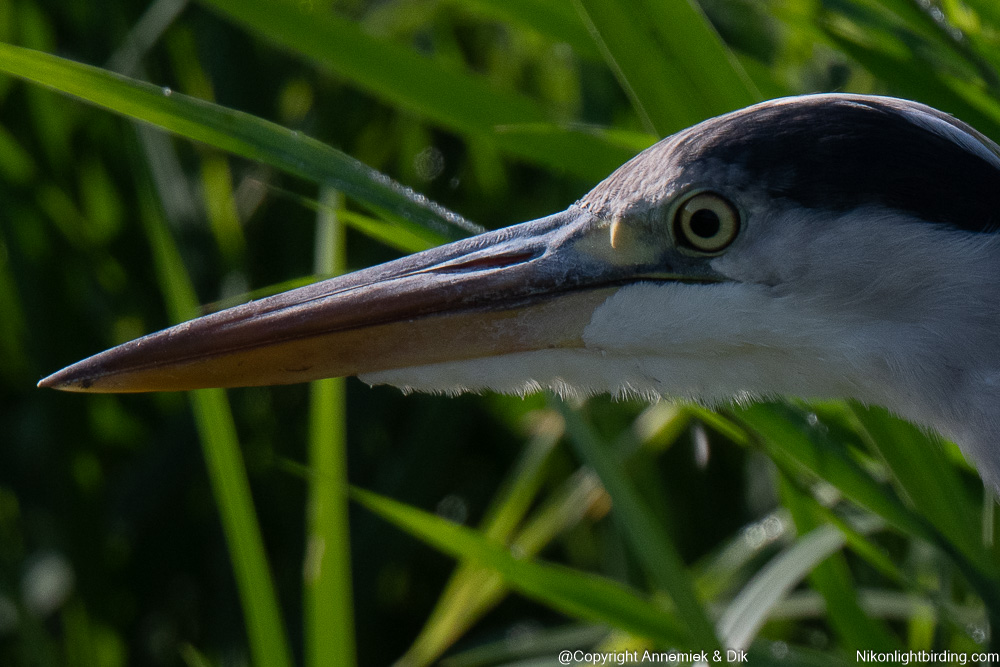
Foto at top: Holland Louersoog cloudy rain Bearded Tit (Baardman), size 17cm, distance 25m Z50 Nikkor 500mm f/5.6E PF VR, equivalent 1500mm, APERTURE mode Birds, Z50 AF-mode Single point, Z50 AF-area Pinpoint, standard camouflage.
F11: full screen
What exactly is “Lightweight bird photography”?
In two pages of this blog, this page and APERTURE mode Birds, we will show you everything you should know about “lightweight bird photography” to be able to produce excellent bird pictures by using lightweight (more or less) affordable equipment and enjoy your bird photography much, much more.
Both, birding and serious bird photography require a fair amount of know how and at least semi pro quality equipment. It takes considerable time and enthousiasm and a bit of luck to develop the knowledge, but the quipment has to be minimally semi professional. Lower quality does not suffice, however nowadays one can produce satisfactory or even excellent bird pictures (or short movies) without using those relatively heavy and extremely expensive pro-lenses like Nikkor 600mm or 800mm f/4 with weights up to several kilograms and prices in the range 5.000 to 20.000 euro.
During the least years Nikon has developed a number of lightweight semi pro lenses and camera’s particularly of the mirrorless type. For example lightweight lenses like Nikkor 300mm f/4E PF VR, Nikkor 500mm f/5.6E PF VR, Nikkor Z 180-600mm f/4.5-6.3 S and Nikkor Z 400 f/4qqq S are top quality lightweight lenses that produce great pictures in bird photography.
First of all and whatever people say or whether you like it or not: Serious bird photography is not easy!
This is because you have to deal with quite a few complications:
- Shyness of birds, by far the most important factor! By the way TRY TO NEVER EVER disturb birds!
- Varying distance, size and speed of birds; resting, moving, hoovering or extremely fast flying birds.
- All kinds of wheather: sun, cloudy, rain, snow, storm, fog.
- Available light: low light, twilight, cloudy, heavy overcast, direct sunlight.
- Expected type bird & behaviour: shy, speedy, … diving, hunting, mating, feeding, nest building, etc.
- Different types of light: direct light, backlight, bird in (deep) shadow, hazu, fog, twilight, etcetera.
- Action versus long distance (camera’s EXPOSURE TIME value versus ISO value).
- Using one or more lenses, converters 1.4 x or 1.7 x or 2.0 x, DSLR’s, MLC’s, full frame or DX, levels of reach (35mm equivalent), ISO sensitivity (noise), autofocus (MF, several AF settings), tracking potential and stabilisation (vibration reduction lenses, tripod/rice bag, handheld, car window, bike, shoulder partner, other).
- Key settings camera: PASM mode, Release mode, APERTURE, EXPOSURE TIME, ISO, standby time.
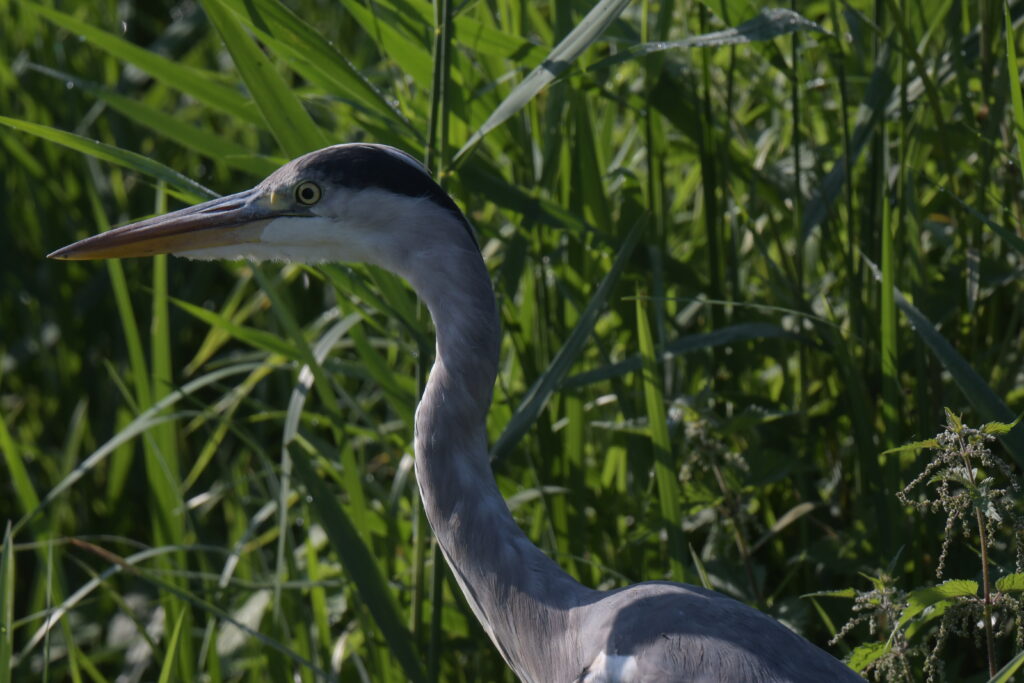
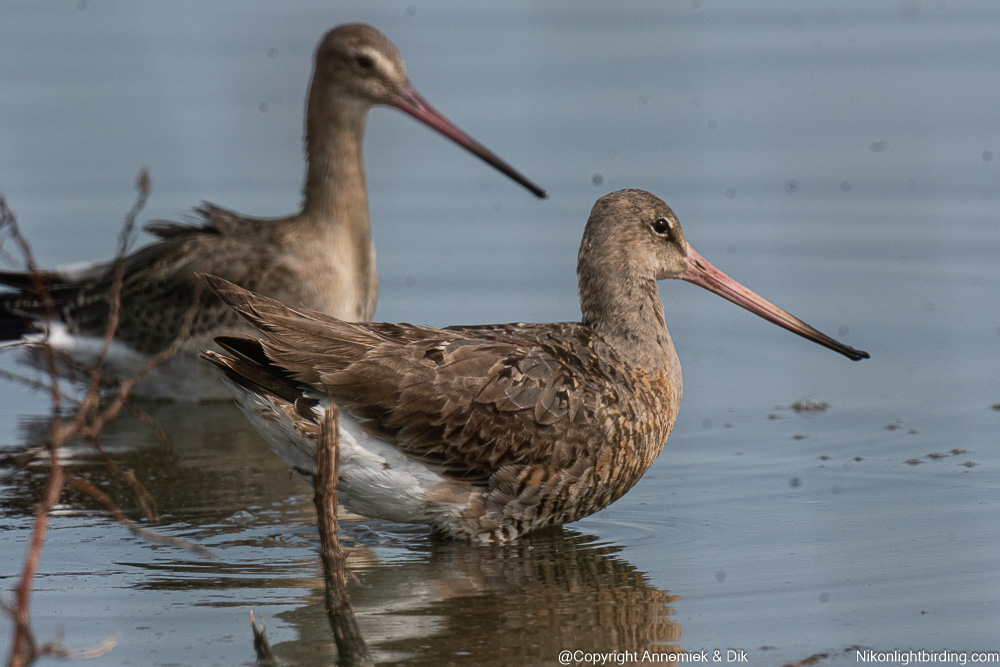
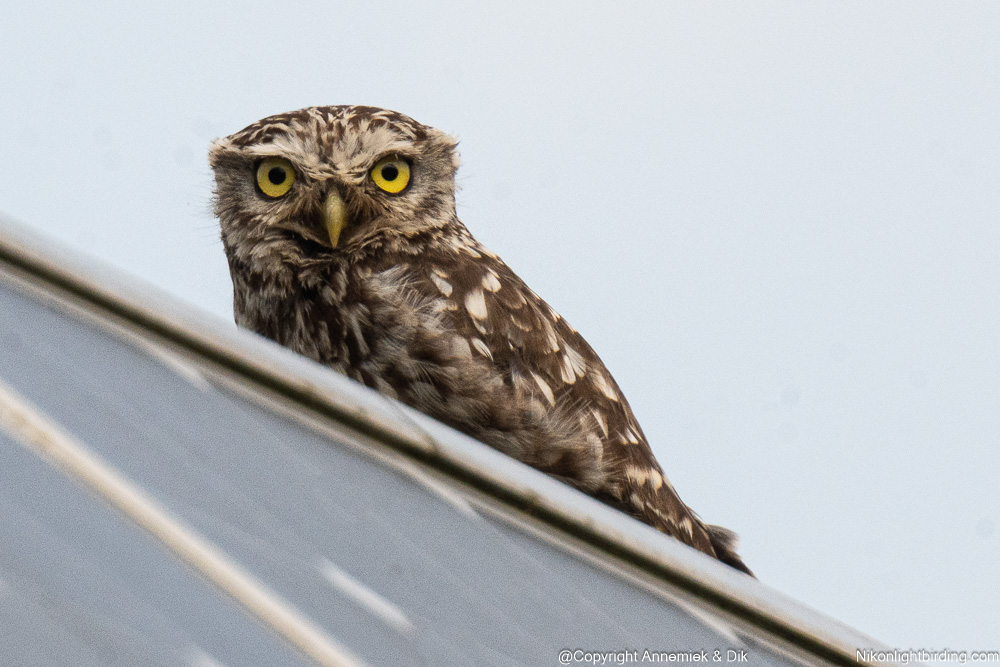
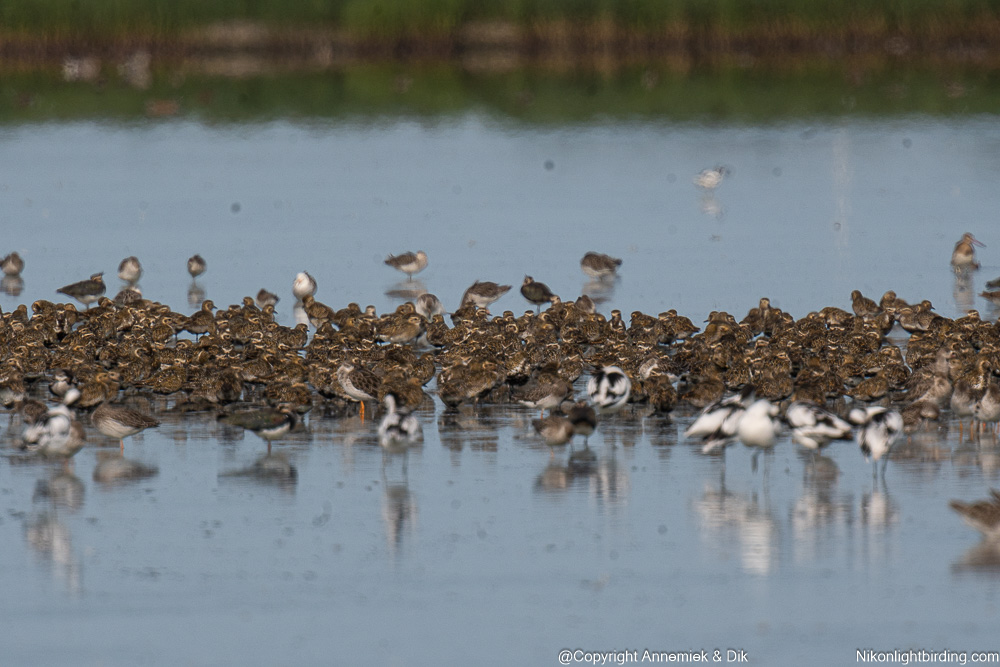
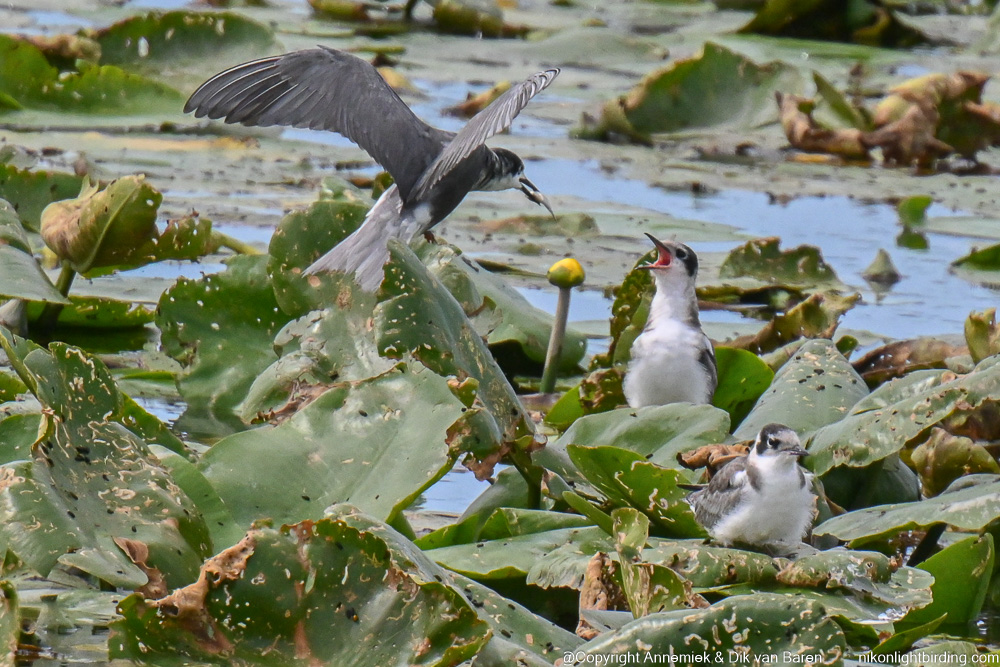
On top of all this the variety of: the natural environment like forest, dunes, mountains, beach, desert, sea, lake, river, bush, the wheather and direction of light, the type of terrain trying to shoot pictures of ever changing and sometimes completely unexpected bird species, far away or close by, from relaxed up to extremely shy or rare, resting, cleaning (“poetsen”), foraging, swimming, diving, hunting, flying, fleeing, mating, feeding their young, etcetera. Look at the pictures below and the diversity and variation of all this:
Continuously changing bird species, (speed of) actions, available light, frontlight, backlight
Look at these pictures:


Requirements
It seems almost impossible to cope with all diversity in size,distance, wheather and action of all species with only one set of equipment and one set of settings, however during decennia of lightweight bird photography using all kinds of Nikon equipment we developed a solution that worked up to today for us about two combinations and one universal set of camera settings “APERTURE mode Birds“.
If you want to be well prepared for your bird photography, you need but three things:
1. Develop knowledge and know how concerning birds
Know the birds in the country or region you are. Use appropiate Bird Guides and or books and or gather sufficient knowledge from local birders. Make sure that you know most of the local birds, their habitat, sounds and “specific” behaviour and definitely their degree of shyness! Otherwise you may spoil your only chance ever to see this bird! We had this sad and frustrating experience with our first Roller (Scharrelaar) ever. Only years later could we really observe and photograph it when we were back again in Portugal.
And also: develop some skills the field like: be quiet, have patience, anticipate, react fast, know your camera, know the birds and their behaviour and anticipate their actions.
2. Always use camouflage and the right equipment
Use camouflage and never disturb or chase birds: car, hide/screen, other.
Photograph exclusively in format RAW (look at the examples below).
Use high quality [zoom] lens/lenses and converters: Nikon, Canon, Leica, Zeiss, as follows:
- In case of long distance photography: telescope + high quality digicompact like Panasonic G3.
- Camera: DSLR and or MLC (mirrorless camera) and or top quality Bridge camera
- Support: tripod, monopod, handheld, other (wall, car window, bike, hide, etcetera).
Covering:
- Expected type bird & behaviour: shy, speedy, … diving, hunting, mating, feeding, nest building, etc..
- Action and or still and or long distance (short EXPOSURE time versus high ISO)
- All kinds of birds: small/large, close by/far away, resting/fast moving/hoovering/flying/hunting ….
- Available light: almost dark, twilight fog, hazy whether, cloudy, sunlight, direct sunlight.
3. Use One universal set of camera settings: “APERTURE Mode Birds”
Use one universal set of settings that optimises your Nikon equipment for maximum reach or maximal autofocus potential.
Use high quality [zoom] Nikon (or Canon Leica Zeiss if you prefer) camera(‘s), lens(es) & converters.
In case of long distance photography (“digiscoping” or “phonescoping”: use telescope + high quality digicompact like Panasonic G3 and or high quality smartphone (we use Apple iPhone).
Camera: DSLR and or Mirrorless and or top quality Bridge camera
Support: tripod, monopod or handheld, other.
Small or large birds close by or far away
2. Optimal settings camera & lenses dealing with:
- Adequate equipment
le light: twilight … direct sunlight
- Expected type bird & behaviour: shy, speedy, … diving, hunting, mating, feeding, nest building, etc.
More about picture format: RAW
@dik Copied from page “Extreme bird photography”APERTURE mode Birds
Using “APERTURE mode Birds” is surprisingly easy and very comfprtable inyour bird photography! So read this page and practice …
Trying to resolve this during decennia of bird photography, using all kinds of camera’s, telescopes, telelenses, tripods, etcetera, we developed “our own” reliable and extremely comfortable “Lightweight bird photography” using our special “APERTURE mode Birds” based on a few photographic principles, some standard photographing techniques and a few interesting features of Nikon equipment:
- Know the birds in the country and region you are. Use appropiate Bird Guides and or books and or gather sufficient knowledge from local birders. Make sure you know the local birds, their habitat, their sounds, degree of shyness and typical behaviour. Then go out and find them.
- Use camouflage and approach birds without disturbing or chasing them.
- Try to use all available light you can get and keep APERTURE values fixed. In modern lightweight bird photography you generally use telelenses with low APERTURE values like f/4 or f/5.6. Don’t make it worse “stopping down” lightweight Nikon (mirrorless) telelenses.
- Do NOT use classical F mount lenses like 300mm f/2.8, 500mm f/4, 600mm f/4 etcetra unless you can really handle them. In spite of their optical top quality they are far too heavy for handheld bird photography by lightweight photographers and they are quite expensive.
- Semi pro D500 uses the AF module of the full pro D6. So for bird action photography use D500 if you use a DSLR. Use Z7 II or Z8 if you prefer mirrorless. If your budget is restriced use Z50. You will miss some AF speed and tracking power and some image quality, but this camera is still not bad at all and extremely light. It is built around the same DX format sensor as D500.
- Nikon mirrorless Z camera’s and Z mount lenses generally produce more detail & image quality than F mount lenses also being lighter.
- Nevertheless: ultralight F mount Nikkor Phase Fresnel lenses 300mm and 500mm deliver fantastic detail. Example pictures below at this page.
- Nikkor TC-14E III provides 700mm equivalent using Nikkor 500mm f/5.6E PF VR without image quality loss. Nikon claims it, we (and others) tested it and found it to be true.
- Use modern denoising tools in post processing but accept some noise and get your in-focus action pictures anyway. Pictures which are not in-focus are worthless, pictures with some noise can still be quite accptable. Don’t be a perfectionist if you are a non-commercial photographer.
3.APERTURE mode Birds
Three photographing techniques plus three camera settings will transform your bird photography into something definitely reliable, succesful and exceptionally comfortable:
- 1. Back button autofocus: completely separate camera funtions autofocus and shutter release.
- 2. Focus and recompose: focus, hold focus, redirect camera somewhat (recomposing), shoot the picture as you want it to be.
- 3. Underexposure structurally 0.5 – 2.5 EV: protect detail in Highlights of your picture.
- 1. Use camera setting Automatic ISO sensitivity control: camera uses minimum ISO value within maximum ISO & minimum shutterspeed.
- 2. Use camera setting Automatic Whitebalance and if occasionally required: correct whitebalance in post production.
- 3. Camera setting Automatice shutdown: save battery power anticipating unexpected long photographic session(s).
Photographing birds in “APERTURE mode Birds” is quite easy however it may take you some time to get the feel for it. It works absolutely great and relaxed! So read and reread this page and practice untl you get used to it …
Example technique “focus and recompose”:
@dik example FAR
Focussing in APERTURE mode Birds *)
When using Nikon DSLR (or other Nikon DSLR you use): know the optimal setting of a9 by heart and (re)set camera, only when required during actual photography, in advanced AF mode like this:
a9 = limit AF options: restrict D500 to 2 options out of 7 like: Single point and GRP out of in total sevenve possilities, Single point, dynamic 25 points, dynamic 72 points, dynamic 153 points, 3-D, GROUP and auto AF. This results in using in total maximally three different combinations of Nikon equipment Single point, GRP and qqq.
At present we are using our favourites D500, Z50, Z7 II, Nikkor 300mm f/5.6E PF VR and Nikkor 500mm f/4E PF VR, TC-14E II or III and aspherical TC-20E III.
When using a Nikon mirrorless Z camera: know the following setting by heart and (re)set camera, when required during actual photography, in advanced AF mode like this:
- AF-mode: AF-S pinpoint
- AF-area: AF-C wide area
(Example picture Z50 on top of this page).
*) If you are using other (semi) professional equipment like Canon, Fujifilm, Leica, Panasonic or Sony you have to work out the equivalent equipment and settings. The principles of lightweight potography and possibly some variation of thepertinent APERTURE mode remain the same.
*) We chose Nikon equipment and review our bird photography exclusively using Nikon lightweight equipment since we are convinced sure this is, for us, the best choice, More about this at Why Nikon? Using any other equipment, may also offer a sound solution in bird photoraphy. Feel free to apply the ideas presented in this blog using any other brand. The idea behind our “lighweight bird photography” are more or less universal. We have been enjoying bird photography using Nikon equipment for over 40 years now. Nikon EL2 was our first DSLR ever. At present our favourites are Nikon D500, Z50, Z7 II, Nikkor 300mm f/5.6E PF VR, 500mm f/4E PF VR, TC-14E II or III and aspherical TC-20E III.
Actually using APERTURE Mode Birds
If you set you camera and choose your equipment accordingly, in other words when using these standard photographing techniques, the right equipment and settings thereof, you can handle your Nikon DSLR or MLC as follows:
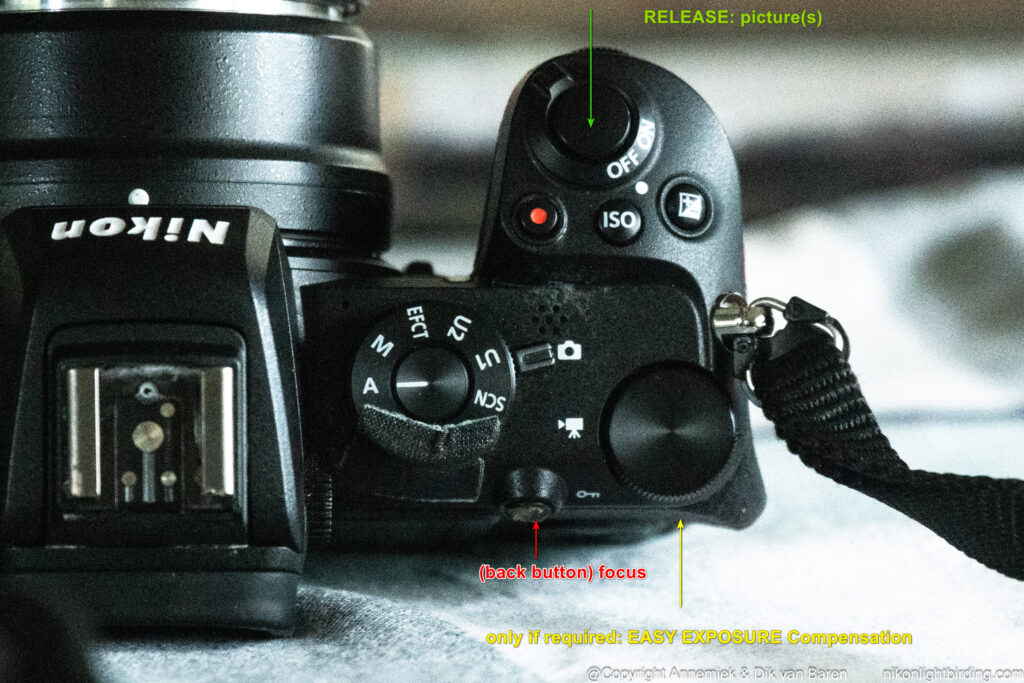
Z50: You only use three camera buttons during actual bird photography like this:
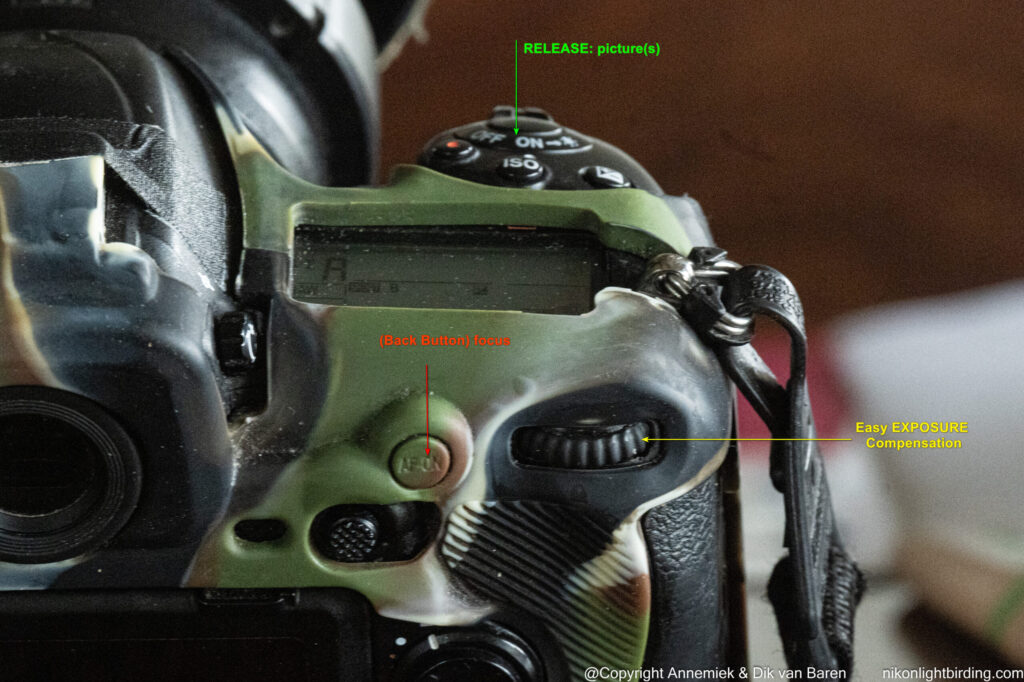
D500: you only use three camera buttons during actual bird photography like this:
For example DSLR D500 and mirrorless camera Z50 either one combined with Nikkor 500mm f/5.6E PF VR:


The RESULTS: some example pictures using these combinations:
Photographing birds (relatively) far away (“reach”)


Photographing “action” or movement:


Tracking (faast) moving birds using ultralight combination of equipment:


