Foto at top: BORDERLINE CASE: Fuerteventura 2015 cloudy. Cream-coloured Courier (Renvogel), a very shy desert bird 75 meter cloudy V3 Nikkor 300mm f/4D equivalent 1135mm substantial camouflage. It was hard spotting those perfectly camouflaged birds at large distances in stone deserts. This picture has hardly sufficient detail and very poor image quality. This borderline case is a typical example of insufficient reach. Today our Z50 Nikkor 500mm f/5.6E PF VR 1500mm equivalent combination and far better image sensor would have produced a far better image.
Extra info: This a rather technical page. Reach (bereik) is key in bird photography but it happens to be generally ill defined. We will try to define and quantify reach (bereik) as precisely as possible. This page is no piece of cake, so take your time particularly to study the examples used. They may clarify the theory because they are real. However if you still feel you don’t want or cannot understand all about reach, you can perfectly suffice by roughly calculating actual reach in any situation with this approach to this page: skip the explanation, apply the “Reach-formula” as shown below, take a look at some examples on this page and be happy ever after in your lightweight bird photography. Just keep using the formula as we will be demonstrating in the examples. It took us also quite some time to understand and quantify “reach” as bird photographers sometimes talk about.
Quantifying reach when buying equipment or picking equipment for photographing birds
What precisely is sufficient “reach (bereik)” in bird photography? Can you calculate it? How do you quantify it? What is the standard measure (maatstaf): meters, pixels, dots … ???
DEFINITION: We define reach in lightweight bird photography as follows: Reach is the distance in meters up to which one can shoot pictures with equal of larger than a well defined standard resolution (pixels/mm2) of a specific bird of defined size (centimeter). It is quite clear that reach is dependent on size of the bird, distance to bird and the 35mm equivalent of the equipment used.
With this definition of Reach in mind one can quantify Reach of certain set of photographic equipment for a bird of any size at any distance as follows:
Reach is quadratically proportional to (size bird S cm) X (equivalent equipment EQ mm)/(distance bird D meter) somewhat corrected for actual conditions of light and atmosphere by a correction factor we will call Cla:
Reach (bereik) (in %) = S 2 x EQ 2 x 1/ D 2 – Cla % of the resolution in our “standard picture”
(We solemny promise that this is the only formula in this blog.)
Cla is a constant accounting for the actual amount of available light and (im)purity of atmosphere value 0-15% in sunlight & clear atmosphere up to maximally 100% in the middle of the night, heavy smoke or fog, etcetera). A standard picture for defining sufficient resolution will be defined below.
In this blog we always use official size “S” as reported in Dutch ANWB Bird Guide: 10 Literature, sites, +terminology. This is the “size” or “length” of a “vertically” standing or horizontally resting/swimming bird from top to toe (van top tot teen).
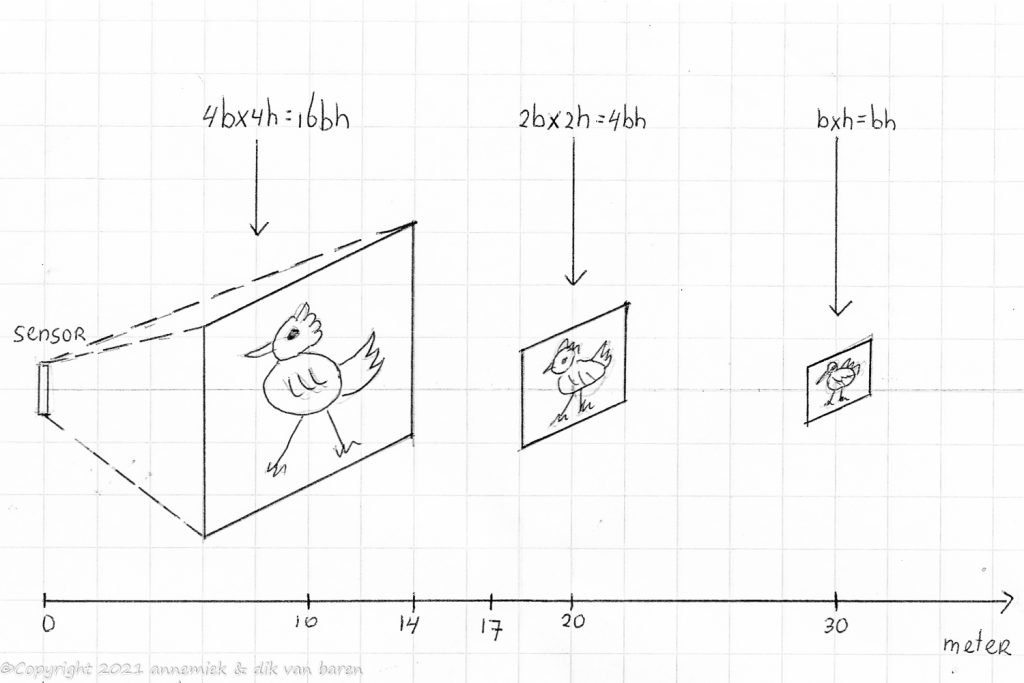
The diagram below may illustrate why S and D are quadratic factors and not linear factors in the equation.

As you can see we still need some kind of standard picture, a precisely defined measure (maatstaf) for satisfactory “sufficient resolution”, a benchmark picture” to quantify sufficient reach like we use our standard second for time and standard meter for size (and mm for equivalent) and percent for quantifying the correction factor.
We define the resolution of the following “benchmark picture” as our standard measure for “sufficiently resolved detail”. This is our personal benchmark. If a picture shows this (or higher) grade of resolution we consider this picture to have sufficient resolution (or better), having satisfactory detail. When quantifying reach of equipment we will always compare pictures this equipment produces with this standard picture, our resolution benchmark:
Now we can define Reach as follows:
Actual Reach = S 2 x EQ 2 x 1/ D 2 – Cla % of the resolution shown in the benchmark picture.
And compare actual reach of with our benchmark picture as follows:
Reach (0 – 100%) = (S/22) 2 x (EQ/450) 2 x (10/D) 2 – Cla percent resolution of benchmark picture.
“Rounded” figures of size and equivalent in order to make future estimates or calculations somewhat easier:
Reach (0 – 100%) = (S/25) 2 x (EQ/500) 2 x (10/D) 2 – Cla percent resolution of benchmark picture.
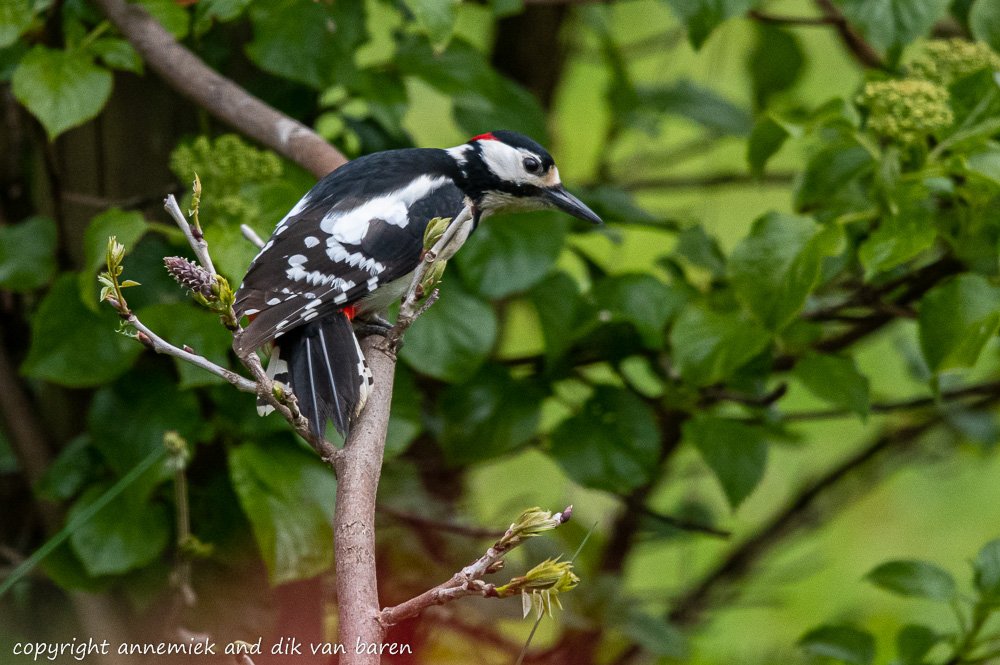
So in case of buying or picking equipment or estimating our reach in the field: we estimate the reach we may obtain with this partclar equipment as being a certain percentage (0 – 100%) of the resolution of our benchmark picture (Great Spotted Woodpecker 16 cm rounded 15 cm distance 10 meter photographed with a 450mm, rounded 500mm, equivalent in average cloudy wheather and average atmosphere zero percentage subtracted for low available light or impure atmosphere).
Ten examples of estimating reach
To demonstrate the value of this formula we show ten examples in which we estimated our actual reach in the field by comparing – in our imagination – the resolution of the pictures we actially shot with the resolution of our benchmark picture, this Great Spotted Woodpecker 10 meter rounded 50omm equivalent.
Example 1 (mind the underlined differences with our benchmark picture): Holland Great Spotted Woodpecker (Grote Bonte Specht) 10 meter sun D500 Nikkor 500mm f/4E PF VR TC-14E equivalent 630mm crop 3000 x 2000 pixels. Compared to: GBS 25cm 10m cloudy clean air rounded 500mm equivalent. The idea is: “Using this equipment in this situation photographing this bird at this distance, etcetera: How does this situation, regarding reach (bereik), compare to my standard picture of a Great Spotted Woodpecker 25cm height, distance 10 meter, using 450 equivalent etcetera?”:
(15/15)² x (10/10)² x (630/450)² => 1.4² => 200% amount detail benchmark picture. (don’t forget the squares !)
Explanation: The larger equivalent results in twice the amount of detail. Sunlight compared to cloudy wheather usually results only in more light contrast and color contrast and does not substantially add more detail.
Example 1:
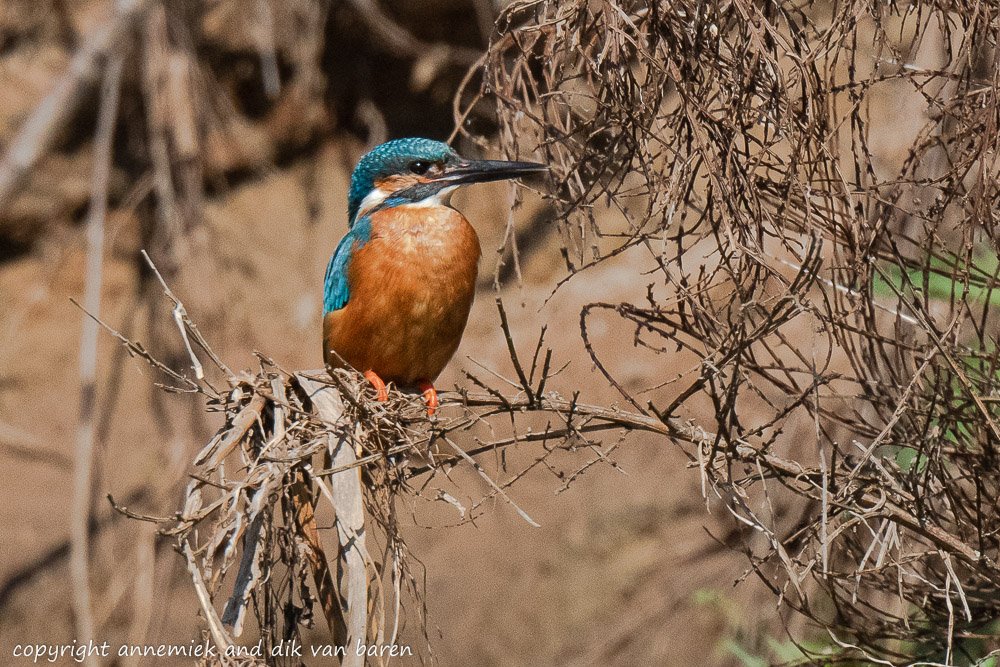
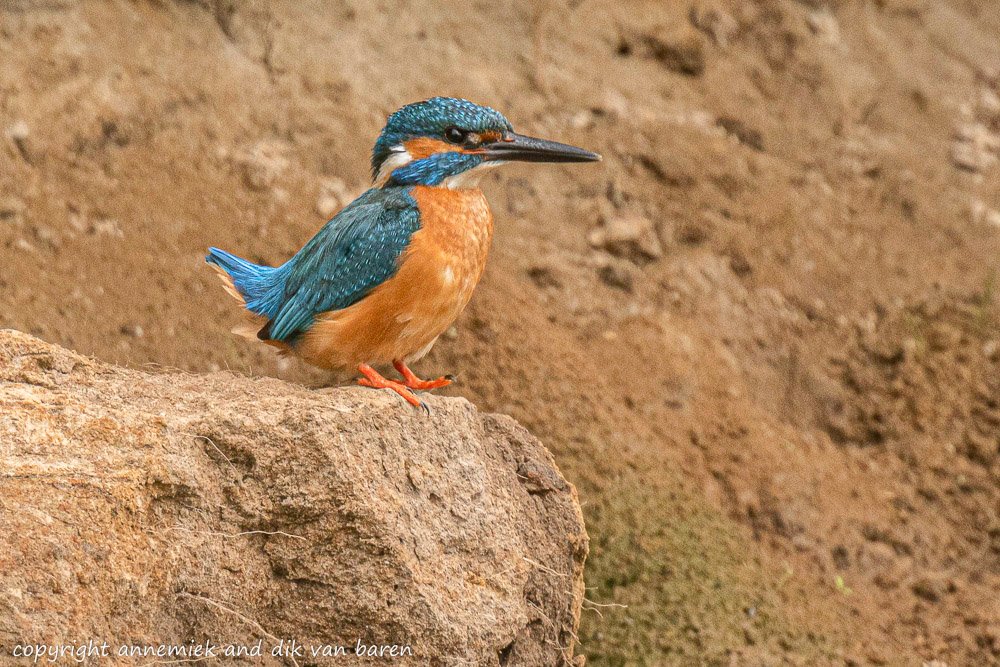
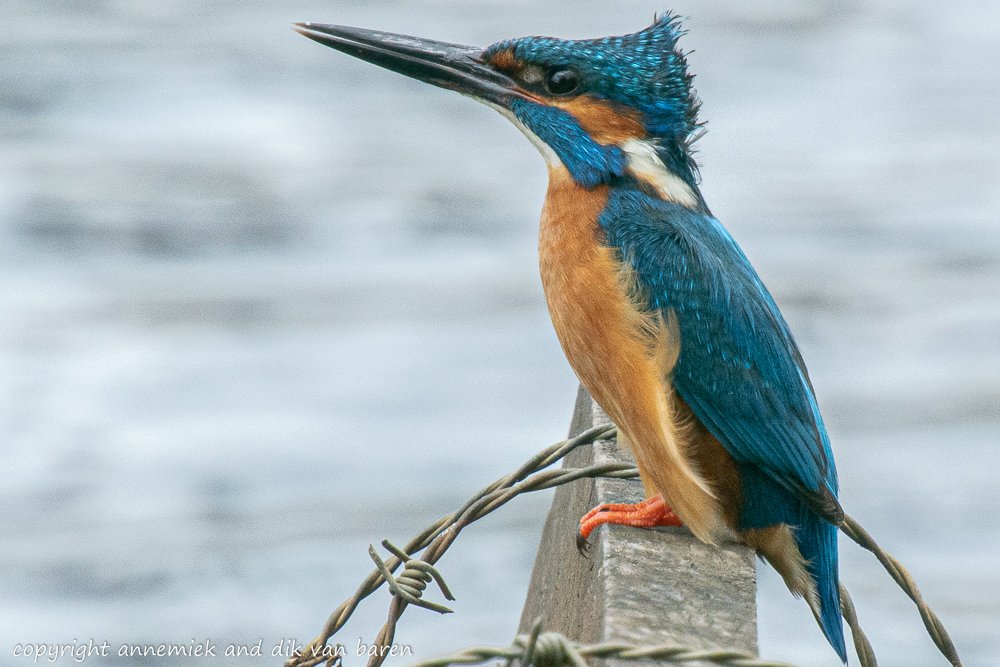
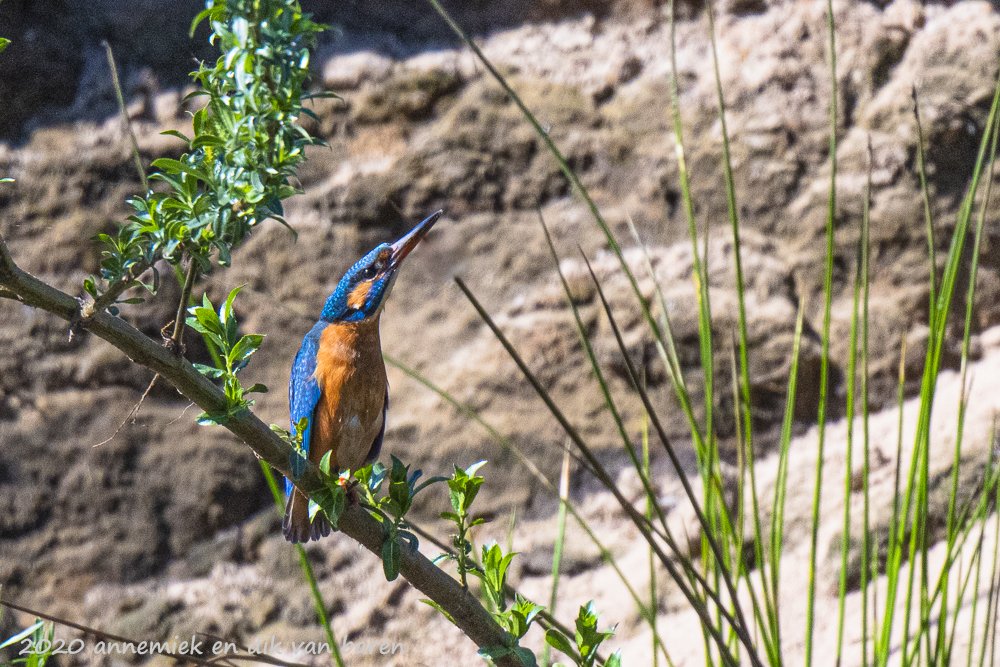
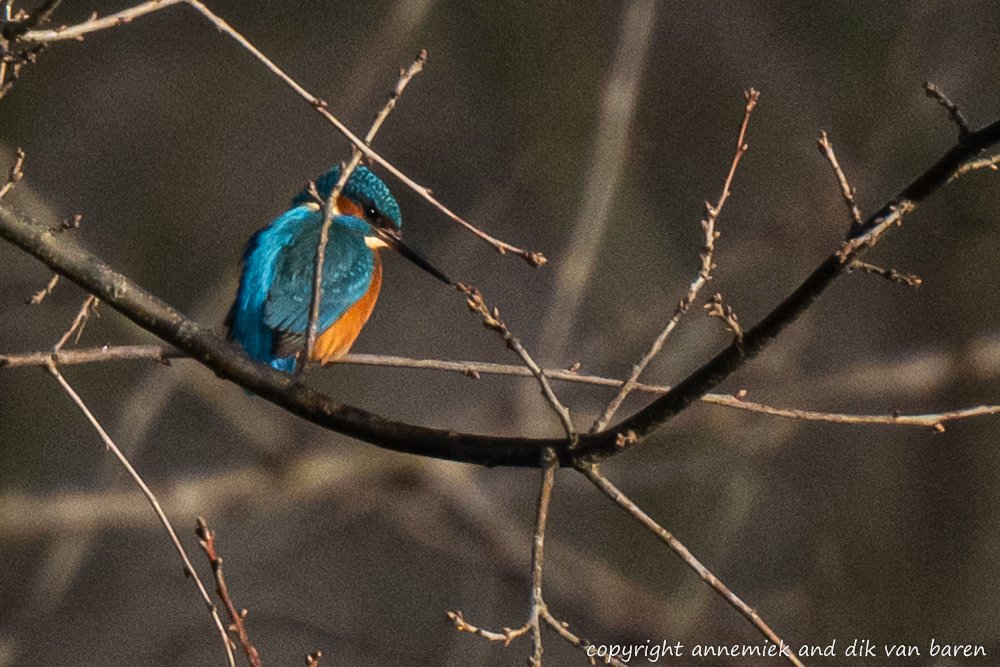
Example 2: Question when buying or selecting equipment: “Can we make a sufficiently detailed picture of a relatively small Kingfisher (IJsvogel) size 16 cm at distance estimated 30 meter, whith a D500 Nikkor 300mm f/4E PF VR TC-14E combination equivalent 1050mm? Please quantified (rounded) answer.
Answer: The actual picture (below) Kingfisher distance 28 meter taken with D500 Nikkor 500mm f/5.6E PF VR TC-14E equivalent 1050mm definitely contains acceptable amount of detail of a rather small bird at relatively large distance 28 meter to our subjective personal judgement!
Actual reach = (25/25) 2 x (10/10) 2 x (1050/750) 2 – 0 => rounded (630/500) 2 – 0 => 126 % of the resolution benchmark picture.
Explanation: Size is equal, distance equal and equivalent is larger. By the way in the field we always use the rounded version of the Reach-formula. Total result: less resolution but still acceptable – our personal judgement – picture. For example birds legs which have good detail.
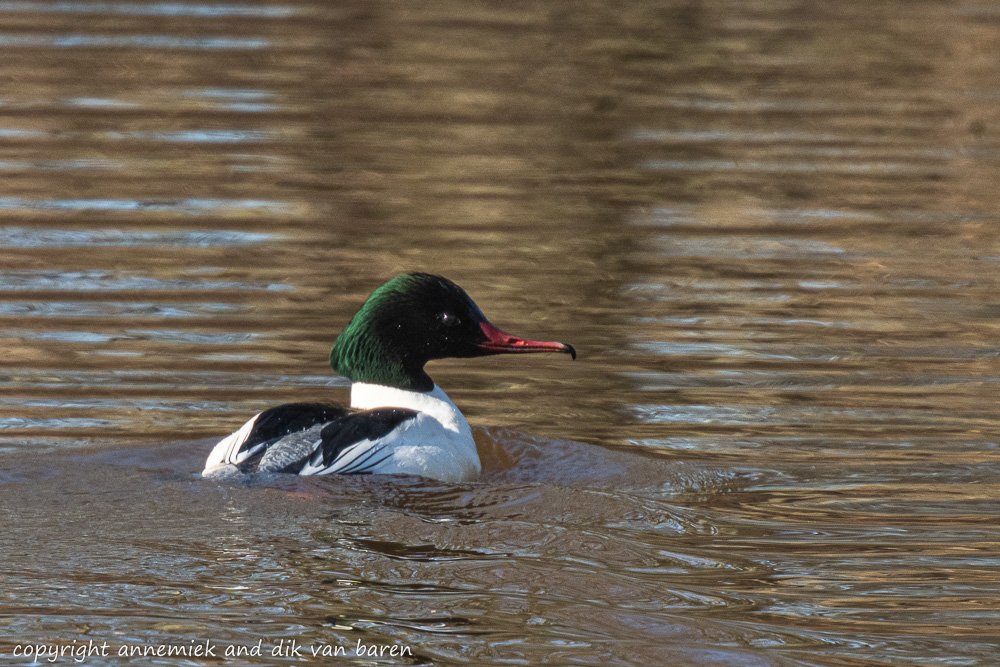
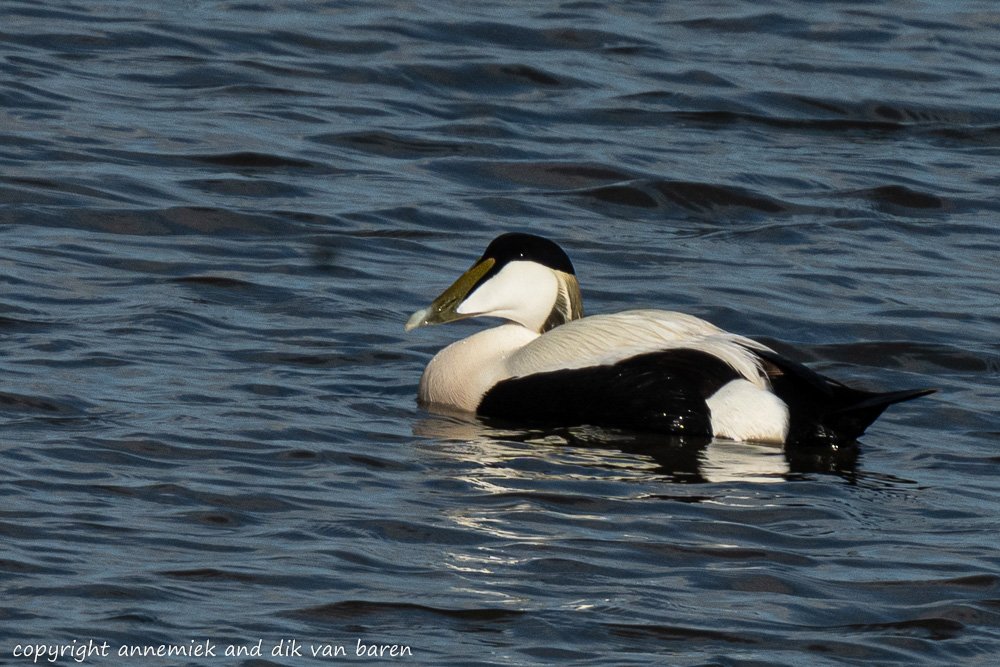
Example 2: when buying or selecting equipment: “Can we make a sufficiently detailed picture of a relatively large Goosander (grote Zaagbek) distance 50 meter whith our Z50 Nikkor 500mm f/5.6E PF VR TC-14E, equivalent 1050 mm?
Answer: The actual picture below of a Goosander (grote Zaagbek) at 50 meter sun taken with Z50 Nikkor 500 f/5.6E PF VR TC-14E equivalent 1050mm standard camouflage contains, to our subjective personal judgment, quite acceptable amount of detail of this relatively large bird at 50 meter.
Example 3: when selecting equipment: “Can we make a sufficiently detailed picture of a relatively small bird like this Kingfisher (IJsvogel) size 16cm distance 28 meter whith our Z50 Nikkor 500mm f/5.6E PF VR TC-20E III, equivalent 1500 mm?
Answer: The picture below of a Kingfisher (IJsvogel) size 16cm distance 28 meter taken whith Z50 Nikkor 500mm f/5.6E PF VR TC-20E III, equivalent 1500 mm substantial camouflage contains, to our subjective personal judgment, acceptable amount of detail of this relatively small bird at 28 meter.
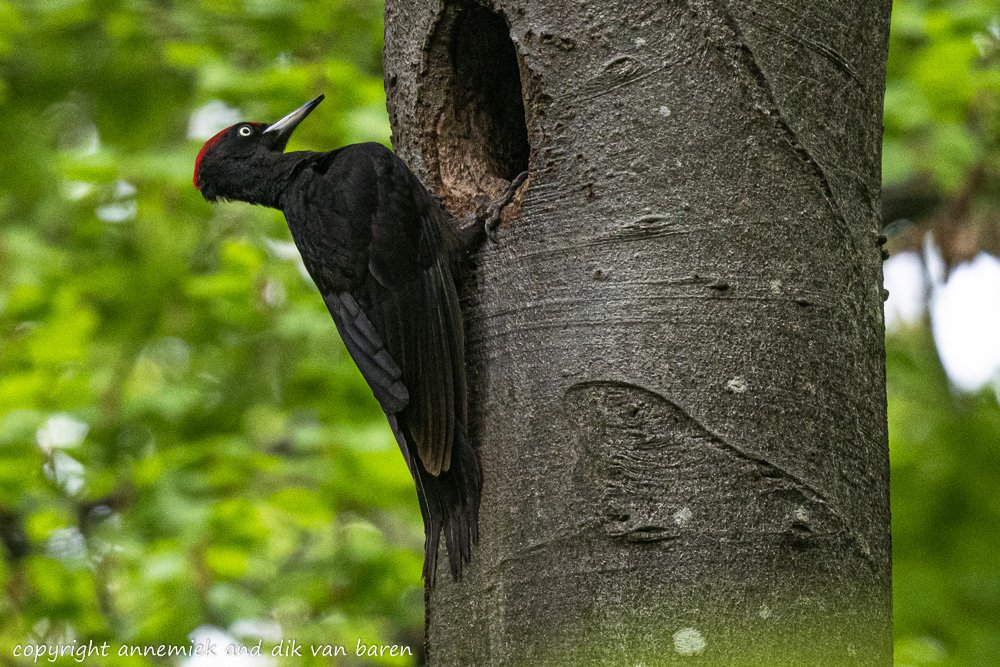
Example 4: when photographing a rather large bird, average size 51cm, at 30 meter, which I expect to show up next to its nest soon and I desperately need to know right now: “Should I use or not use my 1.4 converter to get a detailed frame filling image using Nikkor 500mm f/5.6E PF VR of the expected Black Woodpecker (Zwarte Specht)?“
Answer: The picture below contains an acceptable amount of detail (again our subjective personal judgment) and the complet bird “in view” and in final uncropped print. By the ways picture also shows nice grades of black thanks to high quality image sensor Z50 and Raw workflow.
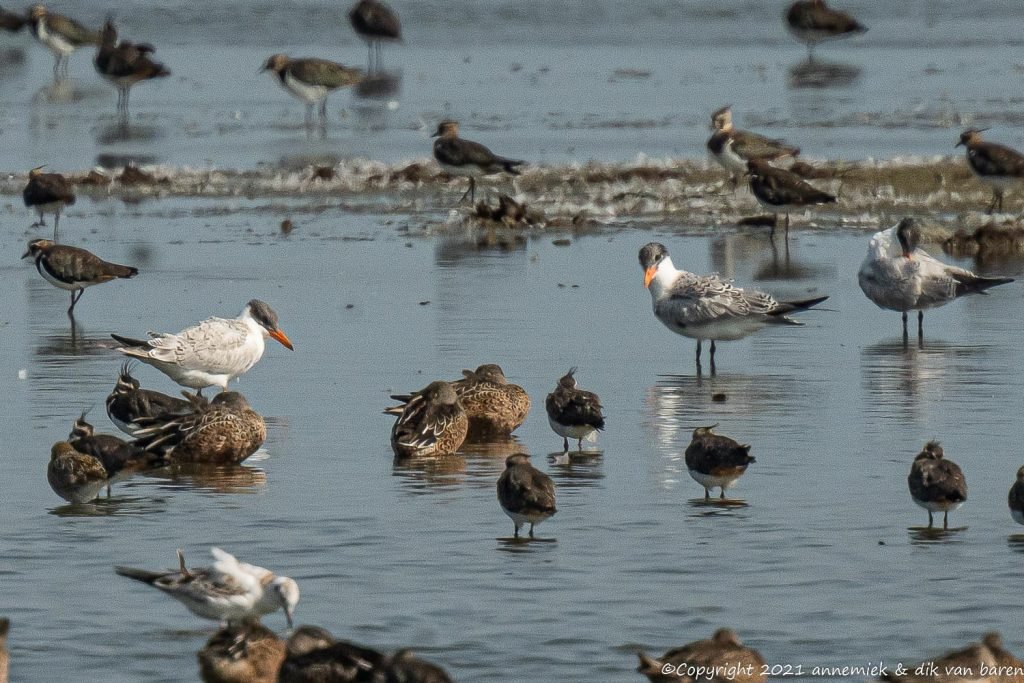
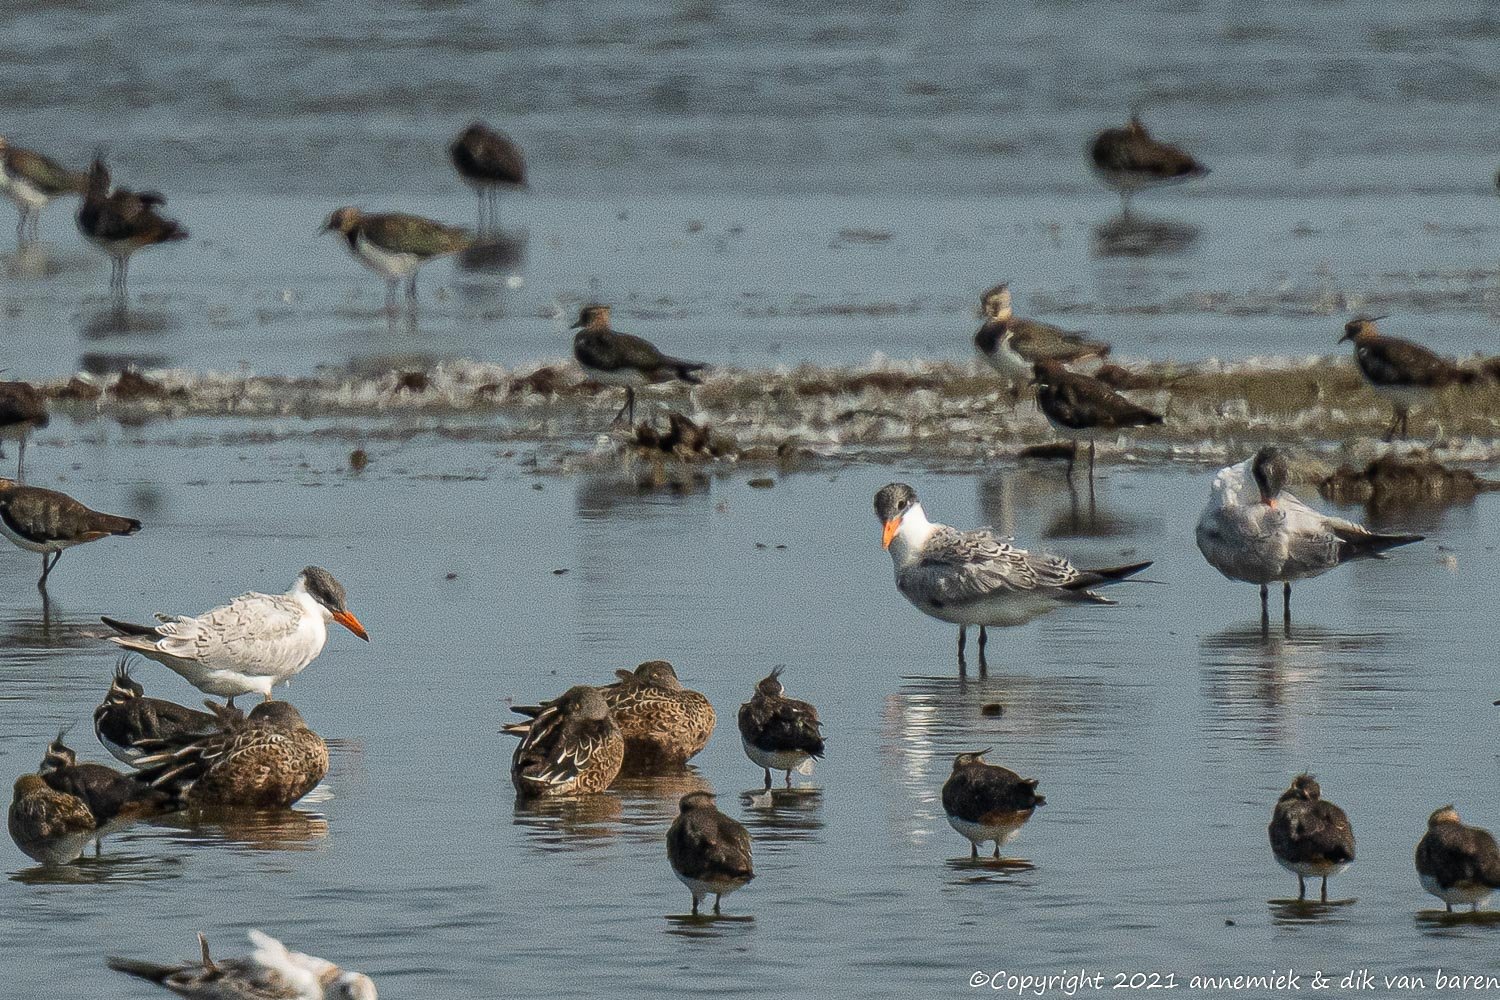
Example 5: Can I shoot a picture with still acceptable but probably not really sufficient detail of these remote interesting in Holland migrating Caspian Terns (Reuzensterns) at a distance of estimated more than 100 meter with my Z50 Nikkor 500mm f/5.6E TC-20E III equivalent 1500mm?
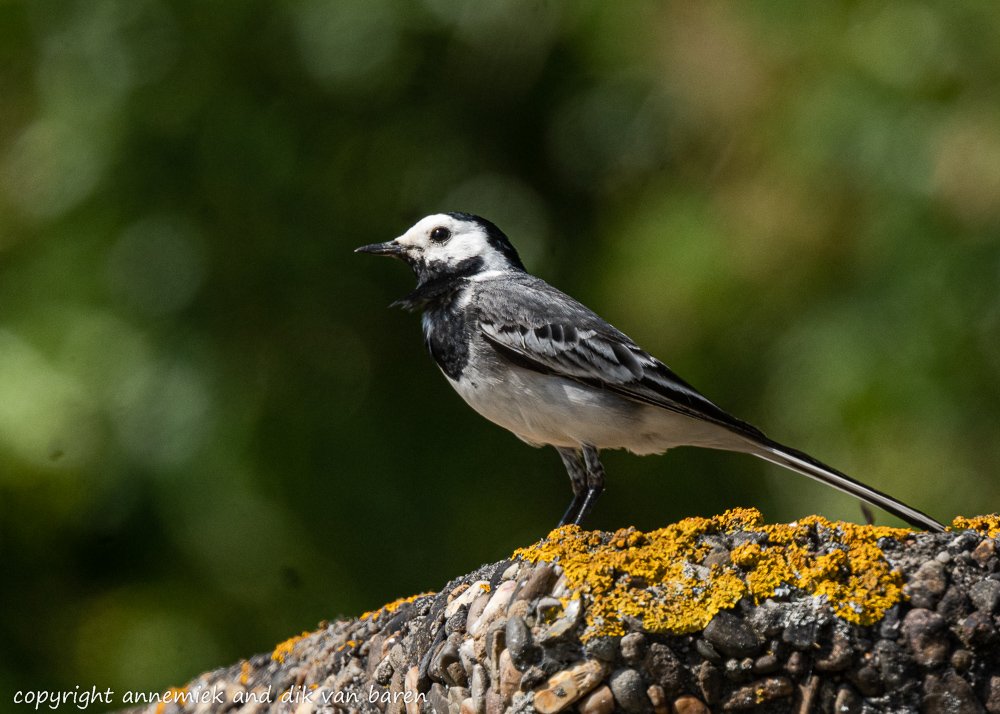
Example 3: when selecting equipment for shooting a small sized bird relatively close by at 8 meter: “Should I remove 1.4 converter if I want a more or less frame filling picture of this White Wagtail (Witte Kwikstaart) at 8 meter with my Z50 Nikkor 500mm f/5.6E TC-14E equivalent 1050mm and shoot with 750mm equivalent or use the converter and use 1050mm equivalent?
Answer: The picture below taken with 1.4 converter contains quite acceptable amount of detail but is more or less frame filling, again our subjective personal judgment !
Answer: The picture below contains acceptable detail CONSIDERING it is a BORDERLINE CASE: Holland Aug 2021 Caspian Tern (Reuzenstern) over 100 meter sun Z50 Nikkor 500mm f/5.6E PF VR TC-20E III equivalent 1500mm standard camouflage..
In these qqq examples we will use different bird species, distance, amount of available light and atmosphere. We will also use digiscoping, Mirrorless, DSLR, full frame, APS-C type and short and long lenses.
Theory is beautiful, but during years of doing reliable estimates of our actual reach in the field, we developed the following practical method for estimating our reach in a given situation:
In 90% of all situations you only need these 2 steps:
- Bring back in your mind our BENCHMARK picture (standard of sufficiently resolved detail)
- Estimate percentage detail actal situation = (size x 1/distance x equivalent)² % detail BENCHMARK picture.
In the examples below we will describe this method of “rounding and calculating” in several steps so you can follow the estimating, rounding and calculating. This “short” approach works out easily and has proven to be quite effective in the field. We always know which equipment to select when and where and we don’t take loads of worthless pictures back home any more.
In cases of significantly less or more available light (dark wheather, twilight, fog, smoke, light snow, sandstorm or exceptionally clean or obviously polluted or vibrating air, we account for an extra maximally 25 percent bonus/malus premium:
percentage actual detail = (size x 1/distance x equivalent)² % BENCHMARK picture +/- premium.
We show a majority of pictures of Kingfisher (IJsvogel) because this bird is active in Holland all year around and breeding March through September but also local in most European and North African countries near the sea and near fresh water. For us this is a good representative bird, rather colourful and active, alyhough often shy and or difficult to find and photograph.
To start let’s first once more show our standard reference, our benchmark picture of a GBS.
Thereafter we will compare with this benchmark picture the next eleven pictures of birds at various distances taken with different equivalents, amounts of available light and condition of atmosphere.
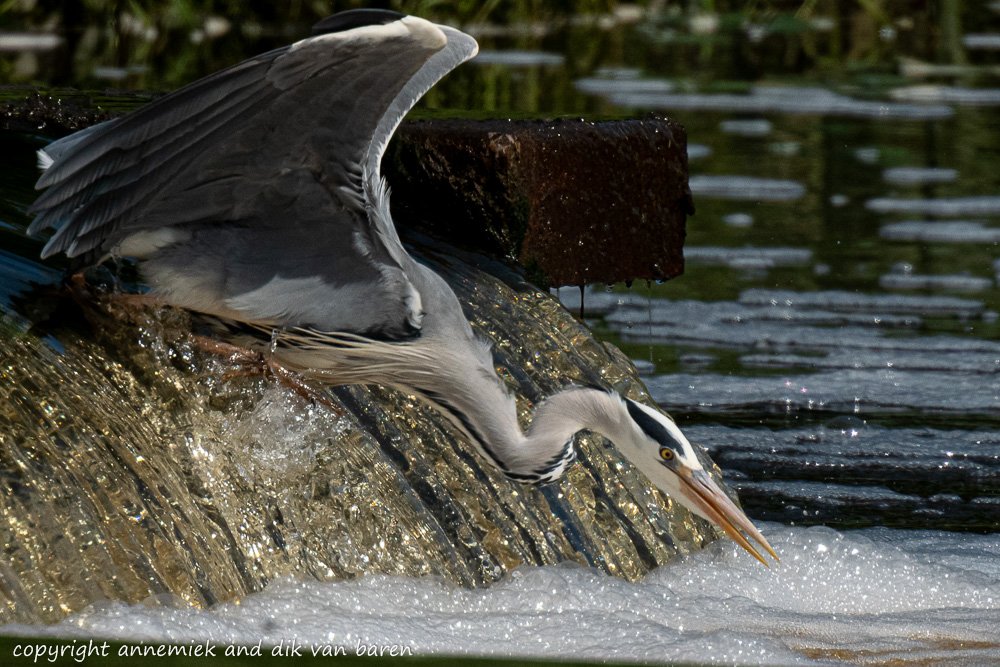
Example 2. Holland Grey Heron (Blauwe Reiger) 40 meter sun handheld Z50 Nikkor 500mm f/5.6E PF VR TC-20E III equivalent 1500mm standard camouflage. Compared to: GBS 25 cm 10 meter cloudy clean air 450mm equivalent:
(95/25 x 10/40 x 1500/450)² => (4/1 x 1/4 x 3/1)² => 900% amount of detail benchmark picture.
Distance 40 meter is no problem whatsoever with a bird of this size! Picture is obviously sufficiently detailed.
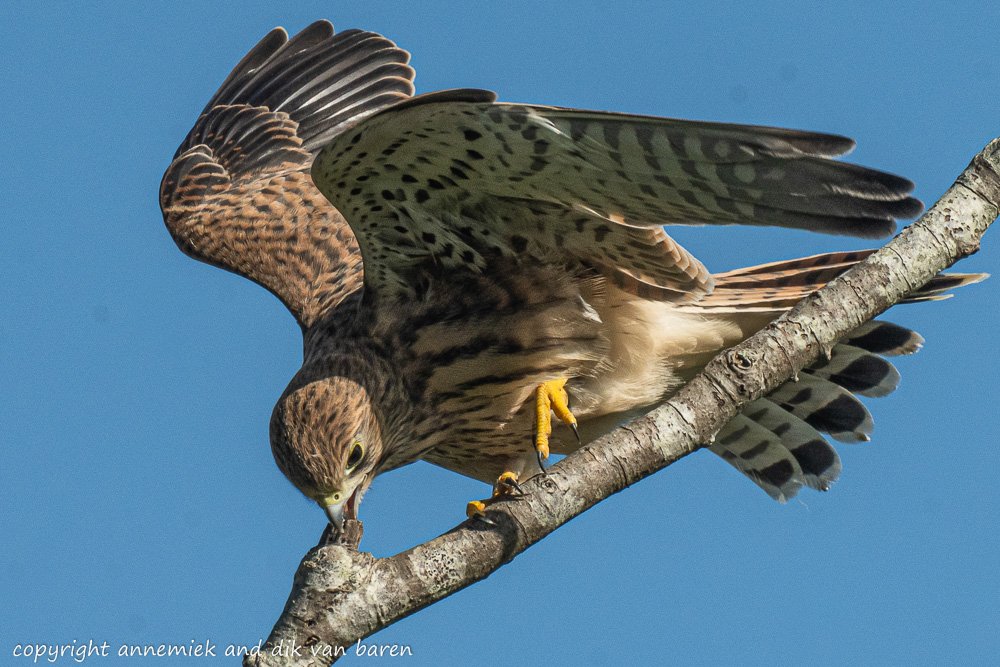
Example 3 Holland Kestrel (Torenvalk) 30 meter sun storm handheld Z50 Nikkor 500mm f/5.6EPF VR TC-20 III equivalent 1500mm, crop 3000 x 2000 pixels. Compared to: GBS 25cm 10m cloudy clean air 450mm equivalent:
(35/25 x 10/30 x 1500/450)² => (7/5 x 1/3 x 3)² => 200% amount of detail benchmark picture.
Improved colour and contrast due to sun, twice amount of detail due to larger bird and large equivalent.
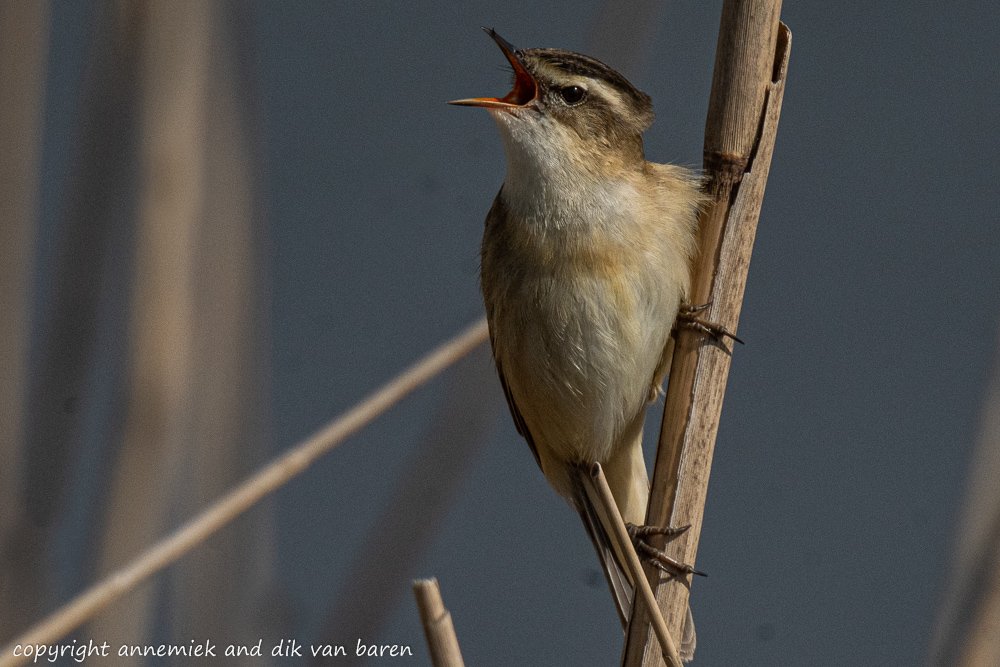
Example 4. Holland Reed Warbler (Rietzanger) 12 meters sun. Tripod Z50 Nikkor 500mm f/5.6E PF VR TC-20E III equivalent 1500mm standard camouflage, crop 3000 x 2000 pixels. Compared to: GBS 25cm 10m cloudy clean air 450mm equivalent =>
(13/25 x 10/12 x 1500/450)² => (1/2 x 5/6 x 3/1)² = 125% of detail benchmark picture.
Definitely sufficient detail of relatively small active bird. High quality sensor, Lightroom RAW conversion and editing and bright sunlight create contrast and colour depth in overall quiet brownish picture. Strong wind finishing touch.
Example 5. Holland Kingfisher (IJsvogel) 15 meter sun handheld D500 Tamron G2 150-150mm f/5.0-6.3 TC X14 substantial camouflage, 3000 x 2000 equivalent 1260mm. Compared to: GBS 25cm 10m cloudy clean air 450mm:
(16/25 x 10/15 x 1260/450)² => (3/5 x 2/3 x 5/2)² =>100% amount of detail benchmark picture.
Definitely more detail because of shorter distance and a moderately larger equivalent. By the way examples 4 and 5 clearly show that Nikkor 500mm f/5.6E PF VR and Tamron G2 150-600mm f/5.0-6.3, though quite different types of lensens both are semi pro high quality lenses producing rich detail at relatively large distance, ideal for bird photography. The Nikon is a bit lighter and still supports advanced autofocus modes 3D and auto using f/8 at 700mm equivalent (1.4 converter). And although the Tamron cannot match this AF functionality because of its f/9 value with also perfect 1.4 converter, this lens has its extremely useful zoom function. We ended up using both: a luxury, but definitely worth its money.
Example 6. Holland Kingfisher (IJsvogel) 18 meter cloudy tripod telescope Swarovski STM80HD 30X Nikon V1 + 1 Nikkor 18.5mm f/1.7 equivalent 1500mm. Compared to: GBS 25cm 10m cloudy clean air 450mm equivalent =>
(16/25 x 10/18 x 1500/450)² => (3/5 x 5/9 x 3/1)² => 100% of detail benchmark picture.
Small bird, high equivalent, extremely dark cloudy winter, but high quality telescope, absolutely great 18.5mm lens and digicompact very suited for digiscoping levelling out.

Example 7. Holland Kingfisher (IJsvogel) 21 meter very dark cloudy rainy wheather. Tripod J5 Nikkor 300mm f/4E PF VR TC-20E III equivalent 1620mm. Compared to: GBS 25cm 10m cloudy clean air 450mm equivalent:
(16/25 x 10/21 x 1620/450)² => (3/5 x 1/2 x 11/3)² => (33/30)² => 120 % amount benchmark.
Great detail thanks to good lens and converter and large equivalent and great quality of Nikon System 1 mirrorless J5 (very small but high quality image sensor). Extremely dark wheather yet surprisingly fine detail and image quality. By exception almost as a curiosity we like to show the original picture also:
qqq raw yet qqq
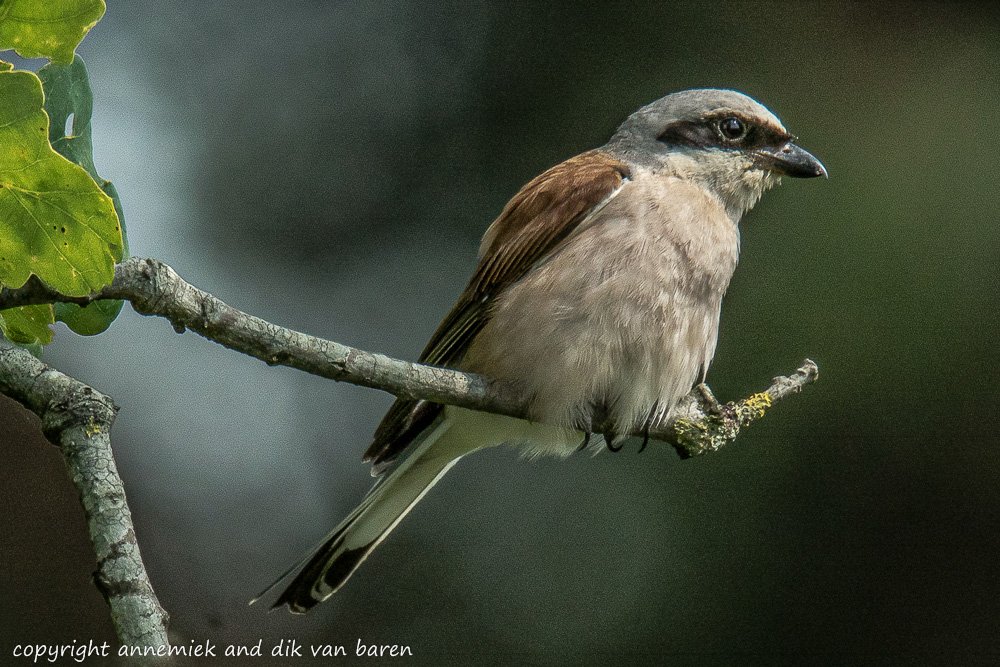
Example 8. Holland Red-backed Shrike (Grauwe Klauwier) 25 meter cloudy. Tripod V3 Sigma Sport 150-600mm f/5.0-6.3 TC 1401 equivalent 2270mm substantial camouflage. Compared to GBS 25cm 10m cloudy equivalent 450mm:
(17/25 x 10/25 x 2270/450)² => 150% of detail of benchmark picture.
Wonderful result of great Sigma Sport with high quality 1.4 converter. It also demonstrates that System 1 V3 can produce goodt images with its small sensor (in contradiction to what people may say about System 1). We bought this V3 on the first day it was available and highly appreciated it many years particularly with Nikkor 300mm f/4E PF VR. Later J5 (example picture 8 above this one) took over. Nowadays Z50 is taking over with a 1500mm equivalent and a grown up sensor and clear viewer, ideal for sun/cloudy bird photography (see picture top of page and next picture).
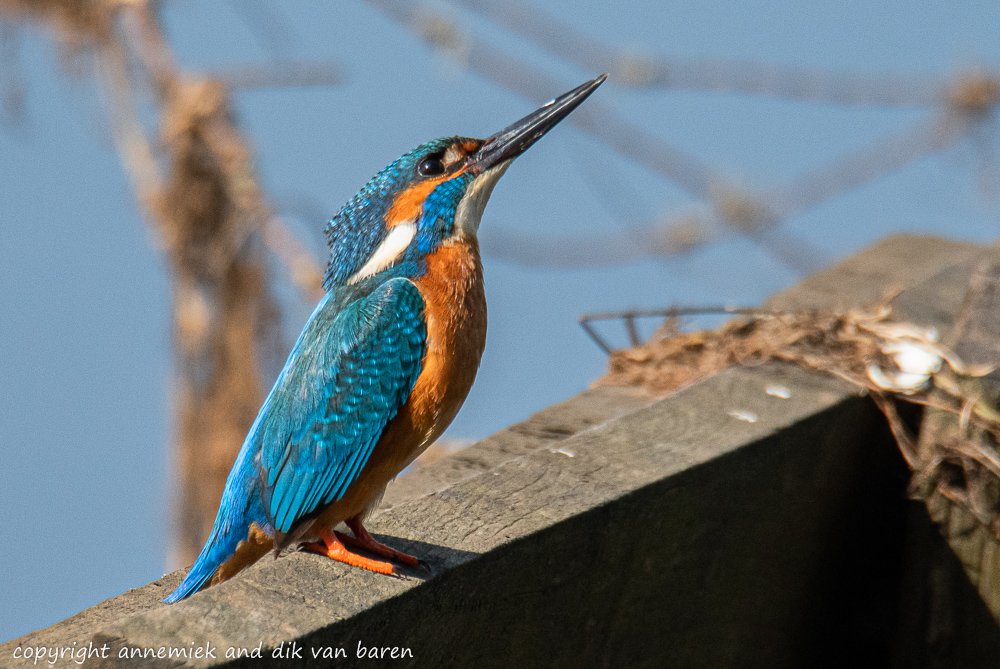
(16/25 x 10/28 x 1500/450)² => 60% => 75% (including bonus clean air) amount of detail benchmark picture. Another example of significant positive effect of clean air.
Example 9. Holland crop 3000 x 2000 Kingfisher (IJsvogel) 28 meter cloudy tripod Z50 Nikkor 500mm f/5.6E PF VR TC-20E III equivalent 1500mm exceptionally clean atmosphere substantial camouflage. Compared to: GBS 25cm 10m 450mm equivalent:
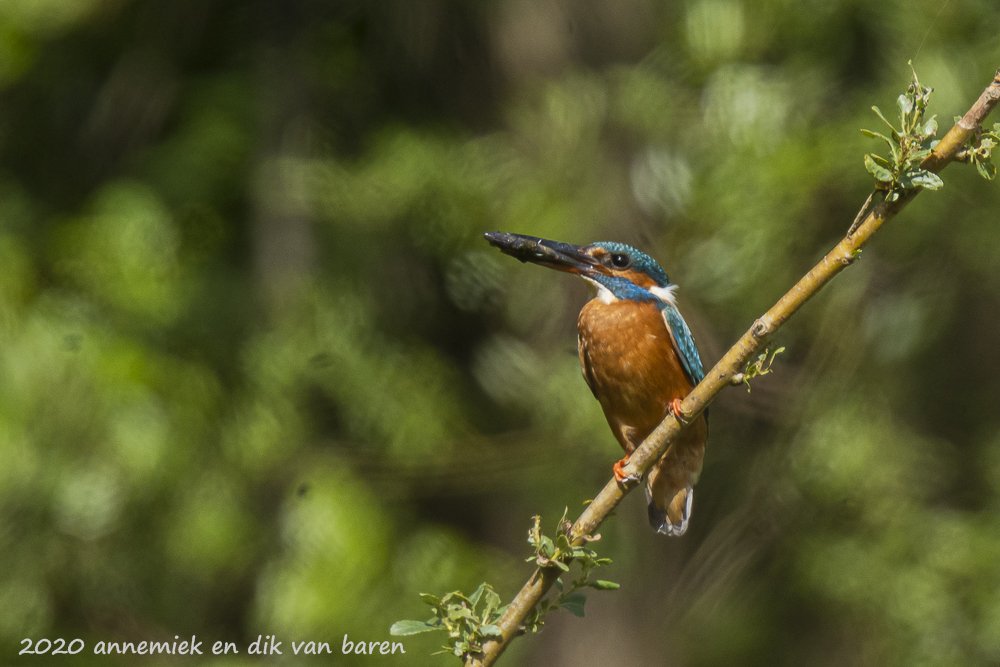
Lightroom Develop Dehaze filter. The rather large fish one can predict that juvenile will fly within few days. They all leave the nest in one day and theafter get chased out off parents territory.
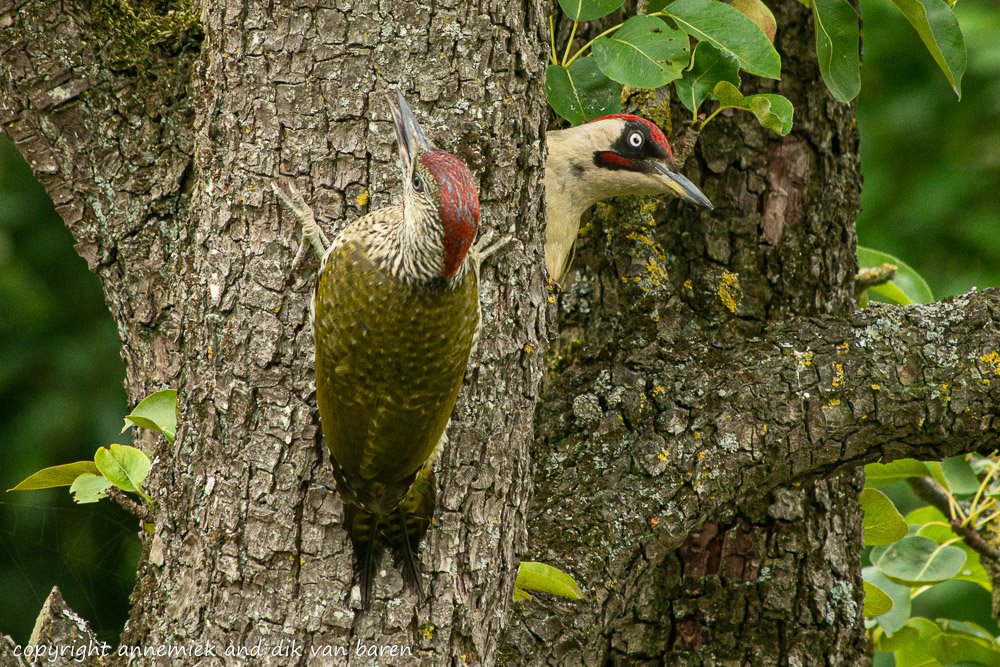
Example 10 Holland Green Woodpecker (Groene Specht) man and juvenile 22 meter cloudy tripod D800 Nikkor 300mm f/4.0D (non VR) TC-20E III equivalent 600mm substantial camouflage.
(200/25 x 10/200 x 1050/450)² => (8/1 x 1/20 x 2/1)² => (4/5)² => 80% detail benchmark picture.
High quality full frame sensor of D800 is providing not only rich detail but also light and color contrast in very dark cloudy wheather.
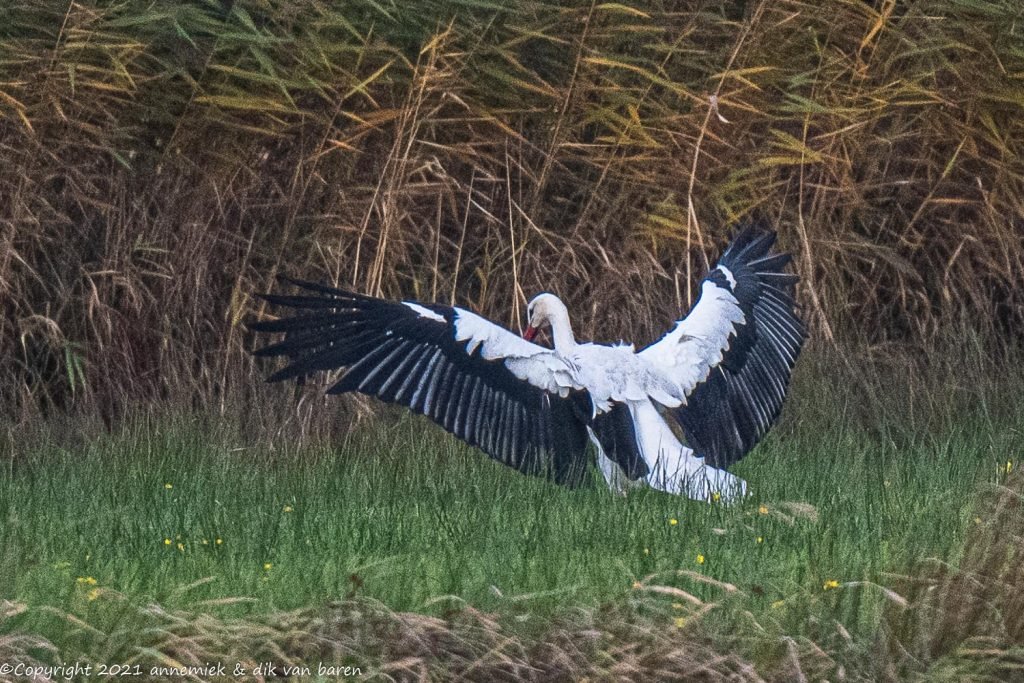
Example 11 Holland White Stork about 200 meter (!) sun handeld D500 Nikkor 500mm f/5.6E PF VR TC-14E equivalent 1050mm standard camouflage.
(200/25 x 10/18 x 600/450)² => (6/5 x 5/9 x 4/3)² => (8/11)² => 55% detail benchmark picture.
Good example of the quadratic arithmetic of our formula: 200 meters distance is more or less cancelled by wingspan 218 cm. In this case we considered wingspan more relevant than size. Notwithstanding 200 meter distance the amount of detail – in our eyes – of this lens is astonishing!
===============
Eleven examples quantifying and comparing reach (bereik) in the field
We will illustrate the quantification of reach in the following 11 examples. WE will compare in our mind the actual situation in the field with our BENCHMARK picture of the Great Spotted Woodpecker at 10 meter, as shown at page 6 Reach. in mind.
In thes examples we will use different bird species, distance, amount of available light and atmosphere. We will also use digiscoping, Mirrorless, DSLR, full frame, APS-C type and short and long lenses.
Theory is beautiful, but during years of doing reliable estimates of our actual reach in the field, we developed the following practical method for estimating our reach in a given situation:
In 90% of all situations you only need these 2 steps:
- Bring back in your mind our BENCHMARK picture (standard of sufficiently resolved detail)
- Estimate percentage detail actal situation = (size x 1/distance x equivalent)² % detail BENCHMARK picture.
In the examples below we will describe this method of “rounding and calculating” in several steps so you can follow the estimating, rounding and calculating. This “short” approach works out easily and has proven to be quite effective in the field. We always know which equipment to select when and where and we don’t take loads of worthless pictures back home any more.
In cases of significantly less or more available light (dark wheather, twilight, fog, smoke, light snow, sandstorm or exceptionally clean or obviously polluted or vibrating air, we account for an extra maximally 25 percent bonus/malus premium:
percentage actual detail = (size x 1/distance x equivalent)² % BENCHMARK picture +/- premium.
We show a majority of pictures of Kingfisher (IJsvogel) because this bird is active in Holland all year around and breeding March through September but also local in most European and North African countries near the sea and near fresh water. For us this is a good representative bird, rather colourful and active, alyhough often shy and or difficult to find and photograph.
To start let’s first once more show our standard reference, our benchmark picture of a GBS.
Thereafter we will compare with this benchmark picture the next eleven pictures of birds at various distances taken with different equivalents, amounts of available light and condition of atmosphere.
Example 1 (mind the underlined differences with our benchmark picture): Holland Great Spotted Woodpecker (Grote Bonte Specht) 10 meter sun D500 Nikkor 300mm f/4E PF VR TC-14E equivalent 630mm crop 3000 x 2000 pixels. Compared to: GBS 25cm 10m cloudy clean air 450mm equivalent. The idea is: “Using this equipment in this situation photographing this bird at this distance, etcetera: How does this situation, regarding reach (bereik), compare to my standard picture of a Great Spotted Woodpecker 25cm height, distance 10 meter, using 450 equivalent etcetera?”:
(1/1 x 1/1 x 630/450)² => 1.4² => 200% amount detail benchmark picture. (don’t forget the squares !!!)
The larger equivalent results in twice the amount of detail. Sunlight compared to cloudy wheather usually results only in more light contrast and color contrast and does not substantially add more detail.
Example 2. Holland Grey Heron (Blauwe Reiger) 40 meter sun handheld Z50 Nikkor 500mm f/5.6E PF VR TC-20E III equivalent 1500mm standard camouflage. Compared to: GBS 25 cm 10 meter cloudy clean air 450mm equivalent:
(95/25 x 10/40 x 1500/450)² => (4/1 x 1/4 x 3/1)² => 900% amount of detail benchmark picture.
Distance 40 meter is no problem whatsoever with a bird of this size! Picture is obviously sufficiently detailed.
Example 3 Holland Kestrel (Torenvalk) 30 meter sun storm handheld Z50 Nikkor 500mm f/5.6EPF VR TC-20 III equivalent 1500mm, crop 3000 x 2000 pixels. Compared to: GBS 25cm 10m cloudy clean air 450mm equivalent:
(35/25 x 10/30 x 1500/450)² => (7/5 x 1/3 x 3)² => 200% amount of detail benchmark picture.
Improved colour and contrast due to sun, twice amount of detail due to larger bird and large equivalent.
==============
Example 5, working towards a large printed picture of large bird: “Will the picture of a close up of a Grey Heron 50 meter taken with Z50 Nikkor 500mm f/5.6E PF VR TC-20E III contain sufficient detail to be printed on A3 format paper or any other media?
We cannot give sound quantative answers to this type of questions unless we have a sound definition and measure (maatstaf) of reach. Nor can we quantify what we consider to be “sufficiently resolved detail”. So let’s try defining these two items if we want to talk about reach in bird photography.
Our “working definition” of “reach” in bird photography is as follows:
The “reach of “certain equipment is:
The number of “sufficiently resolved” pixels per square millimeter of the digital image of this bird produced:
- with this equipment
- of a bird with a certain size (height or wing span)
- at a given distance (meters)
- using a defined amount of available light and (sun, cloudy, shadow, twilight)
- and defined condition of the atmosphere (clear & clean air, smoke, rain, fog, snow, dark night etcetera).
We have listed all 5 factors which in our view and practical experience determine what actual reach (bereik) is, using certain equipment and settings, photographing a certain bird at a certain distance under certain circumstances of available light and transparancy of the atmosphere.
We will also quantify to which extent these factors determine the reach of equipment:
- The 35mm equivalent in millimeters of the used equipment: reach is (squarely proportional) (height x width of bird). Explanation of 35mm equivalent at: Crop.
- The size (upright) bird in centimeters (Bird Guide Tirion): reach is (squarely proportional)
- The distance camera-bird in meters: reach is (inverted squarely proportional)
- A factor we call “Ciso”: estimate 0-100% (lower detail at high ISO values)
- A factor we call“Cair”: estimate 0-100% (lower if eg. air pollution or bonus 15% clean air)
Last but not least we define “sufficiently resolved” (factor number 6 in the formula) by defining a “benchmark picture” (bepaalde foto als maatstaf) below at this page. We will compare and measure the reach of any combination we use, regarding its bereik using always this benchmark picture as our standard measure (maatstaf). Just like we compare the weight of something with the standard kilogram and length of something with the standard meter in Paris.
Ciso is an estimated percentage (0-100%) subtracted of the amount of available light which causes degraded resolution at higher ISO values.
Cair is an estimated percentage (0-100%) subtracted accounting for not-clean air blocking light transmission.
Both, Ciso and Catm, are percentages in the calculation of reach as we will see.
Our benchmark picture should resolve this “our personal judgment”
We will now define a specific bird picture as our benchmark picture:
the picture of a Great Spotted Woodpecker (Grote Bonte Specht), at 10 meter in direct sublight, clean, clear atmosphere as shown below. This is our benchmark picture by definition. (You could use yours if you wish).
Just like mankind ever defined the “meter”, the European unit of length being 1 meter equal to the lenght of some standard golden stick (the “benchmark”) in a cool cellar in Paris, we define the amount of detail in our benchmark picture below as our standard measure (maatstaf) of what we call “sufficiently resolved detail” in lightweight photography. In other words: we consider the amount of detail per square millimeter in this benchmark picture of a Great Spotted Woodpecker at 10 meter distance taken in average but 100% cloudy wheather in Holland at noon, to be “sufficiently resolved”.
A photograph, in this example cropped in Lightroom to dimensions 3000 x 2000 pixels, of a Great Spotted Woodpecker (Grote Bonte Specht) upright size 25 centimeter at a distance of 10 meter, photographed using Nikon D500 at tripod and Nikkor 300mm f/4E PF VR 35mm equivalent 450mm in average cloudy wheather and standard clean air in the middle of the day.
We felt that 3000 x 2000 pixels would be a reasonable size for comparing resolution in pixels/mm² of bird pictures, like comparing resolution in actual pictures with this benchmark picture:
This bird, a Great Spotted Woodpecker, often called “GBS”, almost any day in our garden, is an easy testbird that can be photographed at different distances, under various light conditions, etcetera. You can of course define your own standard bird as it suits you: any common cooperative bird of average size preferably colored. And of course you can use our benchmark picture of this GBS at 10 meter when yyou compare your pictures with this our GBS-benchmark picture in mind.
To ease caculations of actual reach in the field we rounded the size of our GBS (22-24 cm according to Dutch Tirion Bird Guide) to 25 cm. We chose standard distance 10 meter also to ease calculation of actual reach when comparing any (potential) shot with this standard picture. Anb by the ways the equivalent of 450mm in cloudy wheather will almost always in sunlight-situations be “changedd” into 500mm as we will see yet below.
Anyway try to use a combination with relatively small equivalent in your benchmark picture so most of your actual pictures will have larger equivalents and will contain more detail. In that way you are starting your comparisons at the low end of the reach-scale. Also using a 300mm combination in your benchmark picture will make comparisons with actual situations when using for example Sigma Sport 150-600mm, Tamron G2 150-600mm, Nikkor Z 200-600mm or Z 400-600mm quite easy.
Let’s try to write these factors down in a formula. We will explain this formula in detail in the following paragraphs:
reach = (size/25 x 10/distance x equivalent/450)²+ Ciso/CISO + Cair/CAIR) x 100% PIXELS/mm² GBS picture)
Mind the square!
Ciso, Catm, size (of bird in centimeter), distance (camera-bird in meter) and equivalent (35mm equivalent in mm) are entities defining the reach in any actual situation in the field. We will yet clarify the meaning of Ciso and Catm somewhat more below. The entities in caps, SIZE, DISTANCE, EQUIVALENT, CISO (a percentage) and CATM (a percentage), are the corresponding entities in the benchmark picture.
“PIXELS” represents the amount of properly resolved pixels in our GBS-benchmark picture.
Let’s review these six factors one by one:
The so called “35mm equivalent” of a combination (factor 1)
This “35mm equivalent“ of a combination camera-lens-converter has been officially defined as follows: the length in millimeters of the diagonal of the rectangle of an image sensor. For a full frame sensor (36 x 24 mm) this is 43 millimeter, for an APS-C sensor (24 x 16 mm) it is 29 millimeter. By the way 43/29 = 1.5.
For every digital combination of camera-lens-converter the following applies by definition:
35mm equivalent = focus distance of lens (mm) x converter factor x crop factor digital camera (mm).
The optical magnification of a lens is normally linearly proportional to its focal distance in millimeters, so the optical magnification of a camera-lens-converter-combination is linearly proportional to this 35mm equivalent. The amount of detail of the surface in the digital picture of a bird at a certain distance, will therefore be squarely proportional to the 35mm equivalent because length and width of the bird will both be magnifed to the same extent. So reach will be squarely proportional to the 35-mm equivalent of camera-lens-converter combination.
We call this fist rule one or our “quadratic rules“. We will encounter a few “quadratic rules” more below.
You can find a detailed explanation of different methods of “cropping” at 5 Cropping.
| Combination | Crop factor |
| Nikon DSLR full fame sensor D800 | 1.0 |
| Nikon DSLR APS-C sensor D300 D7200 D500 | 1.5 |
| Panasonic four thirds sensor MLC LX3 G1 G3 | 2.0 |
| Nikon System 1 DX sensor MLC V1 V3 J5 | 2.7 |
| Nikon MLC full frame sensor Z7 | 1.0 |
| Nikon System 1 MLC Z APS-C sensor Z50 | 1.5 |
| Combinations we used or still use: | 35mm Equivalent | Sensor type |
| D500 Nikkor 500mm f/5.6E PF VR TC-14E = 500 x 1.4 x 1.5 | 1050 mm | APS-C |
| D500 Sigma Sport 150-600mm f/5.0-6.3 TC 1401 = 600 x 1.4 x 1.5 | 1260 mm | APS-C |
| D500 G2 Tamron 150-600mm f/5.0-6.3 TC X14 = 600 x 1.4 x 1.5 | 1260 mm | APS-C |
| Z50 Nikkor 500mm f/5.6E PF VR TC-20E III = 500 x 2.0 x 1.5 | 1500 mm | APS-C |
| Z7 Nikkor 500mm f/5.6E PF VR TC-14E = 500 x 1.4 x 1.0 | 700 mm | FX |
| D7200 Nikkor 300mm f/4E PF VR TC-14E = 300 x 1.4 x 1.5 | 630 mm | APS-C |
| V3 Nikkor 300mm f/4E PF VR TC-14E = 300 x 1.4 x 2.7 | 1135 mm | CX |
| J5 Nikkor 500mm f/5.6E PF VR TC-20E III = 500 x 2.0 x 2.7 | 1500mm | CX |
| Swarovski STM80HD 50X + V1 1 Nikkor 18.5mm f/1.7 = 50 x 18.5 x 2.7 | 2500 mm | CX |
| Nikon fieldscope ED82 30X + Panasonic G3 20mm f/1.7 = 30 X 20 x 2.0 | 1200 mm | Four Thirds |
Size of the bird (factor number 2)
It makes sense that reach is dependant on the size of the bird being photographed. A Wren (Winterkoning) needs to be pretty close like 6 meters to produce an acceptable detailed picture, whereas at 60 meter a Grey Heron (Blauwe Reiger) still produces a sufficiently detailed picture using the same equipment under the same circumstances.
A bird twice as high compared to our benchmark picture will contain four times as much detail because both hight and width are (more or less) twice the hight and width of our benchmark Woodpecker so the surface of the bird in the picture will contain four times as much detail. In the same way an increasing distance will result in a quadratically decreasing amount of detail. It will follow an “inverted” quadratic rule.
In case of very large birds the situation is essentially different. Now you want to find out know whether this large bird will fit on your screen when using certain equipment. A picture taken with a D500 Nikkor 500mm (equivalent 750mm) shows that a Great Spotted Woodpecker (Grote Bonte Specht) fills up two thirds of the screen. By the way if you know this by heart you can use this information in the field. Take for example a Grey Heron (Blauwe Reiger) at 20 meters in front of you? Or a White-tailed Eagle at 50 meters up in the air? What kind of reach may be too much to make these birds not fit any more on your screen? Do you need a converter or not? That is the question in those situations.
Distance camera-bird (factor 3)
The surface of a photograph is proportional to the heigth and width thereof and both, height and width are linearly proportional to the 35mm equivalent. So the amount of detail in a bird picture decreases quadratically at increasing distance: This “quadratic rule” is quite important in bird photography in the field:
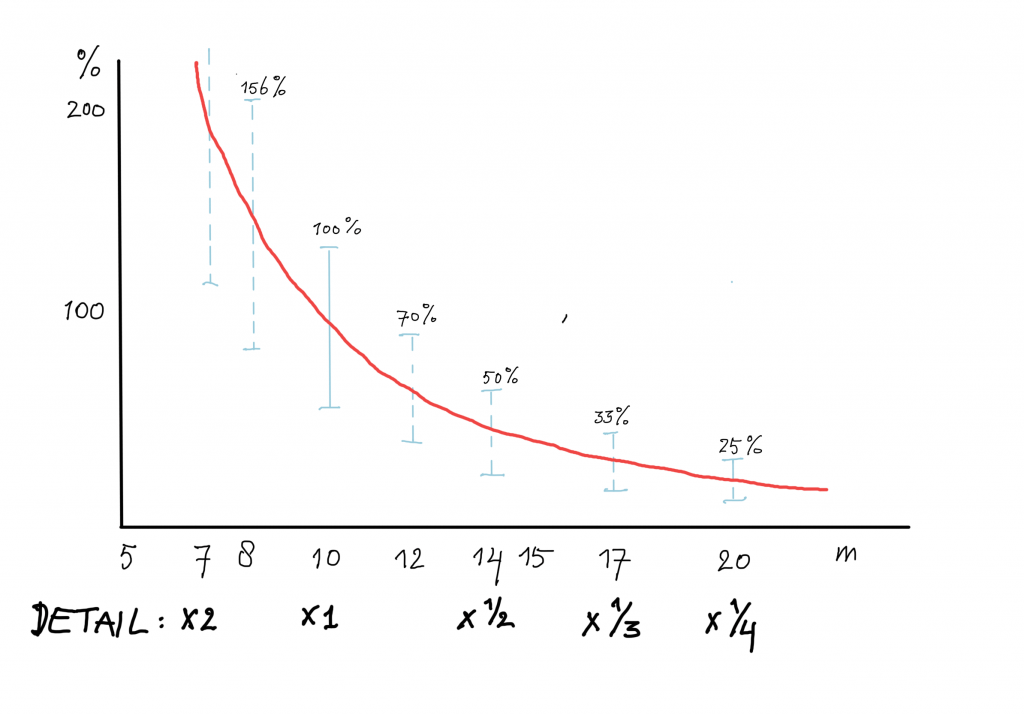
| at 14 meter | 1.4 x 1.4 = 1.96 => 50% amount of detail at 10 meters |
| at 17 meter | 1.7 x 1.7 = 2.89 => 33% amount of detail at 10 meters |
| at 20 meter | 2.0 x 22.0 = 4.06 => 25% amount of detail at 10 meters |
| at 8 meter | 1.5 x amount of detail at 10 meter |
| at 7 meter | 2 x amount of detail at 10 meter |
| at 5 meter | 4 x amount of detail at 10 meter |
By the way this is one of the reasons why converters have factors 1.4, 1.7 or 2.0. Square root 2 = 1.4, square root 3 = 1.7 and square root 4 = 2. All values rounded after first decimal.
So the amount of detail decreases dramatically at increasing distance! The graph below illustrates this and at the same time the quadratically increasing size of the image of the bird at decreasing distance. So if you upgrade a 500mm–combination by adding a 1.4 converter to 700mm or by using a 2.0 converter to 1500mm, so you will find a quadratically increased amount of detail. Also the amount of detail in the picture will increase quadratically at decreasing distance to the bird. The bird may eventually not fit on at your screen when you get too close!
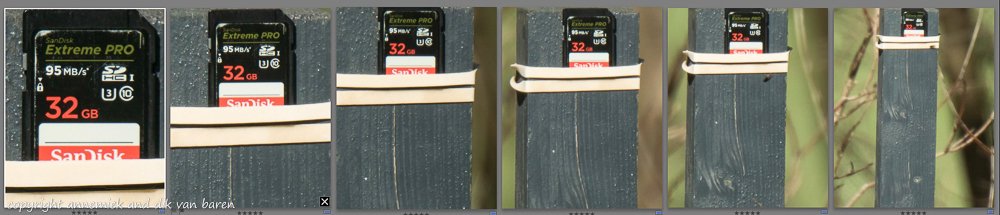
Next testphoto illustrates this “quadratic rule” of decreasing detail at increasing distance to the bird very nicely in a completely different way:
“Ciso” and “CISO”, lower resolution at high ISO, 0 -100%, subtracted (factor 4)
The technical quality of image sensors definitely has effect on reach because this affects amongst others, the isolation of pixels, the color reproduction, the amount of noise generated at high ISO values and the non-linearity of the output signal at the non-straight part of the sensitivity curve – see Camera’s. You can clearly notice this effect of sensor image quality on reach
When comparing for example the output of a D300 with the output of a D500 in low light conditions (all other conditions being equal). However when comparing it in between modern Nikon camera’s, the image sensor quality will not have a very significant impact on reach any more. They are all pretty good.
More important: the impact of noise on reach at very high ISO values is obviously noticable. A decreasing amount of available light will result in progressively decreasing resolution of sensor’s pixels: the isolation of invidual pixels becomes noticably worse. Using a D500 this effect starts at about ISO 3200. Therefore we will account for this high ISO effect in our formula through a factor Ciso (respectively CISO) with a value of 0.00-1.00. At ISO 51.200 (extremely low avalaible light and or when photographing fast action at low light) we estimate the value of this factor tobe about 0.80 using D500 or Z50, causing a decrease in reach of about 20%.
You have to estimate the value of this factor yourself. Use common sense or look at examples below.
Estimated percentages of amount detail subtracted because of available light:
| night or extremely dark wheather (no pictures possible) | 100% |
| twilight | 50-100% |
| winter, early morning cloudy: | 75% *) |
| noon cloudy | 10% |
| noon sunlight | 0% |
*) Mind you: your eyes adapt perfectly and automatically to the amount of available light during the day. For example going from sunrise winter to 10 o’clock in the morning you have to switch the camera from ISO 512.000 to ISO 1600, a range of 5 stops, a factor 32! Your eyes don’t have any problem whatsoever, they adapt perfectly an automatically. So monitor your ISO value throughout the morning and day if you do not like noisy pictures. Particularly in the early hours in the morning you have to watch it almost by the hour.
“Cair” and “CAIR”, clarity of air, estimated value 0 -100 % subtracted, + bonus 15%, (factor number 5)
You have to estimate the values of this factor yourself also. Look at the examples below.
Estimated percentages of amount detail subtracted because of air clarity:
| thick smoke, extremely heavy rain ectetera (photographing birds impossible) | 100% |
| snowstorm, heavy rain | 50% |
| light sandstorm, fog, haze, rain, vibrating air (sun or feezing wheather: differences air layer temperatures | 25% |
| average air, average pollution due to industry, traffiic, smoke, dust, etc. *) | 10% |
| 100% clear air (sun & frost winter, bright wheather, Holland countryside, Wadden Isles, Lesbos, Portugal), … | 0% |
| exceptionally clean air (total lockdown) clear sunlight after rain and other rare situations: “bonus” 15% **) | -15% |
*) We guess that average air pollution by industry, traffic in and around cities, and other “visible” pollution including humidity in Holland is blocking about 10% of the natural light so we define this condition as 90% clear air.
**) You may look surprised seeing a value 1.5 in cases of exceptional air clarity but we experienced this at several occasions amongst others during first Covid 19 total lockdown in Holland spring 2020 when standard air pollution was down to “zero” and our reach really improved with about 15% when compared with “average air”. See the picture of a Kingfisher (IJsvogel) at 33 meters below. Normally we would get that amount of detail, colour and contrast only at a distance of 27 meter or less. For easier comparing these situations in the field to something having “standard polluted air” at 100% we defined standard polluted air to have CAIR = 115% so in most cases we compare to the 100% value in the benchmark picture. Don’t bother if you do not follow this reasoning. It is but a trick for easier calculations. We thus accounted for this exceptional situation by means of an exceptional “bonus” 15%. Sounds clumsy, saves a lot of comparing and calculating.
Conclusion
It works, it really works, estimating reach in this way using the formula and th quadratic rules, time and again. It takes some practicing to get used to the “quick rounding and comparing” in the field in new unique situations, but it really works. It saved us a lot of time and bad pictures and is a great help when choosing or buying photographic equipment. This approach has worked for us for many years now. After some time you will automatically quantify borderline-reach-situations in the field in a few seconds comparing to your benchmark picture and applying these “quadratic rules“.
TIP: Use a telescope with something like a handmade calibrated scale in meters or a telelens with reliable distance meter to measure some actual distances in the field and get some feeling for distances of birds in the field. Our Nikkor 500mm f/5.6E PF VR features a quite reliable distance indicator up to about 30 meters +/- 5 % and up to 10 meters +/-10 %, which by the way is pretty good for a super telelens.
See 4a. Examples reach quantifying actual reach in practical situations in the field.
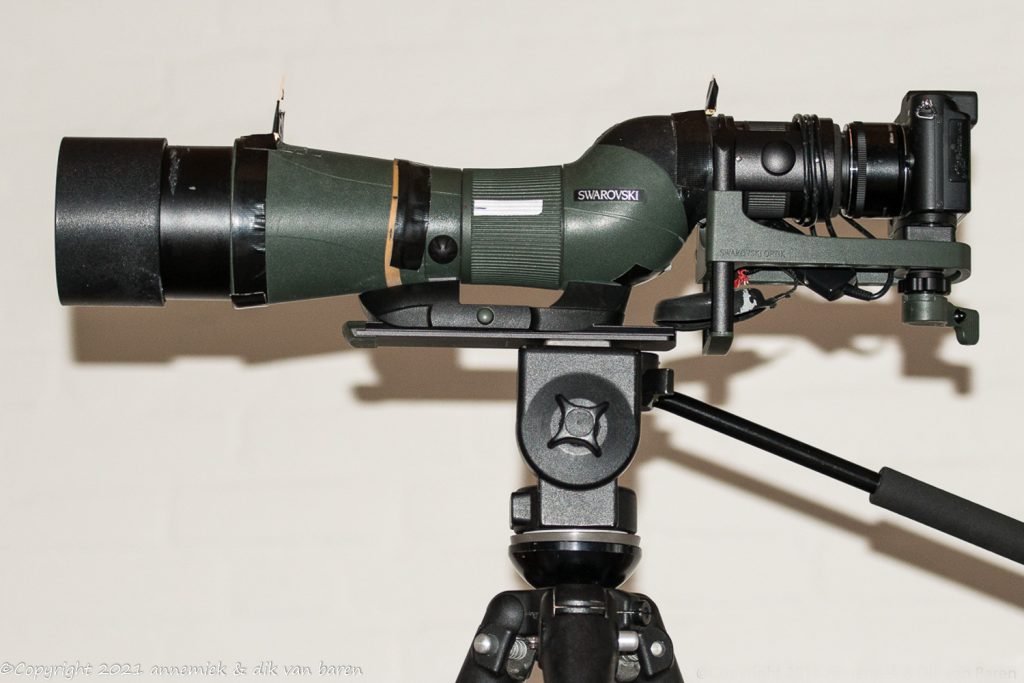
Image Quality of Nikon camera’s suitable for lightweight bird photogaaphy
We defined reach (bereik) as the number of well resolved pixels in the picture per square millimeter. This is to a large extent defined by the dimensions of the sensor. The main property of a sensor in this context is the so called pixel pitch, the distance between the centre of a pixel and the centre of its neighbour. You can find, amongst other information, the size of this pixel pitch of every camera we used sofar in the table below.
| camera | Megapixels | pixels | pixel pitch | camera & sensor | gram | notes |
| D300(S) | 12 | 4800 x 3200 | 5.51 | DSLR APS-C | 840 | |
| D7200 | 24 | 6000 x 4000 | 3.89 | DSLR APS-C | 950 | |
| D500 | 21 | 5568 x 3712 | 4.2 | DSLR APS-C | 860 | |
| D800 | 36 | qqq | 4.87 | DSLR full frame | 2400 | |
| D750 | 46 | qqq | 4.34 | DSLR full frame | 840 | |
| D850 | 46 | qqq | 4.34 | DSLR full frame | 1005 | |
| V3 | 18 | 5232 x 3488 | 2.51 | MLC CX System 1 | 475 *) | |
| J5 | 21 | 5568 x 2546 *) | 2.36 | MLC CX System 1 | 415 *) | specs partially alike sensor D500 |
| Z50 | 21 | 5568 x 3712 *) | 4.2 | APS-C MLC Z Series | 450 *) | specs largely those of sensor D500 |
| Z7 II | 46 | qqq | 5.32 | full frame MLC Z Series | 825 | |
| Z6 II | 24 | qqq | 5.92 | full frame MLC Z Series | qqq | |
| Z5 | qqq | full frame MLC Z Series | qqq | |||
*) weight including FT1- or FTZ-adapter
Below we show a selection of pictures with birds of various size and distance photographed using different combinations. This may give you some idea of the amount of reach you could acquire in similar situationsusing this equipment. At 4a. Examples reach (bereik) we show examples of quantifying reach using our (simplified) formula and quadratic rules.
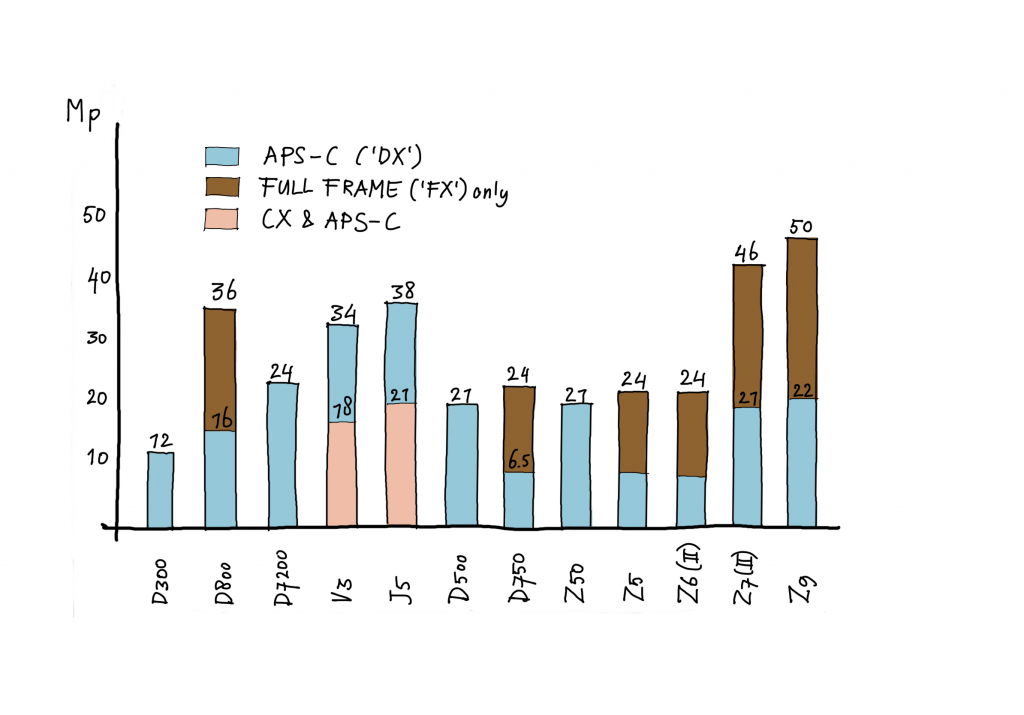
| APS-C camera (D7200, D500, Z50) | total surface camera contributes (24, 21, 21 Mp) |
| Full frame camera (D800, D750, Z7) | (24 x 16)/(24 x 36) = 4/9 of surface contributes (16, qqq qqq) |
| System 1 camera (V3, J5) | (2.7/ 1.5) = 9/5 of surface contributes (34, 38 Mp) |
Contribution to reach of image sensors of different type
Finally some words on a subject that still creates confusion: “Does a full frame camera produce more “resolution” when operating in FF mode (full frame format 36 x 24 mm) than when operating in DX mode (APS-C 24 x 16 mm)? No!
Look at the table above. A full frame camera in DX mode will “cut” a 24 x 16 mm image area out of the full frame sensor area and by the way always at the very centre of this sensor. However you can, using software like Lightroon, “soft crop” an area of 24 x 16 mm (APS-C format) out of the full frame image area at any position you wish, centre, corner, along a side, anywhere. This APS-C size “soft cropped” portion will always have exactly the same resolution being (24 x 16) / (36 x 24) / Megapixels of full frame area, 4/9 of the total amount of pixels of the full frame sensor. So your crop will always have the same resolution (pixels/square millimeter) as any picture created by this camera in DX mode or in FX mode. In other words “full frame” does not mean more reach but it means: in total more pixels (to select an APS-C format area. Try it if you want to be sure. We did so.
However – and this is something essentially different – using a camera in full frame mode, “FX mode”, will give you a larger (factor 2.25) amount of detail and also a larger field of view in your camera viewer, which is often required when photographing fast flying birds since they stay longer “in the picture”. Amongst other features like two card slots and two processors, this may be a reason to go for a full frame Nikon MLC like Z7 (II) or Z6 (II) if you can afford this.
Megapixels output of different types of Nikon sensors normalised to angle of field of an APS-C type camera.
Only when you “normalise” the output af a digital camera to a 24 x 16mm-image area you can systematically compare the contribution in megapixels to reach of full frame and other camera types to the output of an “APS-C type camera” like a D500 or Z50.
You can see this APS-C-normalised contribution to reach of some Nikon camera’s in the diagram below. This diagram is quite informative! It can help you decide which camera to buy if you consider reach to be important.
An example at the same time an interesting rule of thumb estimatin reach
In the field when small birds are relatively far away we often use the following as a reference: we know from experience that photographing a Kingfisher (IJsvogel) 30 meter, sun or cloudy, will produce sufficiently detailed pictures if you use like D500/Z50 Nikkor 500mm f/5.6E PF VR or Sigma Sport 150-600mm or Tamron G2 150-600mm and compatible converters including Nikkor TC-20E III with 1260 – 1500mm equivalent. So, at similar distances we will get, using our inverted square rule distance reach (rounded figures):
at 25 meter 900/725 = 140% (significantly more detail!) at 35 meter 900/1200 = 75% (possibly acceptable if very interesting species or action)
In other words a Rule of fist: plus/minus 15% distance => plus/minus 30% detail!
Examples of pictures of different birds at varying distance
Below we show some pictures of some bird species of different size at various distance using various 35mm equivalent under different conditions of wheather and atmosphere.
These five variables or parameters, the first three of them being size, distance, equivalent, contribe quadratically to actual reach in the field and are printed inside the pictures. If you click on the first picture you can scroll through this gallery and get some idea of what reach in bird photography really is and why the 35mm equivalent is such a meaningful entity.
(click -> open picture, > < next previous picture, x-> exit gallery)

===========================
qqq
============================
Pingback: Sites, publications, termimology – LIGHTWEIGHT BIRD PHOTOGRAPHY
Pingback: 4 Camera’s Light – LIGHTWEIGHT BIRD PHOTOGRAPHY