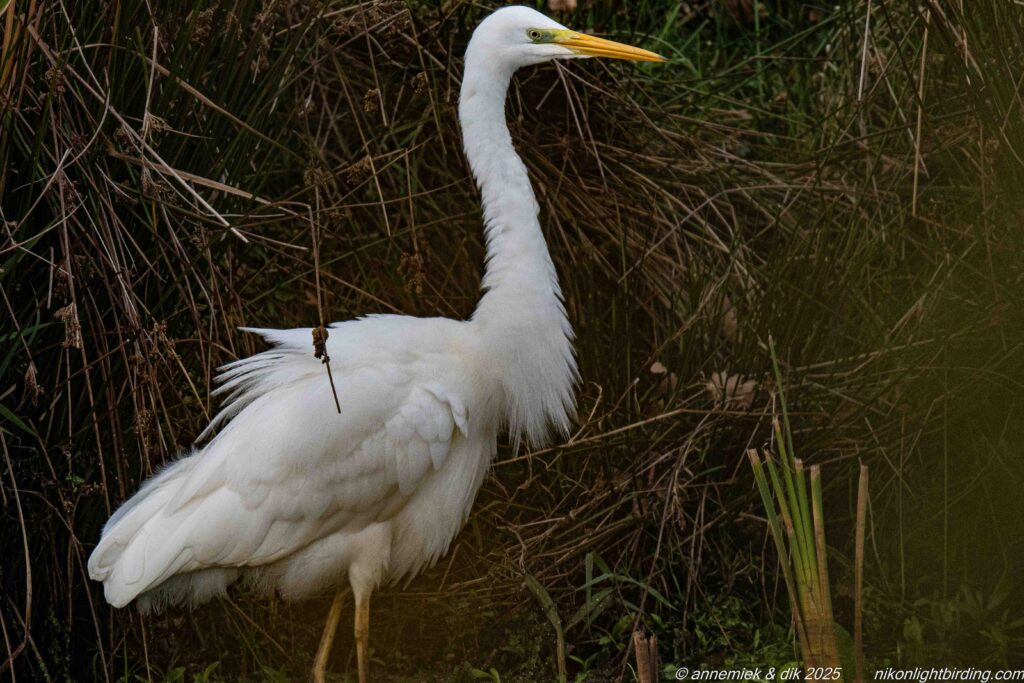
Foto at the top: Holland october 2025 White Stork (Ooievaar), size 101cm, distance 50m, caressing her the way Ooievaars do this …). Picture: backlight and a large “Highlights” and “Whites”.
F11: full screen!
More about APERTURE (diafragma)
APERTURE is an inverted (omgekeerde) measure (maat) in stops (stops) of the diameter of the actual lens opening through which all incoming light is passing onto the image sensor, values annotated like: f/1.4, f/2.8, f/4, f/5.6, f/8, f/11, f/16, f/22, f/32.
In bird photography an APERTURE f/2.8 represents a relatively large lens opening whereas APERTURE value f/16 represents a very small lens opening. More about stops down at this page.

APERTURE value determines overall correct exposure of the pictures but also the so called depth of field (scherptediepte) in the picture. The higher the APERTURE value, like f/2.8 over f/5.6, the more depth of field (scherptediepte) you will get from your lens. This is purely an optical feature of a lens but often key in bird photography if you need good detail from head to tail when photographing large birds or when you deliberately want to isolate the subject bird(s) from the surrounding foreground and or background. In those situations setting APERTURE value is one of the “creative” tools of a photographer.
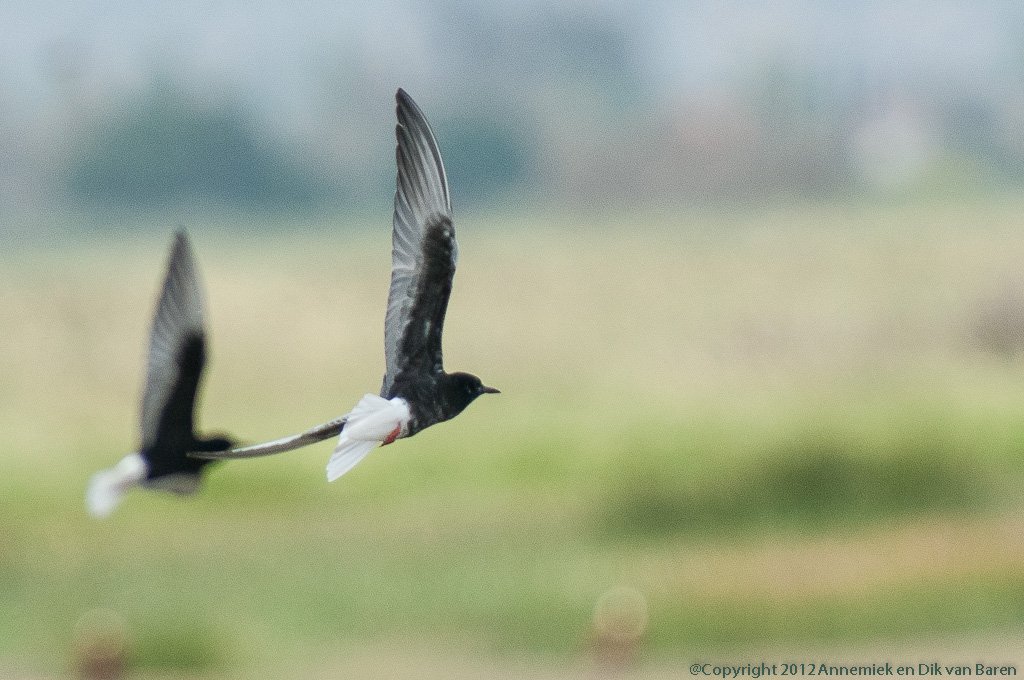
In the next picture only the Black Tern (Zwarte Stern) in the foreground is within depth of field. In this case this was the objective. Using a relatively small APERTURE value resulted in relatively shallow Depth of Field.
Overexposure of pictures
Too high APERTURE values can cause incorrectably so called overexposed pictures with insufficient detail in the Whites and Highlights (Hoge Lichten) (“uitgebleekte Hoge Lichten”) and consequently low contrast of a picture.
“Stops” in photography
In photography the value of each one of “Big Three”, and consequently the amount of light the image sensor is exposed to, is measured and reported back by the camera in so called “stops“, factors 2 or 1/2. Since they are powers of number 2 and not factors (in multiplication), you can add and subtract those values. Some examples may illustrate this:
The overall effect on EXPOSURE TIME of increasing APERTURE by 2 (increasing size of lens opening by factor 4) is equal to the effect of increasing ISO by 2 stops (increasing sensor sensitivity by a factor 4).
The overall effect on EXPOSURE TIME in seconds of decreasing APERTURE by 2 stops, for example by decreasing the size of the lens opening one stop via adding a 1.4 converter and stopping down the lens one stop to protect Highlights detail, at the same time increasing ISO value by 2 stops, is zero. (2 x 1.4 = 2.0 and square root 2 = 1.4)
Whenever you start a photographing session or the situation in the field changes: like distance to the bird(s), weather condition, stationary bird or bird in (fast or slow) action, the direction or type of light, you should reset one or more of “Big Three” so the camera can, base on this actual information, (re)-compute the required actual optimal EXPOSURE TIME according to the particular situation.
APERTURE and autofocus and “Nikons DSLR f/8 support”
Your setting of APERTURE value has two essentially different but quite important effects regarding autofocus:
- A small value of APERTURE (diafragma) may generally cause slower and or less accurate autofocus and tracking because the camera may not receive sufficient light. Repeatedly pressing or briefly touching manual focus ring often helps the camera to resume autofocus. So make sure, when working handheld, supporting the lens so that you can touch manual focus ring when photographing in difficult situations (and use the correct setting AF/M or M/AF or M as explained at Lenses.
- In general: using Nikon DSLR’s with APERTURE values below f/8, some advanced autofocus functions are not supported. This is sometimes referred to as “Nikons “F/8 support“: Nikon DSLR’s, at APERTURE openings smaller than f/8, will not support the advanced AF functions 3 D, Group and Automatic choice AF area as explained at Focussing & tracking.
Be aware of these restrictions when photographing bird action. For example adding a converter may transform your Nikon, Nikon version of Sigma or Tamron D500 into a poor f/9-, f/11-, f/13-combination that may not any more pass sufficient light into the camera to accurately autofocus and or support advanced AF functionality below lens opening f/8 (or may not produce pictures with miss the bokeh you wanted). Using for example Nikkor 300mm f/4E the amount of light that passes through APERTURE f/11 is but 1/8 part (3 stops down being a factor 8!) of the incoming light, less than 12.5% compared to the full APERTURE f/4E. Stopping down this lens may also be disastrous with respect to autofocus functionality and reliability and or loss of bokeh.
Examples of not supported advanced autofocus functions:
- D500 Tamron 150-600mm f/5.0 – 6.3 + 1.4 converter: APERTURE f/9
- D500 Sigma 150-600 f/5.0 – 6.3 + 1.4 converter: APERTURE f/9.
- D500 Nikon 300mm f/4E + TC-20E III, 1 stop stopped down: APERTURE f/11.
However when adding a 2.0 converter to D500 Nikkor 300mm f/4E PF VR it will change APERTURE value to f/8 and the autofocus sensor will only receive 25% of the incoming light, when compared to f/4.0, but will still support all advanced AF functions D500. At Nikon mirroless camera’s (MLC’s) of System 1 and Z Series the situation of advanced AF fuctionality is essensially different.
So you should definitely avoid stopping down lenses (lenzen “afstoppen”) particularly in situations with low availabe light. We ourselves do not any more stop down Nikkor lenses using Nikon cameras with modern image sensors.
Do practice all this, particularly setting and using advanced AF functions and setting APERTURE values and switches of lenses. It takes some time but is definitely worthwhile if not necessary when you want to get fine pictures.
Having said all this, we nevertheless experienced that autofocus (not the advanced AF functionality 3D etcetera!) often still works quite well if one has good available light! For example using a D500 with Tamron 600mm G2 TC X14 or Sigma Sport 600mm TC 1401, by the way both being full blown top quality optical combinations, the DSLR D500 will almost always focus reliably, except of course in classical difficult situations like low contrast, vague, pale, non-structured objects, etcetera.
Diffraction
Stopping down (afstoppen) a lens to extremely low APERTURE values like f/16, f/22 may cause diffraction (diffractie), a complex quamtum physical optical phenomenon that seriously deteriorates image quality and occurs when light is passing through extremely small openings. The amount of diffraction depends on the construction and type of the lens.
Stopping down (“afstoppen” of “diafragmeren”), usually 0.5 – 1.5 stops, sometimes even up to -2.5 EV, affects the operation of the lens used. By using only the central part of the optical glass, which is less “curved” than the side parts, the lens suffers less from optical aberration so photographs will be slightly more detailed. The effect of this phenomenon varies per lens type. You better know this optimal amount of stopping down by heart (if you still care for stopping down at all):
Workshop Lightweight bird photography:
- WS1 Reach (bereik)
- WS2 Estimating reach
- WS3 “Big Three”: APERTURE, ISO, EXPOSURE time
- WS4 APERTURE
- WS5 ISO
- WS6 EXPOSURE TIME
…
Pingback: WS1 Reach (bereik) – nikonlightbirding
Pingback: WS 2 Estimating reach – nikonlightbirding
Pingback: WS 6 EXPOSURE TIME – nikonlightbirding
Pingback: HOME 2 – nikonlightbirding
Pingback: txt home page – nikonlightbirding
Pingback: WS 3 APERTURE, ISO, EXPOSURE TIME – nikonlightbirding