Foto top: Holland sun Cormorant (Aalscholver) size 90cm distance 30m Z7 II Nikkor 500mm f/5.6E PF VR eq. 1500mm subst. cam. 1/2000 f/11 ISO 2800 -1.50EV.
Extra info: Use i-menu Z7 II for programmable overview key settings.
Key settings Z7 II APERTURE mode “Birds“
- ================================= Telelens & converter ============================
- If sufficient available light underexpose picture 0.5-2.0 EV to protect details in Highlights
- ==================================== Camera handling: ============================
- Language: English (matches camera buttons, keyboard shortcuts Lightrooom, online info)
- Camera PASM switch: A (APERTURE driven).
- APERTURE lens: always maximal: NEVER STOP DOWN lens: Maximal light for AF & tracking!
- Size Image area: DX (crop factor 1.5).
- b2: EASY EXPOSURE Compensation (comfortably reset EXPOSURE TIME via back dial)
- Assign AF-ON to AF-L/AE-L button (enabling Back Button Focus)
- ISO Sensitivity automatic: Shutterspeed: Maximum Highspeed: 1/1000 sec (anticipate fast action)
- ISO Sensitivity automatic: Minimum ISO sensitivity e.g.: if cloudy 6400, if sun 3200.
- Standby timer c3: 30 seconds: (switch off camera automatically until next time/day)
- EV Increments: 1/2 stop (easy count & reset)
- =========================================== Light: ===============================
- Autom. light meas’t: Centre weighted. Bird central in viewfinder; Lightroom: recompose pic.
- Centre weighted area light measurement: 8 mm (“average size” bird in viewfinder)
- Underexpose systematically: -0.5 – 2.0 EV: protect detail highlights & shorten EXPOSURE TIME!
- Quality: 14 bits RAW lossless compressed: top quality image files
- Color space: Adobe Colour Space: compatible with Lightroom, ViewNX, etcetera.
- WB auto AUTO2: preserve warm colors (if required adjust in Lightroom)
- ======================================= Focus & track =============================
- Autofocus mode: AF-C, Wide area
- =================================== Shoot a (series of) picture(s): =====================
- = In actual photography: Press AF-ON button: start focus & track bird (Back Button Autofocus)
- = OR do nothing (while camera holds AF position …)
- = OR Full press Release: light measurement, EXPOSURE Time computed, picture(s).
- = Check result (if you have the time) …
WARNING: When using these settings DO NOT use standard EXPOSURE Compensataion +/- button any more! If you keep trying to change EXPOSURE time via this button you may later find that your camera has dramatically underexposed your pictures! Once you use “APERTURE Mode Birds“, which includes ISO sensitivity automatic, the ISO button itself has been set “unoperational” by the camera so you can safely use EASY Exposure compensation +/-. @dik CHK!
About APERTURE values
Anyway and if possible use APERTURE values under f/8 (like f/2.8, f/4, f/5.6) preserving all available light for reliable fast autofocus. Do NOT stopdown your precious tele lenses! The camera needs all the light it can get to deliver reliabe autofocus and tracking of fast moving birds and unexpected action!
In this context we report that we ourselves successfully use values up to f/11 using Nikkor 300mm PF VR or 500mm PF VR ltop lenses and even use f/13 at Sigma Sport or Tamron G2 150-600mm lenses, definitely with acceptable detailed and in-focus pictures though only if it makes sense in the actual situation and only in case of sufficient available light. The autofocus may operate somewhat slower, sometimes even is difficult, but most of the time it works out well with noticeably good detail. Modern telelenses seem to accept stopping down far better than the older working horses like Nikkor 600mm f/4.
About RAW workflow and image quality
In case of RAW workflow the RAW images will not be optimized by the camera but, untouched, written at the memory card. You have to crop, edit and convert them in so called post production using for example Lightroom into high quality JPG pictures with minimal noise, optimal light and contrast, natural colours and maximal detail. This implies larger files and more work however it results in far better pictures.
So preferably set camera Quality to: RAW 14 bits lossless compressed.
About Colour Space
Lightroom, Capture NX,View NX and for example Faststone Viewer all use Adobe Colour space. Colour space roughly spoken determines the amount of color granularity in the picture, the “number of different colours”.
About the built-in 1.4 converter of the Z7 and Z7 II
The menu setting Size Image area of any full frame Nikon MLC can of course be used as a “soft 1.4 converter”. Switching the camera into DX mode has the same effect as adding a 1.4 converter. Switching it into FX mode results in a larger field of view. We use this feature quite often, like in this example:
@DIK PICTURE YET
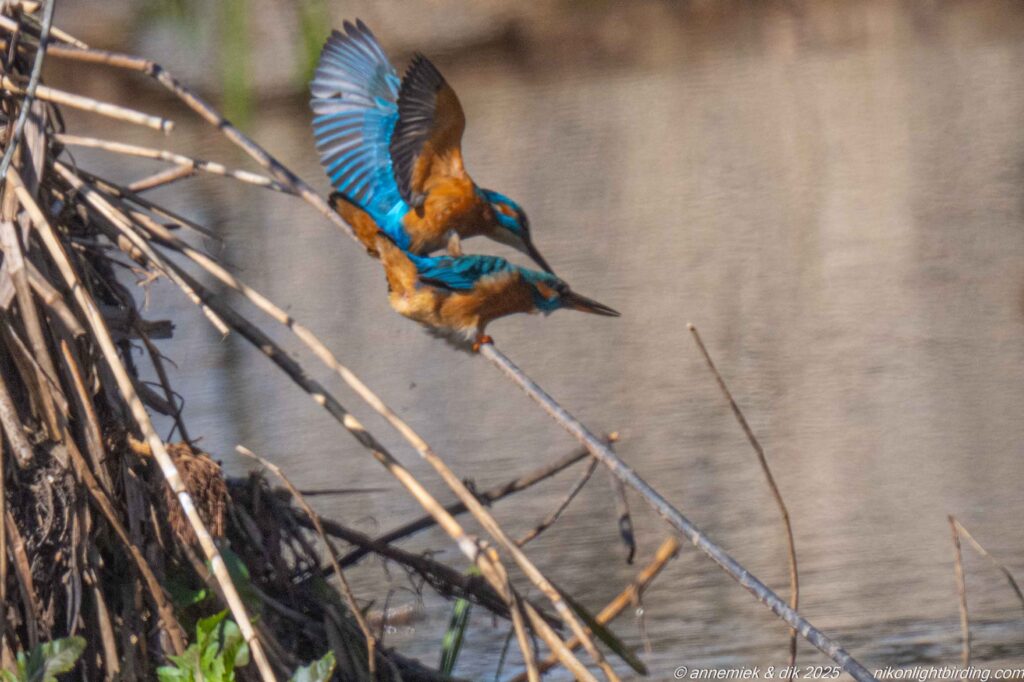
Holland April 2025 overcast Kingfisher (IJsvogel) size 16cm distance 30m measured, equivalent 1500mm substantial camouflage. Mating near nest.
…
Pingback: 3 Lenses Light – LIGHTWEIGHT BIRD PHOTOGRAPHY